Progressive delivery is arguably the most reliable and advanced set of deployment practices based on a simple idea. Instead of shutting down the old release and deploying a new one in its place, progressive delivery takes an iterative approach. It gradually increases the reach of a new release. That gives us quite a few benefits like zero-downtime deployments, reduced blast radius, increased security, and so on and so forth.
I will not go into depth about what progressive delivery is. Instead, I will assume that you are already familiar with it. If that’s not the case, please watch Progressive Delivery Explained – Big Bang (Recreate), Blue-Green, Rolling Updates, Canaries.
Discussing The Pre-Requirements
Today, we are going to go further than merely applying progressive delivery alone. Instead, we will combine it with GitOps and wrap it all up in a continuous delivery pipeline. Just as with progressive delivery, I will assume that you do understand what those are. If you don’t, please watch What Is GitOps And Why Do We Want It? and Continuous Delivery (CD) Is Not What Some Are Trying To Sell You.
Now, before we embark on a quest to combine those three practices, we’ll need to pick the tools we will use.
We’ll choose Argo Rollouts for progressive delivery, Argo CD for GitOps style of deployments, and Codefresh for continuous delivery pipelines. Follow the links if you’re not familiar with any of them.
Finally, we’ll need to pick a progressive delivery strategy we will use. Today that will be canary deployments, even though the examples should apply to any other flavor with only a few minor tweaks.
That’s it. Off we go.
The first thing we’ll need is a Kubernetes cluster. Create it any way you like. It can be a “real” cluster in Cloud providers like AWS EKS, Google Cloud GKE, or Azure AKS. It can also be on-prem, or it can be a local cluster like Minikube or Docker Desktop. It does not matter how you create a cluster, as long as you have one that can be used for the exercises that follow.
Further on, we’ll use Istio service mesh. It could have been ALB, NGINX Ingress, or any implementation of Service Mesh Interface (SMI) like, for example, LinkerD. I chose Istio mostly because I had to pick something, and Istio is the one I use a lot lately.
So, go ahead and install Argo CD and Istio if you do not have them already running in your cluster. Once you do, make sure to get the IP through which istio-ingressgateway is accessible and store it in environment variable ISTIO_HOST. We’ll need it later when we generate the address through which we should be able to reach the application we are about to deploy.
If you are a Windows user, I will assume that you are running the commands from a Bourne Again Shell (Bash) or a Z Shell (Zsh) and not PowerShell. That should not be a problem if you followed the instructions on setting up Windows Subsystem for Linux (WSL) explained in the Installing Windows Subsystem For Linux (WSL) YouTube video. If you do not like WSL, a Bash emulator like GitBash should do. If none of those is an acceptable option, you might need to modify some of the commands in the examples that follow.
All the commands are available in the progressive.sh Gist. Feel free to use it if you’re too lazy to type. There’s no shame in copy & paste.
That’s it. Those are all the pre-requirements. Now we are ready to set up the production cluster or, to be more precise, a simulation of production. That will be the first use-case for GitOps through Argo CD.
Setting Up Production
Since we are applying GitOps principles, everything is defined as code, and code is stored in Git. Among other things, that means that the desired state of our production environment should be in a Git repo as well.
To make things simple, I already created a repo with all the definitions, so all we have to do is fork it and clone the fork.
If you are a Linux or a WSL user, I will assume that you created the
aliasopenand set it to thexdg-opencommand. If you do not have theopencommand (or the alias), you should replaceopenwithechoand copy and paste the output into your favorite browser.
open https://github.com/vfarcic/argocd-production
Please fork the repository.
If you do not know how to fork a GitHub repo, the only thing I can say is “shame on you”. Google how to do it. I will not spend time explaining that.
Next, we’ll clone the newly forked repository.
Please replace [...] with your GitHub organization in the command that follows. If you forked the repo into your personal account, then the organization is your GitHub username.
# Replace `[...]` with your GitHub organization
export GH_ORG=[...]

git clone
https://github.com/$GH_ORG/argocd-production.git

cd argocd-production
If, by any chance, you already had that repository from one of my previous exercises, you might want to merge it with upstream just in case I made some improvements in the meantime.
Please execute the commands that follow only if you already forked the repo before.
git remote add upstream
https://github.com/vfarcic/argocd-production.git

git fetch upstream

git merge upstream/master
Next, we’ll create an Argo CD project that will act as a placeholder for all the applications we’ll deploy to the production environment.
*I will no go into details of how Argo CD works since that would take too much time and is not the main subject of this article. So, I’ll assume that you are already familiar with it. If that’s not the case, please read Creating Temporary Preview Environments Based On Pull Requests With Argo CD And Codefresh as an example of an implementation of Argo CD processes.
kubectl apply --filename project.yaml
Feel free to explore project.yaml file to see all the details of what we defined. For now, the only important note is that the production project we just created will be a placeholder for all the applications we’ll deploy and manage in production.
Next, we’ll need a few tools in production. Specifically, we’ll need Prometheus to retrieve and store metrics that we’ll use to evaluate whether to roll forward or roll back releases of our applications. The definition is stored in the orig directory. However, as you will see soon, we’ll configure Argo CD to manage only the manifests in the helm/templates directory of that same repo, so let’s copy it there.
cp orig/prometheus.yaml
helm/templates/.
Let’s take a quick look at the definition.
cat helm/templates/prometheus.yaml
The output is as follows.
apiVersion: argoproj.io/v1alpha1
kind: Application
metadata:
name: prometheus
namespace: argocd
finalizers:
- resources-finalizer.argocd.argoproj.io
spec:
project: production
source:
path: charts/prometheus
repoURL: https://github.com/prometheus-community/helm-charts
targetRevision: HEAD
destination:
namespace: monitoring
server: https://kubernetes.default.svc
syncPolicy:
automated:
selfHeal: true
prune: true
syncOptions:
- CreateNamespace=true
There is nothing special about that Application. It uses the “official” chart stored in the prometheus-community/helm-charts repo, it will be running inside the monitoring Namespace, and synchronization will be fully automated.
Similarly, we’ll need Argo Rollouts as well. Like with Prometheus, we’ll just copy the definition into the helm/templates directory, assuming that Argo CD will make sure that it is up-and-running.
cp orig/argo-rollouts.yaml
helm/templates/.
Let’s take a quick look at the definition.
cat helm/templates/argo-rollouts.yaml
The output is as follows.
apiVersion: argoproj.io/v1alpha1
kind: Application
metadata:
name: argo-rollouts
namespace: argocd
finalizers:
- resources-finalizer.argocd.argoproj.io
spec:
project: production
source:
path: charts/argo-rollouts
repoURL: https://github.com/argoproj/argo-helm
targetRevision: HEAD
destination:
namespace: argo-rollouts
server: https://kubernetes.default.svc
syncPolicy:
automated:
selfHeal: true
prune: true
syncOptions:
- CreateNamespace=true
As you can see, the definition follows the same pattern as the one we used for Prometheus. It will use the chart from the [argoproj/argo-helm]8https://github.com/argoproj/argo-helm) repo and it will deploy it inside the argo-rollouts Namespace.
Finally, there is one more application we’ll need to deploy. We’ll need a demo app to demonstrate the whole continuous delivery process combined with GitOps and progressive delivery. We’ll use one of my applications for that, and the definition is stored in orig/devops-toolkit-rollouts.yaml. But, before we copy it to helm/templates, we’ll need to change the host to something that will work inside your cluster.
We’ll use xip.io since I could not assume that you have a “real” domain that you can use for the exercises or, if you do, that you configured its DNS to point to the cluster.
We’ll use sed to replace the hard-coded devopstoolkitseries.com host with the one based on xip.io and store the output into the helm/templates directory.
The command that follows assumes that you have the IP through which the Istio Gateway Service can be accessed. That is typically the istio-ingressgateway Service.
cat orig/devops-toolkit-rollouts.yaml
| sed -e
"[email protected]@devops-toolkit.$ISTIO_HOST.xip.io@g"
| tee helm/templates/devops-toolkit.yaml
The output is as follows.
apiVersion: argoproj.io/v1alpha1
kind: Application
metadata:
name: devops-toolkit
namespace: argocd
finalizers:
- resources-finalizer.argocd.argoproj.io
spec:
project: production
source:
path: helm
repoURL: https://github.com/vfarcic/devops-toolkit.git
targetRevision: HEAD
helm:
values: |
image:
tag: latest
ingress:
enabled: false
host: devops-toolkit.3.217.41.40.xip.io
istio:
enabled: true
hpa: true
rollout:
enabled: true
version: v3
destination:
namespace: production
server: https://kubernetes.default.svc
syncPolicy:
automated:
selfHeal: true
prune: true
ignoreDifferences:
- group: networking.istio.io/v1alpha3
kind: VirtualService
jsonPointers:
- /spec/http/*/route/*/weight
That will be our initial definition of the demo application. It assumes that the base manifests are in the vfarcic/devops-toolkit repo. It also overwrites a few of the default values. It will use the latest tag (a horrible practice that we’ll correct soon), it disables NGINX Ingress, and it enables istio, hpa, and rollout. We’ll see the meaning of some of those variable overwrites later. For now, what matters is that we have a definition of the demo application stored in helm/templates together with the rest of the apps running in the production environment.
 !
!
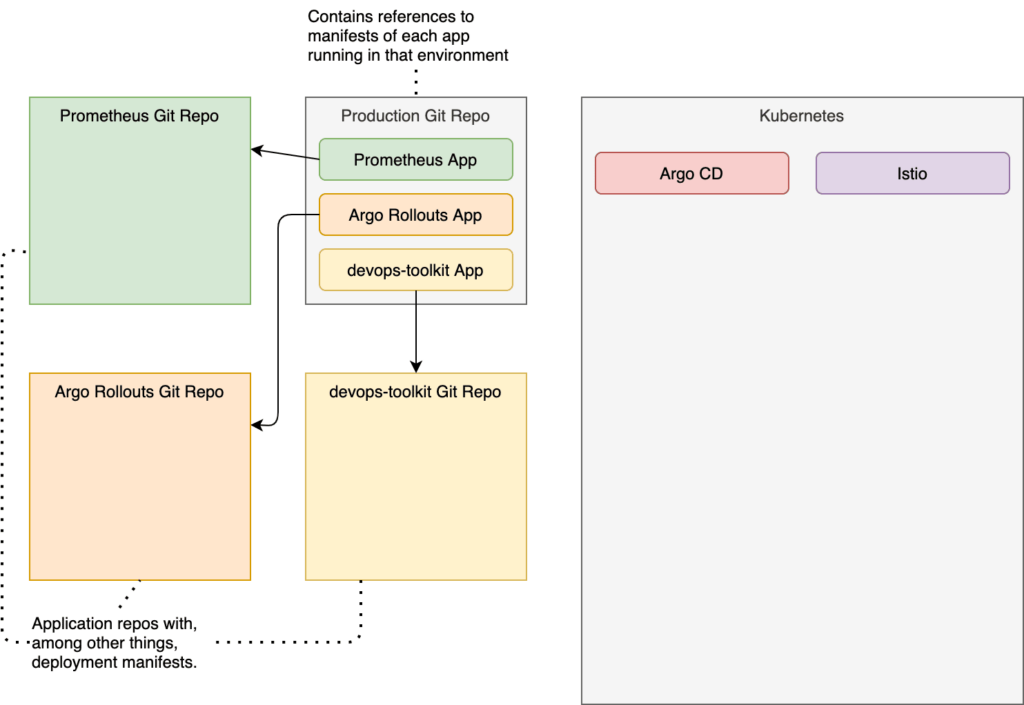
There is only one more thing missing. We need to create an app of apps. All those applications we defined so far are references to different sources where base definitions are stored. All three of them (Prometheus, Argo Rollouts, and devops-toolkit) are referencing the repositories of those applications. We are now missing an app that will tell Argo CD to look for production manifests in the repository we forked initially.
I already prepared the file. However, it has my GitHub organization hard-coded, so we’ll have to change it to yours. Just as before, we’ll use “sed magic” for that.
cat orig/apps.yaml
| sed -e "s@vfarcic@$GH_ORG@g"
| tee apps.yaml
The output is as follows.
apiVersion: argoproj.io/v1alpha1
kind: Application
metadata:
name: production
namespace: argocd
finalizers:
- resources-finalizer.argocd.argoproj.io
spec:
project: production
source:
repoURL: https://github.com/devopsparadox/argocd-production.git
targetRevision: HEAD
path: helm
destination:
server: https://kubernetes.default.svc
namespace: production
syncPolicy:
automated:
selfHeal: true
prune: true
syncOptions:
- CreateNamespace=true
That definition is still following the same pattern. The Application is almost the same as the one we used for the other apps. The major difference is that, this time, the repoURL is set to the helm path of the argocd-production repo, which holds all the Applications that should run in production. It is an application that defines all the applications for a specific environment.
Let’s push the changes to GitHub before we create the app of the apps. Even though we will create it manually, the definitions should, as a minimum, be stored in Git.
git add .

git commit -m "Initial commit"

git push
Now we can apply the definitions of the app of the apps.
kubectl apply --filename apps.yaml
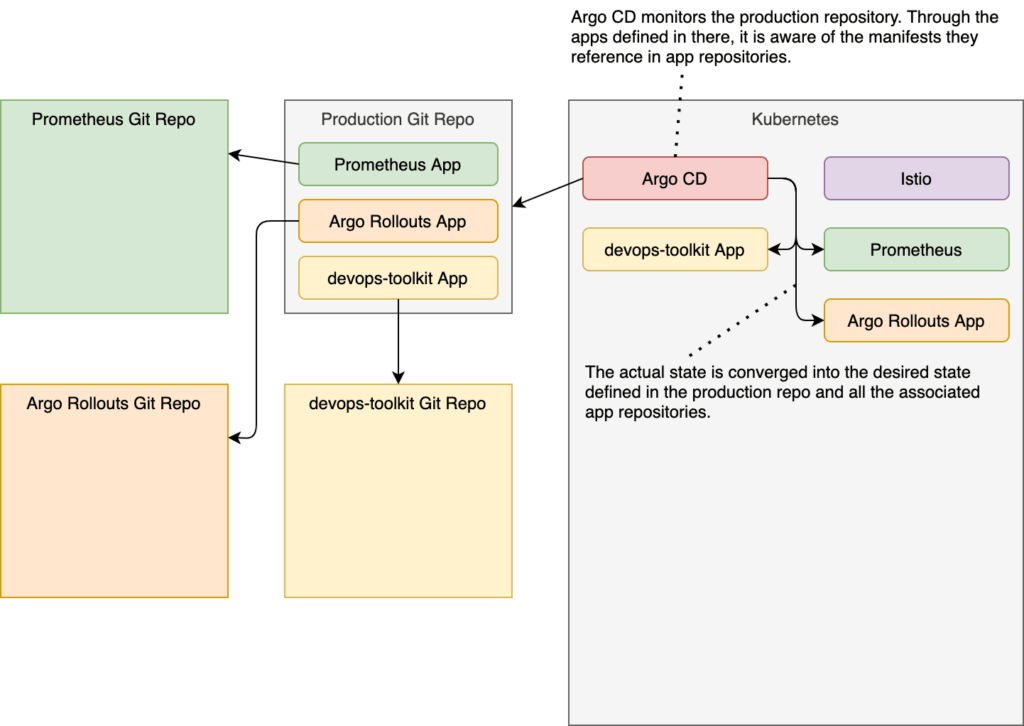
That’s it. We have the whole production environment defined in Git repositories, with those three apps combined representing the desired state. Argo CD, on the other hand, made sure that the actual state (the cluster) is converged into the desired state. We can confirm that through the Argo CD UI.
Let’s “discover” the Argo CD UI address.
Please note that, depending on how you installed Argo CD, the command might differ in your case.
ARGOCD_ADDR=$(kubectl
--namespace argocd
get ingress argocd-server
--output jsonpath="{.spec.rules[0].host}")
The output, in my case, is as follows.
argocd.52.73.202.6.xip.io
If the output is empty or there was an error, you probably did not enable Ingress for Argo CD, or you forgot to specify the address. If that’s the case, you might need to update your Argo CD installation.
Now that we know the address of Argo CD, we can open it in the default browser.
Please note that the command that follows uses HTTP. If you set up TLS for your Argo CD UI, you might need to change http to https in the command that follows.
open http://$ARGOCD_ADDR
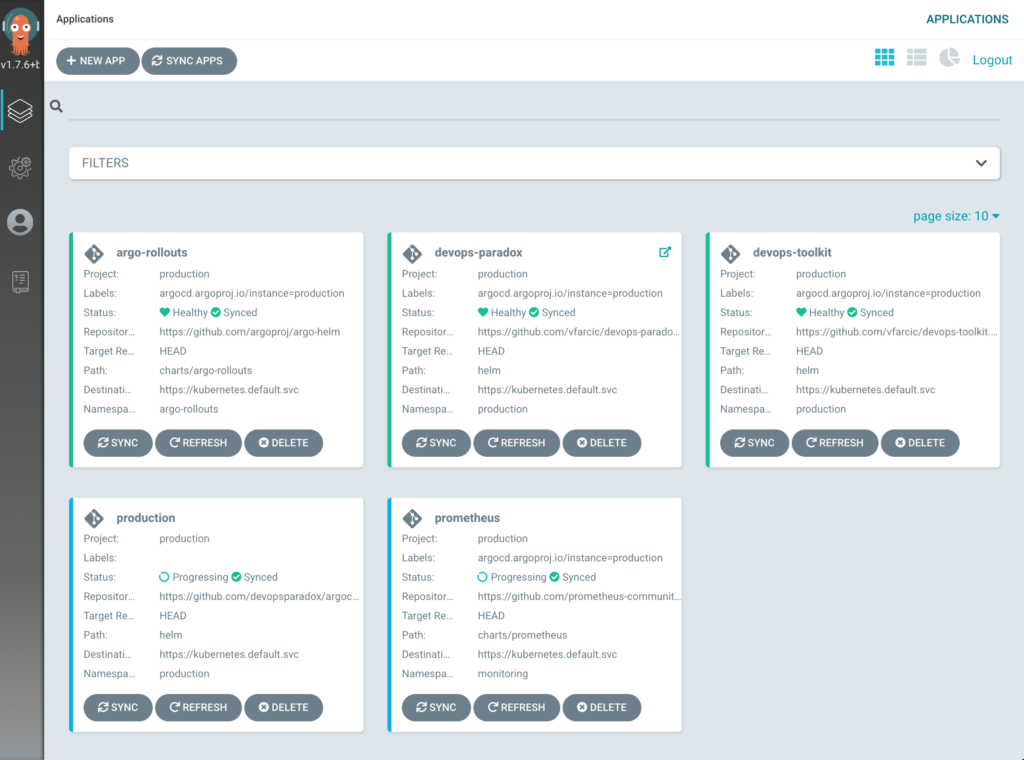
We should see five applications in Argo CD UIs home screen. There should be production, which is app of the apps. It “discovered” the rest of the apps defined in the production repo, and it deployed the other four. We have prometheus, argo-rollouts, devops-toolkit, and devops-paradox. If you’re confused about the latter (devops-paradox), it was already defined in the production repo we forked earlier. Still, even though it’s there, we will not use it today, so you can ignore it.
 !
!
We’re done with the production repo (for now), so we can just as well get out of the local copy.
cd ..
Now that production is set up, we can turn our attention to the devops-toolkit app. That’s the one we’ll use as a guinea pig for progressive delivery.
Defining The Application
The devops-toolkit demo app is available in the vfarcic/devops-toolkit. However, given that we will start making changes to the app, you will have to fork it. Otherwise, I would need to give you write access to my repo, and that’s not something I’m willing to do. I do not trust you enough.
open https://github.com/vfarcic/devops-toolkit.git
I’m sure you know how to fork a GitHub repo. So just do it. Fork it!
Let’s clone the forked repo.
git clone https://github.com/$GH_ORG/devops-toolkit.git

cd devops-toolkit
Just as before, if, by any chance, you already had that repository from one of my previous exercises, you might want to merge it with upstream just in case I made some improvements in the meantime.
Please execute the commands that follow only if you already forked the repo before.
git remote add upstream
https://github.com/vfarcic/devops-toolkit.git

git fetch upstream

git merge upstream/master
There are a couple of ways we can approach updates of the releases in the production repo. For example, we could modify the file in the production repo every time we want to have a new release of that application. We are not going to do that. That would mean that the pipeline needs to know about all the app definitions in the production repo. More importantly, it would mean that the structural changes to the definition would need to be done there. I prefer that everything related to a single application is in the repo of that app. That way, people in charge of the application can have (almost) full control over it from a single repo.
Long story short, we’ll create a template (of sorts) in the devops-toolkit repo. Later on, we’ll be able to instruct the pipeline to “transform” some key values of that file and copy it into the production repo whenever we need a new release.
By now, you probably know that I do not want to make you work too much, so I have already prepared the file we’ll use. We just need to copy it and, while doing that, replace the hard-coded Istio Gateway address with the one that will work your setup.
cat orig/production-rollouts.yaml
| sed -e
"[email protected]@devops-toolkit.$ISTIO_HOST.xip.io@g"
| tee production.yaml
The output is as follows.
apiVersion: argoproj.io/v1alpha1
kind: Application
metadata:
name: devops-toolkit
namespace: argocd
finalizers:
- resources-finalizer.argocd.argoproj.io
spec:
project: production
source:
path: helm
repoURL: https://github.com/vfarcic/devops-toolkit.git
targetRevision: HEAD
helm:
values: |
image:
repository: vfarcic/devops-toolkit
tag: {{.IMAGE_TAG}}
ingress:
enabled: false
host: devops-toolkit..xip.io
istio:
enabled: true
hpa: true
rollout:
enabled: true
version: v3
destination:
namespace: production
server: https://kubernetes.default.svc
syncPolicy:
automated:
selfHeal: true
prune: true
ignoreDifferences:
- group: networking.istio.io
kind: VirtualService
jsonPointers:
- /spec/http
It’s yet another Argo CD application with the reference to the repoURL and the path where the definitions are, a few production-specific values we are overwriting, and the ignoreDifferences section. Assuming that you already have a basic understanding of how Argo CD works, you should not have any issue understanding that definition except, maybe, the last part (ignoreDifferences). So let’s talk about it.
Argo CD will ensure that whatever is defined in Git repos it monitors is applied to the cluster. It will do its best to always keep the actual state the same as the desired state of our applications and all the resources they need. However, that is in stark contrast with the dynamic nature of Kubernetes clusters and the processes running inside it.
Argo Rollouts will roll out new releases gradually. It will let a fraction of our users see it, and it will run the analysis to decide whether the reach of the new release should be increased to more users or it should rollback. To do that, it will need to modify the behavior of the application at runtime. In other words, Argo Rollouts will be changing the actual state. To be more specific, Argo Rollouts will be modifying the weight of Istio Virtual Services.
Argo CD, on the other hand, does not like when someone modifies the actual state. As a matter of fact, it despises it, and it will do its best to undo any divergence from the desired state. So, if Argo Rollouts modifies Virtual Services (the actual state), Argo CD will soon afterward try to undo those changes by synchronizing the actual (cluster) into the desired state (Git).
As you can see, Argo CD and Argo Rollouts might be at odds. One is trying to make the cluster resources always the same as the definitions in Git, while the other is trying to modify the resources in the cluster as part of progressive delivery processes.
We are fixing those issues through the ignoreDifferences section of the Application definition. Argo CD will ignore the section of the VirtualService manifests defined inside specified jsonPointers. Given that weight we discussed is inside spec.http, it will be ignored, except during the initial deployment.
Now that we have the production environment up-and-running and that we explored the production.yaml file that will be used to define new releases of devops-toolkit, we can turn our attention to the pipeline that will glue it all together into a continuous delivery process.
Creating The Pipeline
Before we create a Codefresh pipeline that will do all the work for us, I should probably comment on a few assumptions I made.
I am assuming that you already have codefresh CLI installed. Also, I am guessing that you created a GitHub context so that Codefresh knows how to use your repositories. If my assumptions are wrong, please go through the Samurais Do NOT Use UIs: Using CLI To Configure Codefresh And Create And Manage Kubernetes Pipelines article. It provides all the instructions you’ll need, and much more.
With that out of the way, let’s double-check whether the CLI works and whether you have a github context.
codefresh get contexts
In my case, the output is as follows.
NAME TYPE
CF_HELM_DEFAULT helm-repository
github-2 git.github
To simplify the commands that follow, we’ll put the NAME of the git.github context into an environment variable.
Please replace [...] in the commands that follow with the context you’re planning to use.
# Replace `[...]` with the `git.github` context. Create it if there isn't one
export CF_GIT_CONTEXT=[...]
By now, you probably have the expectation that I prepared everything so that you can be as lazy as you can be. Given that I would feel bad not meeting your expectations, I created a definition of the pipeline we will use. We just need to replace a few hard-coded values.
cat codefresh/codefresh-master.yml
| sed -e "s@repo: vfarcic@repo: $GH_ORG@g"
| sed -e "s@context: github@context: $CF_GIT_CONTEXT@g"
| sed -e "s@git: github@git: $CF_GIT_CONTEXT@g"
| tee codefresh-master.yml
The output is as follows.
version: "1.0"
kind: pipeline
metadata:
name: devops-toolkit-master
description: Triggered when pushing changes to the master branch
spec:
triggers:
- type: git
provider: github
context: github-2
name: master
repo: devopsparadox/devops-toolkit
events:
- push.heads
pullRequestAllowForkEvents: true
branchRegex: /^((master)$).*/gi
verified: true
contexts: []
stages:
- release
- deploy
steps:
main_clone:
title: Cloning repository
type: git-clone
arguments:
repo: "${{CF_REPO_OWNER}}/${{CF_REPO_NAME}}"
git: github-2
revision: "${{CF_BRANCH}}"
stage: release
build_app:
title: Building Hugo
image: klakegg/hugo:0.75.1-ext-alpine
commands:
- ./build.sh
- cf_export REPO_PATH=$PWD
stage: release
build_image:
title: Building container image
type: build
arguments:
image_name: vfarcic/devops-toolkit
tags:
- ${{CF_SHORT_REVISION}}
registry: docker-hub
stage: release
clone_env_repo:
title: Cloning production env. repo
type: git-clone
arguments:
repo: devopsparadox/argocd-production
git: github-2
stage: deploy
define_production:
image: vfarcic/argocd-pipeline:1.0.ee76b7a
title: Defining production environment app
working_directory: "${{clone_env_repo}}"
commands:
- export IMAGE_TAG="$CF_SHORT_REVISION"
- git checkout -b $CF_REPO_NAME-$CF_SHORT_REVISION
- cat $REPO_PATH/production.yaml | kyml tmpl -e IMAGE_TAG | tee helm/templates/$CF_REPO_NAME.yaml
- git add .
stage: deploy
push_env_repo:
title: Push production env. changes
type: git-commit
arguments:
repo: devopsparadox/argocd-production
git: github-2
commit_message: "Adding commit ${{CF_SHORT_REVISION}} from ${{CF_REPO_NAME}}"
git_user_name: "${{CF_COMMIT_AUTHOR}}"
working_directory: /codefresh/volume/argocd-production
stage: deploy
github_pr:
title: Creating a pull request
type: github-pr
working_directory: "${{clone_env_repo}}"
arguments:
GITHUB_TOKEN: "${{GITHUB_TOKEN}}"
GITHUB_REPO_OWNER: "${{CF_REPO_OWNER}}"
GITHUB_REPO_NAME: argocd-production
HEAD: "${{CF_REPO_NAME}}-${{CF_SHORT_REVISION}}"
TITLE: "${{CF_SHORT_REVISION}} from ${{CF_REPO_NAME}}"
BASE: master
stage: deploy
I’ll assume that you already have at least a basic understanding of Codefresh pipeline syntax, so I’ll provide only a quick overview of what it does.
The triggers section will ensure that pipeline builds are triggered whenever we push a change to the master branch of the devops-toolkit repo.
Inside the release stage of the steps section, we are cloning the app repo (main_clone), and we are building the binary (build_app) and the container image (build_image). Those are standard steps that you are probably already doing one way or another.
The deploy stage is more interesting.
In the deploy stage, we are cloning yet another repo (clone_env_repo). This time, we are retrieving the production repository. Further on (define_production), we are checking out a new branch of the production repo and modifying the production.yaml file from the app repo using kyml. It replaces the placeholder in the definition with the new image tag (the one we built in one of the previous steps). Finally, we are pushing the changes (push_env_repo) and creating a new pull request (github_pr).
That’s it. The pipeline might look big at first, but it is a straightforward one.
The most important observation is that we are NOT interacting with the cluster in any form or way. For all we know, neither Codefresh nor anyone or anything else has access to the cluster. Instead, we interact only with Git repositories hoping that Argo CD running inside our cluster will pull the changes and do the right thing.

Let’s act as responsible adults and push those changes to Git before creating the pipeline.
git add .

git commit -m "Progressive"

git push
Creating a pipeline is easy, so let’s just do it.
codefresh create pipeline
-f codefresh-master.yml
Next, let’s take a look at the pipeline from the Codefresh UI.
open https://g.codefresh.io/pipelines/edit/workflow?pipeline=devops-toolkit-master
Please click the VARIABLES tab, and you’ll see that one was detected as non-existent. Expand the DETECTED VARIABLES section, and you’ll see that GITHUB_TOKEN is missing. I did not want to hard-code the token inside the pipeline definition (that would be irresponsible), so it’s defined as a variable.
Please click the GITHUB_TOKEN button and type the GitHub token (create it if you do not have it at hand). Since the token is confidential, we should encrypt it by clicking the Encrypt icon next to the value.
All that’s left is to click the SAVE button.
Exploring The Initial Deployment
We still need to explore the Argo Rollouts definition. We’ll go through it fast since the focus is not to go deep into any specific tool but to demonstrate how to combine it all into a unified process. If you need an overview, please watch Argo Rollouts – Canary Deployments Made Easy In Kubernetes.
Everything related to Argo Rollouts is in the helm/templates/rollout.yaml and helm/values.yaml files, so let’s take a quick look at the former one first.
cat helm/templates/rollout.yaml
I’ll let you explore the definitions yourself. Once you’re done, we’ll take a look at the values.yaml file since it contains the critical piece of information.
cat helm/values.yaml
The output, limited to the relevant parts, is as follows.
...
rollout:
enabled: false
steps:
- setWeight: 10
- pause: {duration: 2m}
- setWeight: 30
- pause: {duration: 30s}
- setWeight: 50
- pause: {duration: 30s}
analysis:
enabled: true
The rollout process will have three steps, with pauses in between. It will set the weight to ten percent, wait for two minutes, change the weight to thirty percent, wait for thirty seconds, change the weight to fifty percent, wait for thirty seconds again, and, after all that, roll out fully.
The reason for having the first pause so long (compared to others) lies in Prometheus pulling frequency. By default, it pulls metrics every two minutes, so we want to ensure that the metrics are available for the analysis. That’s why the spec.strategy.canary.steps.analysis.startingStep entry in helm/templates/rollout.yaml is set to 2. Argo Rollouts will start analyzing metrics only after it reaches the second step (setWeight: 30), or, to put it in other words, after a bit more than two minutes.
The initial deployment of the app is already done. The moment we told Argo CD of the existence of the production repo, it converged the actual into the desired state. Since devops-toolkit is one of the Argo CD applications defined in that repo, it should already be running inside the cluster. We can confirm that by retrieving the devops-toolkit-devops-toolkit rollout from the production Namespace.
kubectl argo rollouts
--namespace production
get rollout devops-toolkit-devops-toolkit
If that command did not work, you probably did not install the kubectl plugin for Argo Rollouts. If that’s the case, please visit the Kubectl Plugin Installation for instructions.
The output is as follows.
Name: devops-toolkit-devops-toolkit
Namespace: production
Status: Healthy
Strategy: Canary
Step: 6/6
SetWeight: 100
ActualWeight: 100
Images: vfarcic/devops-toolkit-series:latest (stable)
Replicas:
Desired: 2
Current: 2
Updated: 2
Ready: 2
Available: 2

NAME KIND STATUS AGE INFO
devops-toolkit-devops-toolkit Rollout Healthy 21h
revision:1
devops-toolkit-devops-toolkit-647879f7c5 ReplicaSet Healthy 21h stable
devops-toolkit-devops-toolkit-647879f7c5-rzqwr Pod Running 21h ready:1/1
devops-toolkit-devops-toolkit-647879f7c5-zpgdq Pod Running 21h ready:1/1
We can see that the first deployment (revision:1) was successful. The ActualWeight is set to 100, meaning that all the traffic is going to that release. Now, to be fair, that wasn’t progressive delivery. The first release of something cannot be deployed progressively since there is no previous release to progress from. We’ll change that soon when we deploy a second release of the demo app.
Rolling Back Releases
There are two typical outcomes of any deployment. It’s successful, or it failed. Actually, there is a third outcome that can be described as “we don’t know”, but I’ll leave that one aside.
In the case of canary deployments, success means that it is rolled out to all the users, while repeated failure results in a rollback to the previous release. We’ll explore the latter first.
Let’s see what happens when things go wrong. For that, we’ll be sending requests to a non-existing endpoint. As a result, that should generate response codes with errors in 4xx range.
First, we’ll need the IP of the Istio Gateway.
echo $ISTIO_HOST
Copy the output.
Next, open a second terminal session and (re)declare the ISTIO_HOST variable.
Please replace [...] in the command that follows with the IP copied earlier.
# Replace `[...]` with the IP of the Istio Gateway Service
export ISTIO_HOST=[...]
Now we can start sending “false” requests to the app, hoping they will generate issues that will compel Argo Rollouts to roll back the release we are about to deploy.
while true; do
curl -I http://devops-toolkit.$ISTIO_HOST.xip.io/this-does-not-exist
sleep 1
done
Let’s leave the loop running and go back to the first terminal session.
Now we can “pretend” to create a new release of the application.
Typically, we’d write some code, create a pull request, deploy it to a temporary preview environment, let our colleagues review it, and do whatever else we usually do before merging PRs. But we’ll skip all that for brevity reasons. Progressive delivery (e.g., canary deployment) is generally used only in production anyway.
All in all, we’ll skip the PR part of the process and make some changes directly to the mainline.
echo "Will it roll back?"
| tee README.md

git add .

git commit -m "A silly change"

git push
We made a silly change to the local copy of the repository, and we pushed it to GitHub. As a result, a new pipeline build should be running (or it might have already finished). Let’s take a quick look at it.
open https://g.codefresh.io/builds2
Please select the latest build to see the progress.

Once the build is finished, we should have a new pull request with the suggested changes in the argocd-production repo. That means that we are practicing continuous delivery instead of continuous deployment. If the latter is your preference, all you would have to do is change the pipeline to push directly to the mainline of the production repo instead of making a pull request.
Let’s see the newly created PR.
open https://github.com/$GH_ORG/argocd-production/pulls
Go inside the PR and explore the changes. Merge it once you’re done.
From here on, Argo CD should detect the modification to the definitions in the production repo and make the necessary changes to the cluster. Since the app definition is based on Argo Rollouts, the modification should start the process of canary deployments. We can watch the progress with the command that follows.
kubectl argo rollouts
--namespace production
get rollout devops-toolkit-devops-toolkit
--watch
After a few minutes, when the process is finished, the output should be similar to the one that follows.
Name: devops-toolkit-devops-toolkit
Namespace: production
Status: Degraded
Message: RolloutAborted: Rollout is aborted
Strategy: Canary
Step: 0/6
SetWeight: 0
ActualWeight: 0
Images: vfarcic/devops-toolkit-series:latest (stable)
Replicas:
Desired: 2
Current: 2
Updated: 0
Ready: 2
Available: 2

NAME KIND STATUS AGE INFO
devops-toolkit-devops-toolkit Rollout Degraded 4m29s
# revision:2
devops-toolkit-devops-toolkit-787dc7b9b6 ReplicaSet ScaledDown 3m16s canary
devops-toolkit-devops-toolkit-787dc7b9b6-2 AnalysisRun Error 70s 5, 5
# revision:1
devops-toolkit-devops-toolkit-647879f7c5 ReplicaSet Healthy 4m16s stable
devops-toolkit-devops-toolkit-647879f7c5-sk7fs Pod Running 4m16s ready:1/1
devops-toolkit-devops-toolkit-647879f7c5-zzvbz Pod Running 4m16s ready:1/1
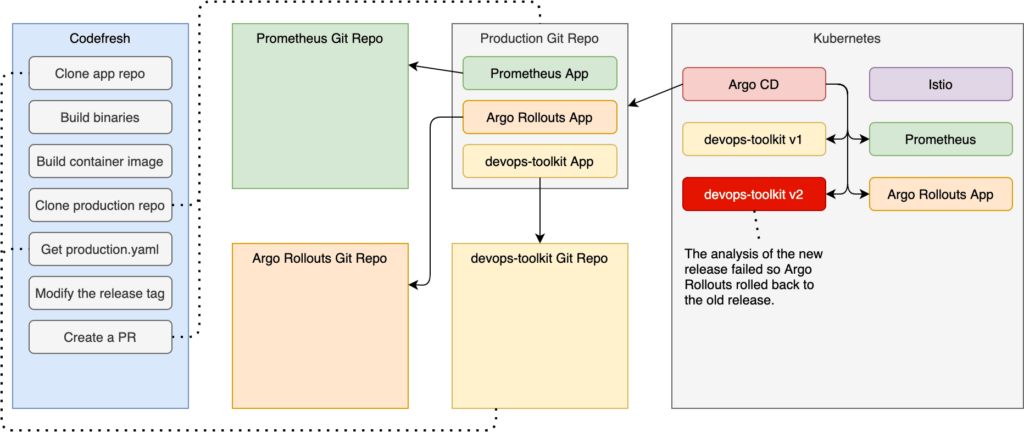
The process immediately changed the weight so that ten percent of the requests are going to the new release, while all the rest are redirected to the old. Two minutes later, it increased the weight of the new release to thirty percent and started analyzing metrics stored in Prometheus. After the analysis failed to reach the threshold three times, it started rolling back to the old release. At the end of the process, the situation is the same as if we never even tried to roll out a new release. Only the old release is running, and a hundred percent of the requests are redirected to it.
Pease ctrl+c to stop watching the rollout.
We will not need the loop sending requests to the non-existent endpoint, so let’s stop it as well.
Go to the second terminal session and cancel the loop by pressing ctrl+c.
Let’s see how a successful rollout looks like.
Rolling Forward Releases
Assuming that you are still in the second terminal session, please execute the commands that follow to start sending “good” requests to the app and, through them, generate “positive” metrics.
while true; do
curl -I http://devops-toolkit.$ISTIO_HOST.xip.io
sleep 1
done
Next, we’ll make yet another silly release and see what happens.
Go to the first terminal session and execute the commands that follow to make just enough change to the repo to initiate another pipeline build.
echo "Will it roll forward?"
| tee README.md

git add .

git commit -m "A silly change"

git push
Let’s wait until the build is finished. If you’re bored staring at a static screen, feel free to go back to Codefresh builds and watch it progress.
All that’s left to do, once the pipeline build is finished, is to go to the argocd-production repo and merge the newly created pull request.
open https://github.com/$GH_ORG/argocd-production/pulls
Open the newly created PR and merge it.
Let’s see how this rollout will look like.
kubectl argo rollouts
--namespace production
get rollout devops-toolkit-devops-toolkit
--watch
After a couple of existing minutes, the output should be similar to the one that follows.
Name: devops-toolkit-devops-toolkit
Namespace: production
Status: Healthy
Strategy: Canary
Step: 6/6
SetWeight: 100
ActualWeight: 100
Images: vfarcic/devops-toolkit:0b4838a (stable)
Replicas:
Desired: 2
Current: 2
Updated: 2
Ready: 2
Available: 2

NAME KIND STATUS AGE INFO
devops-toolkit-devops-toolkit Rollout Healthy 11m
# revision:3
devops-toolkit-devops-toolkit-65d98bd45b ReplicaSet Healthy 3m27s stable
devops-toolkit-devops-toolkit-65d98bd45b-2fczg Pod Running 3m27s ready:1/1
devops-toolkit-devops-toolkit-65d98bd45b-zd4vp Pod Running 19s ready:1/1
devops-toolkit-devops-toolkit-65d98bd45b-3 AnalysisRun Successful 79s 14
# revision:2
devops-toolkit-devops-toolkit-787dc7b9b6 ReplicaSet ScaledDown 10m
devops-toolkit-devops-toolkit-787dc7b9b6-2 AnalysisRun Error 8m21s 5, 5
# revision:1
devops-toolkit-devops-toolkit-647879f7c5 ReplicaSet ScaledDown 11m
All the requests should be going to the new release, and the old one should be scaled down to zero replicas. We were successful!

That’s it. You can stop watching the rollout and stop sending requests by pressing ctrl+c in both terminal sessions.
Cleaning Up The Mess
It’s always a good idea to clean up the mess after we’re finished “playing”, so let’s remove any trace of our activities.
Please make sure that you are in the first terminal session and execute the commands that follow.
I’ll use gh CLI to open the repos. Please install it if you do not have it already.
cd ..

codefresh delete pipeline
devops-toolkit-master

cd argocd-production

gh repo view --web

# Delete the repo

cd ..

cd devops-toolkit

gh repo view --web

# Delete the repo

cd ..

rm -rf argocd-production
devops-toolkit
Finally, destroy the cluster if you created it only for the exercises.