Are you a ninja?
It’s a silly question. I know that you are most likely not a real ninja. But you might be considering yourself a ninja of software engineering. “What does Viktor mean by that?” I’m glad you asked.
Ninjas appear, perform the mission, and disappear without leaving a trace behind.
“Why is Viktor talking nonsense? What does that have to do with software engineering?” Again, I’m glad you asked.
Software engineers that use UIs to perform actions act in the same way as ninjas. They tend to fill in some fields and click some buttons until they accomplish their goals. They do what needs to be done and leave no trace behind them. They come when we least expect them and disappear as soon when their job is done. Those are the same traits as those exhibit by ninjas. But there is a different breed of engineers.
Some are team players, and some are not. Team players will always work in a way that their teammates can get insight into their knowledge, can reproduce their work, review it before going live, and provide feedback. Those are people who share their expertise through code stored in Git. They enable others to reproduce their work by creating scripts, code, declarative definitions, etc. They are documenting everything in the form of code and READMEs. They make pull requests and ask for feedback, enabling others to gain insight into their work.
Now, to be fair, it is possible to document the steps from a UI, and it is possible to share that with others. It is possible, but not likely to happen. It is unrealistic for someone to document every step performed through a UI. It is impractical to wait for feedback until a button is pressed. It is impossible to expect that others will be able to reproduce every single step from a document based on actions in a UI. That’s open to interpretation. It is slow. Above all, it is done by humans who are incapable of doing the same thing over and over again.
So, we have “real” team players writing code and scripts, creating pull requests, and expecting feedback. Then there are people who are mostly focused on doing things in isolation by clicking buttons in some UI. The former are team players, while the latter are ninjas. They work alone, and they leave no trace behind.
However, we do not need ninjas. We need samurais. They fight as a team.
UIs are great as a learning experience, but using them is slow, prone to errors, hard to reproduce, and results in hard-to-document processes. Writing code and scripts to accomplish the same results is a sign of maturity and experience. It is proof that we are capable of working in a team while also being an expert.
I must admit that I exaggerated. There is value in UIs as well as in running commands and defining everything as code. Experts are often mixing all those methods. We at Codefresh believe that the best way to accomplish the goals is to combine all those. That’s why we built an awesome UI, but also why we believe that APIs, CLIs, and everything-can-be-defined-as-code are just as important. Nevertheless, today I’ll try to go into the extreme by showing you how to operate everything through CLI and declarative definitions stored in Git.
That’s enough of an introduction into something that is not really related to ninjas or samurais. Our goal today is to accomplish through code and commands things that most people do through UIs. We are about to create, manage, and monitor a Codefresh pipeline and everything else we might need without opening the UI.
How does that sound? Are you ready to become a samurai?
Discussing The Plan
The only thing I will assume you prepared in advance is a Kubernetes cluster. Create one if you haven’t already. You can use whichever process you are already using to create a cluster, or you might want to reuse an existing one if you already have it. You might even want to go through the “Applying GitOps And Continuous Delivery (CD) On Infrastructure Using Terraform And Codefresh” articles published separately for AWS EKS, Azure AKS, or Google Cloud GKE.
Ultimately, it does not matter how you created a Kubernetes cluster or what type it is, as long as you are aware of a few potential issues. To begin with, I tested all the examples using GKE, EKS, and AKS. They should work in any other Kubernetes platform, but I cannot guarantee that there isn’t a thing or two you’ll need to change in the examples that follow. Also, Codefresh needs to be able to access your cluster, so those running locally and without a public IP like, for example, Docker Desktop or Minikube, are out of the game.
That’s it. That’s all I expect you to prepare in advance. Create a Kubernetes cluster, and make sure that Kube config is pointing to it.
Before we create a pipeline, we need to have quite a few things. To begin with, we need to install codefresh CLI and authenticate it. We need a Git repository where we will store the resources we need to define. We will also need to create a Kubernetes ServiceAccount that will allow Codefresh to perform specific actions. For all that to make sense, we will need to tell Codefresh how to connect to the cluster.
We will also need to provide info on connecting to our Git repository so that Codefresh can create a webhook that will notify it whenever we push a change. It will also need to pull specific commits and use them as the source code required by some of the pipeline steps.
Finally, we’ll need to create a Codefresh project inside which the pipeline will reside.
I probably forgot to mention a thing or two. We’ll figure out what we’re missing once we start doing whatever we need to do.
What matters is that we will be able to create the pipeline only once we handle all the prerequisites.
Does that make sense? Do we have a plan in place?
I’ll assume that you’re nodding in agreement, so let’s get going.
Installing The codefresh CLI And Getting The Code
To begin with, we will need Codefresh CLI.
If you are already using codefresh.io, you might be used to doing everything through the UI. Not today. We’ll use the CLI for all the operations we’ll need to do in Codefresh. You will not see the UI today.
Please follow the instructions in the Codefresh CLI Installation page. Once the CLI is installed, you should authenticate it. You’ll need an API key for that. If you do not have it already, go to the User Settings page and click the GENERATE button inside the API Keys section. Type devops-catalog as the KEY NAME, select the SCOPES checkbox, and click the CREATE button. Make sure to copy it by clicking the Copy token to clipboard link below the API KEY field.
All the commands are available in the pipeline-cli.sh Gist. Feel free to use it if you’re too lazy to type. There’s no shame in copy & paste.
Execute the command that follows once you have the token.
Please replace [...] with the token you just copied to the clipboard.
# Replace `[...]` with the token
codefresh auth
    create-context devops-catalog
    --api-key [...]
If you are a Windows user, I will assume that you are running the commands from a Bourne Again Shell (Bash) or a Z Shell (Zsh) and not PowerShell. That should not be a problem if you followed the instructions on setting up Windows Subsystem for Linux (WSL) explained in the Installing Windows Subsystem For Linux (WSL) YouTube video. If you do not like WSL, a Bash emulator like GitBash should do. If none of those is an acceptable option, you might need to modify some of the commands in the examples that follow.
Next, we should generate the definitions of the resources we need to create. But, given that I’m a good guy, I’ll save you from typing by letting you fork a repo I created. It contains everything we need.
Let’s open it.
If you do not have the open command (or the alias), you should replace open with echo and copy and paste the output into your favorite browser.
open https://github.com/vfarcic/codefresh-cli-examples
Next, you will need to fork the repo. We’ll soon make some changes to the code, and you wouldn’t be able to push them to my repo. So, it needs to be yours.
If you do not know how to fork a GitHub repo, the only thing I can say is “shame on you”. Google how to do that. I will not spend time explaining that.
Next, we’ll clone the newly forked repository.
Please replace [...] with your GitHub organization in the command that follows. If you forked the repo into your personal account, then the organization is your GitHub username.
# Replace `[...]` with the GitHub organization
export GH_ORG=[...]

git clone
    https://github.com/$GH_ORG/codefresh-cli-examples.git

cd codefresh-cli-examples
Now we are ready to set up all the prerequisites.
Setting Up The Kubernetes Prerequisites
The first thing we need to do is provide sufficient permissions for Codefresh to be able to perform actions in your Kubernetes cluster. We need a ServiceAccount, bound to a role with the permissions, which we’ll store in the codefresh Namespace. Let’s take a look at an example.
cat create-cluster.yaml
The output is as follows
---

apiVersion: v1
kind: Namespace
metadata:
  name: codefresh

---

kind: ClusterRole
apiVersion: rbac.authorization.k8s.io/v1
metadata:
  name: codefresh
rules:
  - apiGroups: [ "*"]
    resources: ["*"]
    verbs: ["get", "list", "watch", "create", "update", "patch", "delete"]

---

apiVersion: v1
kind: ServiceAccount
metadata:
  name: codefresh
  namespace: codefresh

---

apiVersion: rbac.authorization.k8s.io/v1
kind: ClusterRoleBinding
metadata:
  name: codefresh
roleRef:
  apiGroup: rbac.authorization.k8s.io
  kind: ClusterRole
  name: codefresh
subjects:
- kind: ServiceAccount
  name: codefresh
  namespace: codefresh
There is nothing special about that definition. Assuming that you have a basic understanding of Kubernetes, you should be able to figure out what is what. The only note worth mentioning is that we might be a bit too generous with the rule in the ClusterRole. You might want to be less permissive and limit further what Codefresh can do. But, for our examples, being generous might not be a bad thing.
Let’s apply those resources.
kubectl apply
    --filename create-cluster.yaml
Now that we have the ServiceAccount with the permissions that restrict what can and what cannot be done inside the cluster, we can let Codefresh know how to connect to our cluster.
Adding Kubernetes Config
Next, we need to “create a cluster” in Codefresh. That’s a bit misleading name for what we’ll do. We are not really going to create a cluster. Instead, we will use the create cluster command to provide Codefresh with the information on connecting to your cluster.
Before we proceed, I must warn you that there is a potential complication if you’re using Amazon Elastic Kubernetes Service (EKS). Codefresh does not allow “special” characters in the name of the cluster. On the other hand, when you add EKS cluster to Kube config, the name is typically something like arn:aws:eks:us-east-1:336151728602:cluster/devops-catalog. If that’s your case, please create a new Kube config context using the --alias argument to specify a non-default name. A command would be something like aws eks update-kubeconfig ... --alias devops-catalog. In other words, create Kube config like you usually do with aws CLI, but make sure that you add --alias. If you are unsure that the current name is, please output Kube config with kubectl config view.
Adding Kubernetes config to Codefresh is easy. All we have to do is specify the ServiceAccount, the Namespace where it’s located, and the Kube context we want to pass to Codefresh. We have all but the context, so let’s retrieve it.
export CURRENT_CONTEXT=$(
    kubectl config current-context)
All that’s left is execute codefresh create cluster.
codefresh create cluster
    --kube-context $CURRENT_CONTEXT
    --serviceaccount codefresh
    --namespace codefresh
You should see the output message stating that the Kubernetes context was added to Codefresh. From now on, it should know how to connect to our cluster. Given that it uses a specific ServiceAccount, it is limited to whichever permissions we assigned it.
If we are unsure whether the cluster config was indeed added, we can always retrieve them all.
codefresh get clusters
The output, in my case, is as follows.
ID                       NAME
5f6b9a60e8d0861f02196a64 devops-catalog
The ability to connect to the cluster is not enough. We must also allow it to perform certain actions related to our Git provider of choice.
Adding Git Context
I am assuming that your Git provider is not open to everyone. You almost certainly restricted who can pull repos, who can push changes, who can create webhooks, and so on. Even open-source projects do not use the do-whatever-you-want model. There are always some restrictions.
So, our next step is to create a token that will be specific to Codefresh and through which we can decide what it can and what it cannot do. From the Codefresh perspective, we need to add a Git context. But, before we do that, let’s see which ones we already have.
codefresh get contexts
The output, in my case, is as follows.
NAME            TYPE
CF_HELM_DEFAULT helm-repository
The only context I have is the one that comes out of the box and allows my pipelines to use Codefresh default Helm repository. We’ll ignore that one.
In your case, there might already be a git.github context. You could use it if its already set up. However, the goal is to show how to do everything from scratch using CLI, so we’ll ignore whichever contexts you might already have.
The first thing we need to do is generate a GitHub token.
I’m using GitHub for the examples, and you should do the same, for now. Later on, you should be able to modify the examples to use whichever other Git provider you might be using. Codefresh currently supports *BitBucket, GitHub, GitLab, and Stash, at least when operated through the CLI.*
Let’s go to the GitHub’s Personal access tokens page.
open https://github.com/settings/tokens
Please click the Generate new token button.
Type codefresh in the Note field, and select all the checkboxes.
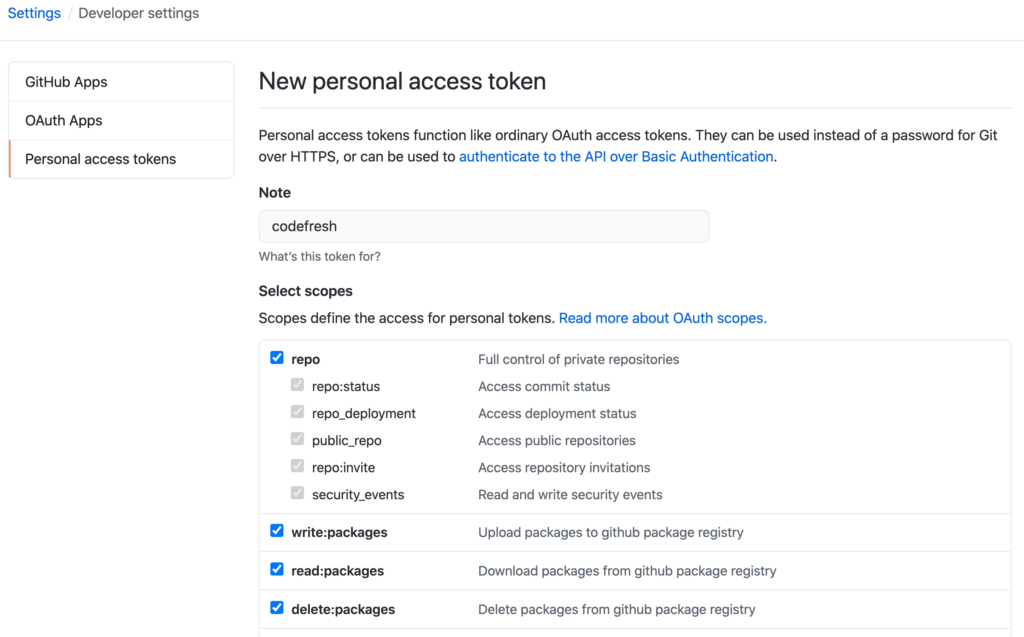
You should be much more restrictive than allowing Codefresh full access to your repos. Still, for the purpose of the exercises, we will go all in and save ourselves from a potentially lengthy discussion about the relationship between specific permissions and actions they might enable.
Click the Generate token button, and make sure that you do NOT close the screen.
This is the first and the last time you will ever see the token. Assuming that you do not have a photographic memory, we’ll need to store it somewhere. Today, that somewhere will be an environment variable and a file.
Please replace [...] with the newly created token in the commands that follow.
export GH_TOKEN=[...]

echo "export GH_TOKEN=$GH_TOKEN"
    | tee env
Now you have the token stored locally in the env file. You should be able to retrieve it whenever you need it, either by outputting that file or executing source env. The latter will export the GH_TOKEN variable.
Before you freak out, thinking that I just exposed you to the risk of accidentally pushing the token to GitHub, let me assure you that it will not happen.
cat .gitignore
The output is as follows.
/env
The env file is in .gitignore, so you are safe from accidents that happened to many before you.
Now we are ready to create a git context that will enable Codefresh to work with your Git repositories.
codefresh create context
    git github devops-catalog
    --access-token $GH_TOKEN
To be on the safe side, we’ll output all the contexts and confirm that the newly created one is indeed there.
codefresh get contexts
The output is as follows.
NAME            TYPE
CF_HELM_DEFAULT helm-repository
devops-catalog  git.github
We are almost done with the prerequisites. Before we dive into the “real” goal, the only thing missing is to create a project where our pipelines will reside.
Creating A Project
Creating a project is the easiest and the most straightforward thing we’ll do today. Now, to be fair, everything else was easy as well. The complication was that we needed additional info like Kube config or GitHub access token. A project does not require any of those. We just need to tell Codefresh what the name of the project is.
codefresh create project devops-catalog
The project was created, or maybe it wasn’t. It really depends on whether you already had a project with that name or not. If you did, you can ignore the Project already exists: "devops-catalog" error message, and move on.
To be on the safe side, we’ll list all the projects and confirm that the one we created is indeed there.
codefresh get projects
The output is as follows.
NAME           PIPELINES LAST_UPDATED TAGS
devops-catalog 0         2020-09-23
That’s it. Now we are ready to do what we are set to do. Now we can create a pipeline.
Creating A Pipeline
The goal is to create a pipeline that will demonstrate that we can use the resources we created. To be more specific, we’ll create a pipeline that will clone the code, use a particular Kube context, and retrieve all the Namespaces. That should prove that the Kube config and the GitHub token we added work as expected. Also, we’ll create a pipeline in the devops-catalog project to confirm that works as well. Finally, we’ll push a change to the git repo as a way to validate that Codefresh was capable of using the GitHub token to create a webhook.
How does that sound?
I’ll assume that the answer is “Great. Let’s do it!”, so we’ll move on.
The goal is not to teach you how to write Codefresh pipelines or to walk you through everything we can do inside them. That would take too much time and is out of the scope of this article. So, I already prepared a sample one we can use. However, since I might have experimented with codefresh.yml at the root of this repo, first, we’ll copy the “golden” version from the orig directory.
cp orig/codefresh.yml .
Let’s see what we got.
cat codefresh.yml
The output is as follows.
version: "1.0"
kind: pipeline
metadata:
  name: devops-catalog/codefresh-cli
  description: Argo CD production environment app
  project: devops-catalog
spec:
  triggers:
  - type: git
    provider: github
    name: main
    repo: vfarcic/codefresh-cli-examples
    events:
    - push
    branchRegex: /master/gi
    verified: true
  contexts: []
  steps:
    main_clone:
      title: Cloning main repository
      type: git-clone
      repo: '${{CF_REPO_OWNER}}/${{CF_REPO_NAME}}'
      revision: '${{CF_REVISION}}'
      git: devops-catalog
    apply_env:
      title: Applying production environment
      image: codefresh/kubectl
      commands:
      - kubectl config use-context my-cluster
      - kubectl get namespaces
  stages: []
As I already mentioned, this is not a deep dive into Codefresh pipelines, so I will not explain in detail every single line of that file. Besides, you should be able to deduce what it does, even if you do not have prior experience.
What matters is that we are using the main_clone step to get the code. Inside it, there is the instruction git: devops-catalog that tells Codefresh to use that specific Git context. That’s the one we created earlier.
In the apply_env step, we set the current Kubernetes context to my-cluster and using the kubectl get namespaces command.
The use-context command is a standard one, yet it might require a bit of explanation.
Pipelines contain the collection of all Kube contexts we add through codefresh create cluster commands. Right now, we have only one, but there could be others. As such, it is essential to always choose which context should be used.
You probably noticed that the pipeline is using the context my-cluster. That is probably not your context. I could not know in advance which one it will be, so I hard-coded it in the pipeline as a place-holder. Let’s change it to whichever context you are using through a bit of “sed magic”.
cat codefresh.yml
    | sed -e "s@my-cluster@$CURRENT_CONTEXT@g"
    | tee codefresh.yml
That’s it. Our pipeline is ready, and all that’s left is to tell Codefresh to use it.
codefresh create pipeline
    -f codefresh.yml
You probably already noticed that I have a paranoid nature and want to double-check everything. This is not an exception, so we’ll check whether the pipeline was created.
codefresh get pipelines
The output, in my case, is as follows.
NAME                         UPDATED           CREATED
devops-catalog/codefresh-cli a few seconds ago a few seconds ago
Let’s see whether we can run the newly created pipeline.
Running Pipeline Builds And Observing Logs
One obvious way to run a pipeline build is to execute it manually. We could do that through the UI or through the codefresh run command. But, more often than not, neither options are desirable.
We should run pipeline builds as reactions to changes to our Git repository. The most common way to do that is through Git webhooks notifying Codefresh that there are changes in the source code.
Codefresh should have created a Webhook that will trigger whenever we push changes to that repo. We could validate that by going to the repo’s webhooks screen, but we won’t. A better test is to push a change to the repo. If that triggers a pipeline build, we can rest assured that the webhook was indeed created and works correctly.
git add .

git commit -m "Adding app of apps"

git push
Let’s see whether a new pipeline build was created due to pushing a change to the repo.
codefresh get builds
    --pipeline-name codefresh-cli
The output is as follows.
ID     PIPELINE-NAME     STATUS  CREATED       STARTED FINISHED TOTALTIME TRIGGER WEBHOOK REPOSITORY        BRANCH
5f6... .../codefresh-cli delayed 2020-09-25...                  00:00:16  main    true    .../codefresh-cli master
There should be a single build for the codefresh-cli pipeline. Copy the ID. We’ll need it soon.
Finally, sometimes, especially when builds fail, we might want to look at the logs. We can do that through CLI as well.
Please replace [...] with the token you just copied to the clipboard.
export BUILD_ID=[...] # e.g., `5f6e10b5c343f14d8b37fd19`

codefresh logs $BUILD_ID -f
The output, limited to the last entries, is as follows.
...
Executing command: kubectl get namespaces
NAME              STATUS   AGE
argocd            Active   12m
codefresh         Active   7m43s
default           Active   17m
ingress-nginx     Active   13m
kube-node-lease   Active   17m
kube-public       Active   17m
kube-system       Active   17m
Successfully ran freestyle step: Applying production environment
Reading environment variable exporting file contents.
Reading environment variable exporting file contents.
We can see that the last step did indeed retrieve all the Namespaces in the cluster. That alone should confirm that we can communicate with the Kubernetes cluster from Codefresh pipelines.
That’s it. We’re finished, and all that’s left is to cover our tracks.
Destroying What We Created
This will be the final test. If you pass it, you will become a samurai.
We are about to remove any trace of what we did. We will cover our tracks so that no one can see what we did. We’ll remove any trace of our activities.
Typically, we would not want to “hide” our work. That would be against teamwork and knowledge sharing. But this is only a practice that is not supposed to live longer than needed. We should always clean the mess after we’re finished playing. That is, at least, what I’m telling my daughter. I’m not very successful with her, but I hope you might be more open to my suggestions.
First, we’ll remove the cluster from Codefresh records.
codefresh delete cluster $CURRENT_CONTEXT
Next, we’ll remove the GitHub context.
codefresh delete context devops-catalog
Finally, we’ll delete the pipeline.
codefresh delete pipeline
    devops-catalog/codefresh-cli
We’ll even go out of the local copy of the repo and get back to where we started.
cd ..
The only thing left untouched is your cluster. You created it without my help, so I’ll assume that you know how to destroy it. Do it. Remove it from the face of the earth.
Now we are finished. We accomplished a set of tasks, and we removed any trace of our activities. We did all that through a terminal session without using Codefresh UI even once (excluding the creation of the API token).
Congratulations. You graduated. You are a samurai now. Now you live in a two-dimensional monochromatic world of terminals.
UIs Are Not Evil
I was probably too harsh. UIs are useful, depending on the use case. There is no easier way to learn something than by exploring the options available in UIs. That’s how one finds out all the available possibilities a product offers. More importantly, UIs are great for getting insights. If we want to visualize our pipelines, we can do it through Codefresh UI. If we want to gain insights into the relation between commits, releases, JIRA tickets, and deployments, Codefresh UI is probably the best place. There are many other reasons for using UIs, but not today. The focus of this article was on the CLI.
The point I’m trying to make, probably by going to extremes, is that there are use-cases when working from a terminal is the best choice and those when UIs are a more natural destination. Knowing how to use both allows us to pick the right tool for the job.
Today, we explored Codefresh CLI. We’ll go through the UI some other time. Until then, I encourage you to explore it on your own. You can read the documents, but that is often not needed. It is intuitive, and it allows us to get emersed into all the possibilities Codefresh offers without a steep learning curve.