Article Content
What Is Artifactory Terraform Integration?
Artifactory Terraform integration enables teams to manage Terraform modules, providers, and backend resources through a centralized repository. By using JFrog Artifactory, users gain a private registry to store and control access to Terraform assets, including modules and providers.
This setup improves control over infrastructure-as-code (IaC) assets by ensuring they are stored locally within an organization’s infrastructure. Artifactory offers private local registries for Terraform modules and providers, keeping them within a controlled environment. It reduces reliance on public registries and mitigates security risks.
Supported Terraform Repository Types in Artifactory
JFrog Artifactory supports several Terraform repository types for different Terraform components and deployment needs:
- Local repositories: Local repositories provide private storage for both Terraform modules and providers. Users can select the desired type from the Terraform Registry Type list without needing to differentiate between modules and providers, as the same repository setup can handle both.
- Remote repositories: Remote repositories serve as a proxy for Terraform resources hosted externally, caching them within Artifactory. This type allows users to access modules and providers from remote sources, with local caching providing resilience against external network outages.
- Virtual repositories: Virtual repositories aggregate multiple local and remote Terraform repositories into a single endpoint. In Artifactory, this setup often includes both local module and provider registries, simplifying access and management by providing a centralized URL for all Terraform resources.
- Backend repositories: Artifactory also supports a dedicated backend repository type for Terraform, specifically for storing Terraform state files. This backend repository type is exclusively local, offering centralized storage for state files, and does not have remote or virtual variants.

Senior Developer Evangelist, Octopus Deploy
Kostis is a software engineer/technical-writer dual-class character. He lives and breathes automation, good testing practices, and stress-free deployments with GitOps.
TIPS FROM THE EXPERT
In my experience, here are tips that can help you better integrate Artifactory and Terraform for maximum efficiency and security:
- Leverage Smart Remote Repositories for multi-region deployments: If you operate in multiple geographies, use Smart Remote Repositories to synchronize Terraform modules/providers between Artifactory instances in different regions. This reduces latency and ensures consistent availability.
- Automate module versioning with CI/CD pipelines: Integrate tools like GitHub Actions, GitLab CI, or Jenkins to automatically package and deploy Terraform modules to Artifactory. Use semantic versioning (e.g., v1.2.3) to keep track of changes.
- Tag and label Terraform resources for better governance: Add metadata tags when uploading Terraform modules or providers. Use properties in Artifactory to organize resources by team, environment (prod, staging), or compliance level.
- Implement role-based access control (RBAC): Configure Artifactory permissions to restrict access to specific Terraform repositories. For example, developers can read modules, while admins can upload and manage versions.
Tutorial: Getting Started with Artifactory Terraform Registry
Here’s an overview of how to work with different types of Terraform registries. These instructions are based on the Artifactory documentation.
Using Terraform Module Registries
Terraform modules are configurations that encapsulate a collection of resources defined in .tf files, making them reusable across infrastructure deployments. To set up a Terraform module registry in JFrog Artifactory, you must create a local repository to store the module files in a structured format.
To prepare a module for deployment, compress the .tf files into a .zip file and deploy it to the module repository, following the directory layout convention for module storage:
<namespace>/<module-name>/<provider-name>/<module-version>.zip
For example:
terraform-aws-modules/vpc/aws/3.2.1.zip
hashicorp/consul/aws/DEV-321.zip
This structure organizes modules by their namespace, name, provider, and version, allowing them to be indexed and accessed by the Terraform CLI.
Using Terraform Provider Registries
Terraform providers are plugins that enable Terraform to interact with various cloud providers, SaaS platforms, and APIs. To set up a provider registry in Artifactory, create a directory for storing provider binaries, which should also be structured according to the following naming conventions:
<namespace>/<provider-name>/<module-version>/terraform-provider-{NAME}_{VERSION}_{OS}_{ARCH}.zip
For example:
google/3.88.0/terraform-provider-google_3.88.0_darwin_amd64.zip
This layout organizes providers by namespace, provider name, version, operating system, and architecture, ensuring that Terraform can resolve the correct binary for each environment.
Setting Up a Local Module or Provider Registry
To create a local repository for either modules or providers, follow these steps:
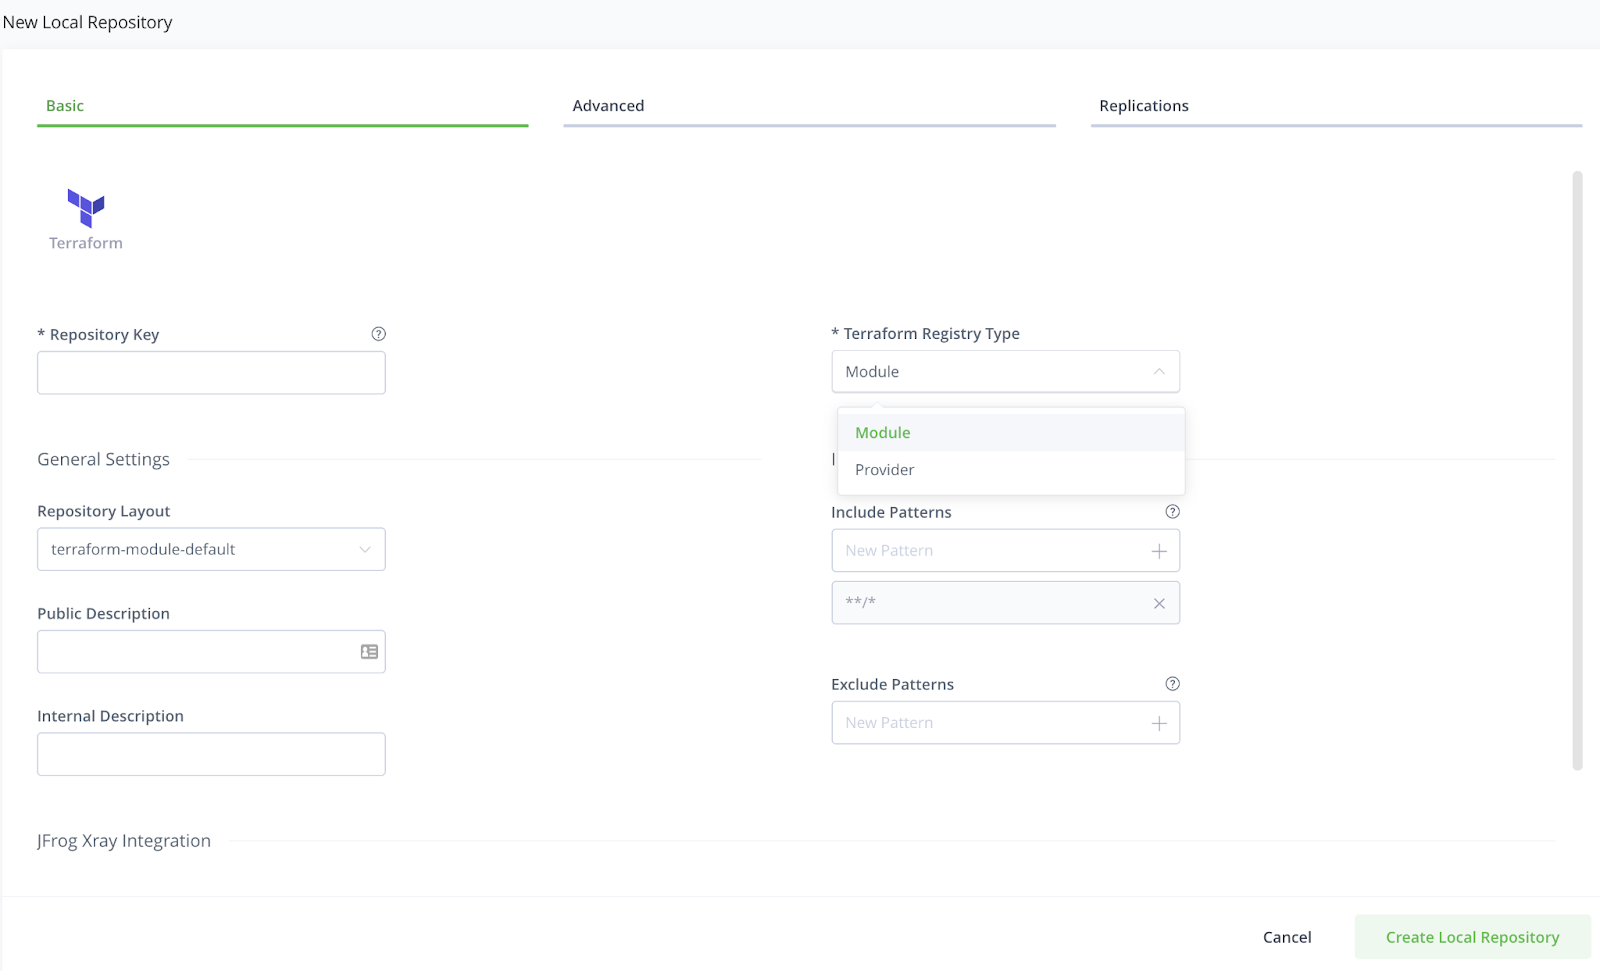
- Go to Repositories > Local > New Local Repository.
- Set the Package Type to
Terraform. - Under the Basic tab, select
Modulefor modules orProviderfor providers from the Terraform Registry Type list. Artifactory will then apply the appropriate default repository layout.
This setup enables Artifactory to calculate metadata and index the packages, allowing them to be accessed and downloaded directly via Terraform.
Setting Up a Remote Registry
Remote repositories in Artifactory can proxy and cache external Terraform modules and providers. To set up a remote repository for Terraform:
- Navigate to Repositories > Remote > New Remote Repository.
- Set the Package Type to
Terraform. - Enter the appropriate Registry URL and Providers URL, such as
<base_Artifactory_URL>/api/terraform/repokeyfor using Smart Remote Repositories or the official HashiCorp URL for GitHub-hosted providers.
If using Artifactory version 7.39.4 or later, you may set the system property to override the source URL during module initialization:
artifactory.terraform.override.modules.source.hostname=false
This setting is optional and can be used to adjust URL behavior during initialization.
Setting Up a Virtual Registry
A virtual repository aggregates local and remote Terraform repositories under a single URL, making it simpler to access all Terraform resources. To create a virtual repository:
- Go to Repositories > Virtual > New Virtual Repository.
- Set the Package Type to
Terraform. - Select the desired local and remote Terraform repositories to include in the virtual registry under the Basic settings tab.
This setup provides a single endpoint for Terraform to pull resources from both local and remote repositories, simplifying access and management across environments.
Setting Up a Terraform Module or Provider Registry to Work with Artifactory
Setting up a Terraform module or provider registry in Artifactory involves configuring the Terraform CLI to interact with Artifactory, deploying Terraform resources (modules and providers), and ensuring Artifactory resolves resources as needed.
Step 1: Configure the Terraform Provider Registry with Artifactory
To configure Terraform to work with Artifactory, first log in to the JFrog Platform domain using the following command, replacing <MY_JFROG_DOMAIN> with your domain:
terraform login <MY_JFROG_DOMAIN>
This command initiates the login process, saving the access token in the ~/.terraform.d/credentials.tfrc.json file.
Next, to specify that Artifactory should be used as the registry for resolving providers, add the following block to the ~/.terraformrc file (Linux/Unix) or %APPDATA%/terraform.rc (Windows):
provider_installation {
  direct {
    exclude = ["registry.terraform.io/*/*"]
  }

  network_mirror {
    url = "<MY_JFROG_DOMAIN>/artifactory/api/terraform/<MY_REPOSITORY_KEY>/providers/"
  }
}
Replace <MY_JFROG_DOMAIN> with your domain and <MY_REPOSITORY_KEY> with the key for your Artifactory Terraform repository.
Step 2: Deploy Terraform Providers
To deploy a Terraform provider to Artifactory, use the following curl command. Be sure to replace each placeholder:
curl -uadmin:<TOKEN> -X PUT "https://<MY_JFROG_DOMAIN>/artifactory/<MY_REPOSITORY_KEY>/<NAMESPACE>/<PROVIDER_NAME>/<VERSION>/terraform-provider-<PROVIDER_NAME>_<VERSION>_<OS>_<ARCH>.zip" -T <PATH_TO_FILE>
For example:
curl -uadmin:EXAMPLE_TOKEN -X PUT "https://mycompany.jfrog.io/artifactory/terraform-providers/hashicorp/null/3.1.0/terraform-provider-null_3.1.0_linux_amd64.zip" -T terraform-provider-null_3.1.0_linux_amd64.zip
Step 3: Deploy Terraform Modules
Deploy a Terraform module by using a similar curl command. Again, replace placeholders with actual values:
curl -uadmin:<TOKEN> -X PUT "https://<MY_JFROG_DOMAIN>/artifactory/<MY_REPOSITORY_KEY>/<NAMESPACE>/<MODULE_NAME>/<PROVIDER_NAME>/<VERSION>.zip" -T <PATH_TO_FILE>
For example:
curl -uadmin:EXAMPLE_TOKEN -X PUT "https://mycompany.jfrog.io/artifactory/terraform-modules/terraform-aws-modules/vpc/aws/2.0.0.zip" -T vpc-aws-module.zip
Step 4: Resolve Terraform Providers and Modules
To ensure that Terraform resolves providers from Artifactory, add this configuration to the main.tf file:
terraform {
  required_providers {
    <PROVIDER_NAME> = {
      source = "<NAMESPACE>/<PROVIDER_NAME>"
    }
  }
}
Example:
terraform {
  required_providers {
    docker = {
      source = "kreuzwerker/docker"
    }
  }
}
For Terraform modules, specify the Artifactory URL in the source parameter:
module "module-name" {
  source  = "<MY_JFROG_DOMAIN>__<NAMESPACE>/<MODULE_NAME>/<PROVIDER_NAME>"
}
Example:
module "vpc" {
  source = "mycompany.jfrog.io__terraform-aws-modules/vpc/aws"
}
Step 5: Generate and Use an Identity Token
Create a file named credentials.tfrc.json in the Terraform directory (typically ~/.terraform.d/credentials.tfrc.json). Populate it with the following format, replacing <MY_JFROG_DOMAIN> and IDENTITY-TOKEN:
{
  "credentials": {
    "<MY_JFROG_DOMAIN>": {
      "token": "IDENTITY-TOKEN"
    }
  }
}
This setup allows Terraform to authenticate to Artifactory using the specified token, making Artifactory the primary registry for both module and provider resources.
Terraform Best Practices for Artifactory Users
If you are managing Terraform with Artifactory, here are a few useful practices to keep in mind.
1. Use Terraform Modules and Dynamic Blocks
Terraform modules help encapsulate and reuse configuration code across deployments, promoting consistency and efficiency. Use modules to break down infrastructure into manageable components, such as network configurations, IAM policies, or compute instances. Leverage well-maintained public modules or create custom modules for the organization.
Dynamic blocks further simplify repetitive configurations within a module. For example, when provisioning multiple resources with similar attributes, dynamic blocks reduce code duplication and make it easier to adapt configurations.
2. Apply Loops and Conditionals
Terraform supports both for_each and count constructs to iterate over resources or define conditional provisioning logic. The for_each loop works well when you need to create multiple resources with different properties, as it assigns unique keys to each resource instance. For example, you can iterate through a map of subnet configurations to create subnets dynamically.
Conditional expressions allow you to enable or disable resources based on variables, making the Terraform code more adaptable. Use the ternary operator (condition ? true_value : false_value) or the count attribute to manage optional resources. For example, conditionally including an auto-scaling group only in production environments improves resource efficiency.
3. Implement Linting
Linting the Terraform code helps maintain consistent formatting and identify potential issues early in the development process. Tools like tflint and terraform fmt can automatically detect and correct syntax errors, warn about deprecated attributes, or highlight misconfigurations.
These tools ensure that infrastructure code adheres to best practices and minimizes errors during execution. Additionally, configure pre-commit hooks to enforce linting before changes are committed to version control. By integrating linting into the CI/CD pipeline, you can catch errors early and enforce coding standards across teams.
4. Test the Code
Testing is crucial for verifying that Terraform configurations work as expected. Tools like Terratest enable integration and end-to-end testing of infrastructure by deploying resources and validating their configurations programmatically. Use Kitchen-Terraform to test resource attributes against expected values in a sandbox environment.
Automating tests for edge cases, failure scenarios, and complex resource dependencies ensures that the Terraform code is reliable. Combine testing tools with CI/CD pipelines to run these tests automatically with every code change, enabling faster feedback loops and reducing deployment risks.
5. Write Thorough Documentation
Clear documentation is essential for maintaining and scaling Terraform configurations. Document each module, including its purpose, input variables, output values, and usage examples. This information helps other team members understand and reuse the module without ambiguity.
In addition to module-level documentation, provide a high-level architecture diagram and describe how Terraform interacts with other tools or platforms. Use markdown files or integrate tools like terraform-docs to automatically generate structured documentation from the Terraform code. Well-documented configurations improve collaboration and accelerate onboarding for new team members.
Conclusion
Artifactory’s integration with Terraform streamlines infrastructure management by centralizing modules, providers, and state files in a secure and efficient manner. By following the practices outlined in this guide, teams can optimize their Terraform workflows, enhance security through controlled access, and maintain consistent and reliable infrastructure deployments. This combination of automation, governance, and best practices makes Artifactory an indispensable tool for managing Terraform resources at scale.

The World’s Most Modern CI/CD Platform
A next generation CI/CD platform designed for cloud-native applications, offering dynamic builds, progressive delivery, and much more.
Check It Out