
Is your Helm chart promotion process complicated and difficult to automate? Are rapidly increasing Helm chart versions making your head spin? Do you wish you had a way to quickly and easily see the differences between deployments across all of your environments?
If you answered “yes” to any of these questions, then read on! My purpose for writing this article is to share a few of the techniques that I’ve seen make the biggest impact for Codefresh and our customers. That said, if what you’re looking for is a more comprehensive list of Helm best practices, then we’ve got you covered over in our documentation.
I’ve been lucky to see a lot of great ideas and approaches regarding Helm, so in order to choose the ones I think are most impactful, I’ll start by defining what I think success looks like.
My goals for simpler Helm deployments and promotions are to be able to:
- Easily find and look at any chart version
- Minimize my Helm chart version sprawl
- Easily compare the differences between deployments across all my environments (test, QA, staging, production, etc.)
- Easily automate promotions from one environment to another
Of course, your definition of “simpler” may differ from mine, which is why this isn’t really a “best practices” article. I’m just presenting some cool ideas, which you can take or leave depending on whether or not you find them helpful in your particular situation. Let’s take it one goal at a time, starting with…
Easily find any chart version
If you’re deploying charts directly from a Git repository, then you know that while it’s easy to look at the HEAD of your repo/branch to examine a currently-deployed chart, examining older versions of that chart is not so easy. I’m referring to the tedious task of sifting through one’s Git history, one commit at a time, trying to find a specific chart version. UGH – this is never a good time!
One way that I’ve seen folks attempt to make this scenario more workable is to put the Helm chart version in their commit message. I’ve found this method unreliable in practice, and searching for a specific chart version requires a lot of cryptic grepping and git log commands. A similar approach is to tag one’s Git commits with the Helm chart version. This is still rather cryptic to deal with, and it creates an additional problem with tag sprawl.
Furthermore, there are other problems beyond just searching for chart versions. When deploying charts from Git to multiple environments, a common approach is to create a long-lived branch for each environment. In this scenario, when I promote a chart from one environment to another, I’m essentially copying the chart from one branch to another, usually with a Pull Request. This means that I now have 2 copies of the same chart. Not only are we placing a lot of trust in my Pull Request to ensure that I’ve captured every single file from the chart version I’m promoting, but we’ve also lost our single source of truth for this version: placing it into 2 different long-lived branches introduces the possibility of divergence.
In short, managing chart versions in Git alone is painful. And it’s for this reason that Codefresh recommends…
Technique #1: Use a Helm Chart Repository
Storing your Helm charts as packages in a repo makes it way easier to find whichever version(s) you’re looking for. For example, if I have a Helm chart called “buslog”, I can quickly search for all available versions:
helm search repo buslog
Then I can pull the specific version that I want to examine:
helm pull myrepo/buslog --version 1.3.16
Don’t get me wrong – we should still develop and update our Charts in Git. I’m just saying that whenever we update the chart and increment its version, we should push it as a package to a Helm chart repository (via a CI pipeline) where it can be easily searched and used/reused for deployments. Furthermore, we are now free to place our charts wherever we like in Git – they don’t necessarily need to be tied to the Git repository we use for deployments any more.
Speaking of deployments, let’s take a moment to talk about 3 mechanisms that you can use to deploy your Helm chart repository-based packages from your CD.
- Helmfile tool – lets you deploy a helmfile.yaml list of charts, including the specific version and repository where each chart lives. You can also have one helmfile.yaml per environment/branch, and since their charts all refer back to the same repository, our single source of truth is maintained. Simply call the helmfile binary from your CD pipeline to apply a helmfile.yaml file.
- Argo CD application spec – if you’re using Argo CD, then one option is to simply update your application specs to point to charts in a Helm chart repository instead of a Git repository. As with Helmfile, we can have Argo CD applications that deploy charts to lots of different environments, and since they all refer to the same Helm chart repo, we get our single source of truth. Here are the fields you’ll need to update in your application specs:
spec:
  source:
    chart: buslog   # the chart attribute replaces the path attribute
    targetRevision: 1.3.16
    repoURL: https://h.cfcr.io/codefreshdemo/public
- Helm Umbrella Chart – This mechanism is really flexible. You can use it to deploy a single chart, or a group of related charts. You can use it in conjunction with a Helmfile or an Argo CD application to group related charts together, or you can just deploy it by itself from a basic CD pipeline with the helm command. Umbrella charts also have some advanced features which we’ll talk about later in this article. Here is an example:
apiVersion: v2  # v2 = Helm3
name: test-environment
type: application
version: 0.1.19
dependencies:
  - name: buslog
    version: 1.3.16
    repository: https://h.cfcr.io/codefreshdemo/public
And one final note on Helm chart repositories… One of the barriers to adopting a repository in Helm 2 was that it typically required one to manage an additional application or VM in which to house this repository. Now with Helm 3, you can use any OCI-based container registry as your Helm chart repository. This includes most of the major Docker registries that you’re probably already using, like Amazon ECR, Google Artifact Registry, Azure ACR, Harbor, Artifactory, etc.
Let’s move on to our next goal…
Minimize Helm chart version sprawl
I know there are lots of different chart versioning strategies out there (some of which use the appVersion field, which I don’t really discuss here), so this goal may or may not resonate with you. That said, one very common versioning strategy is to increment a chart’s version every time it gets a new Docker image. Since new Docker images tend to get built for every application commit, then this could very well mean that you’re also generating a new chart version for every commit. And if we’re versioning on every commit, then the versions have lost not only their meaning, but also their usefulness.
One way to bring meaning back to chart versioning is to only version a chart when it’s structure changes (i.e. the Chart.yaml, values.yaml, or templates), and not for each time its image changes. “But wait,” you say, “when I change my image, won’t I at the very least need to change the chart’s values.yaml??” Well, not necessarily. And this brings us to our next technique…
Technique #2: Use Umbrella Charts
Helm charts have the ability to include other charts, referred to as subcharts, via their dependencies section. When a chart is created for the purpose of grouping together related subcharts/services, such as to compose a whole application or deployment, we call this an umbrella chart.
When using an umbrella chart, it is really easy to override values in its subcharts, such as the tag of a new image. We do this in the umbrella chart’s values.yaml, by placing the new value at <name-of-subchart>.path.to.image.tag. For example, to override the image.tag value in the buslog subchart our previous umbrella chart example, we would place this set of attributes into the umbrella chart’s values.yaml:
buslog:
  image:
    tag: featureXYZ-4a28596
So the idea here is that you would have an umbrella chart in the Git repo/branch that you use for deploying one or more services (usually a group of related services) to an environment. Then for most changes, your CI or promotion pipeline is just going to update one line in this umbrella chart’s values.yaml, and it will leave the subchart (buslog in this example) completely alone. Your subchart would only need to have its chart version incremented on those rare occasions when its non-image elements change (usually as part of a CI pipeline).
In this scenario, you may feel that it makes sense to update the version of the umbrella chart, since we are changing its values.yaml with the subchart’s new image. If so, then that’s OK – we’ve still massively reduced the amount of frivolous version updates in all of our subcharts, which is a big improvement. And if not, then that’s OK too – I haven’t found very many scenarios in which I’ve been able to derive value from versioning umbrella charts that represent the deployment of a whole environment. One exception to that might be if you wanted to deploy duplicate environments. In that case, versioning the umbrella chart (and maybe also storing it in a Helm chart repo) could be very useful.
At this point, I think a visual aid might help illustrate how this all comes together. Here is a build from an example CI pipeline for a microservice, which processes both its Helm chart and its Docker image.
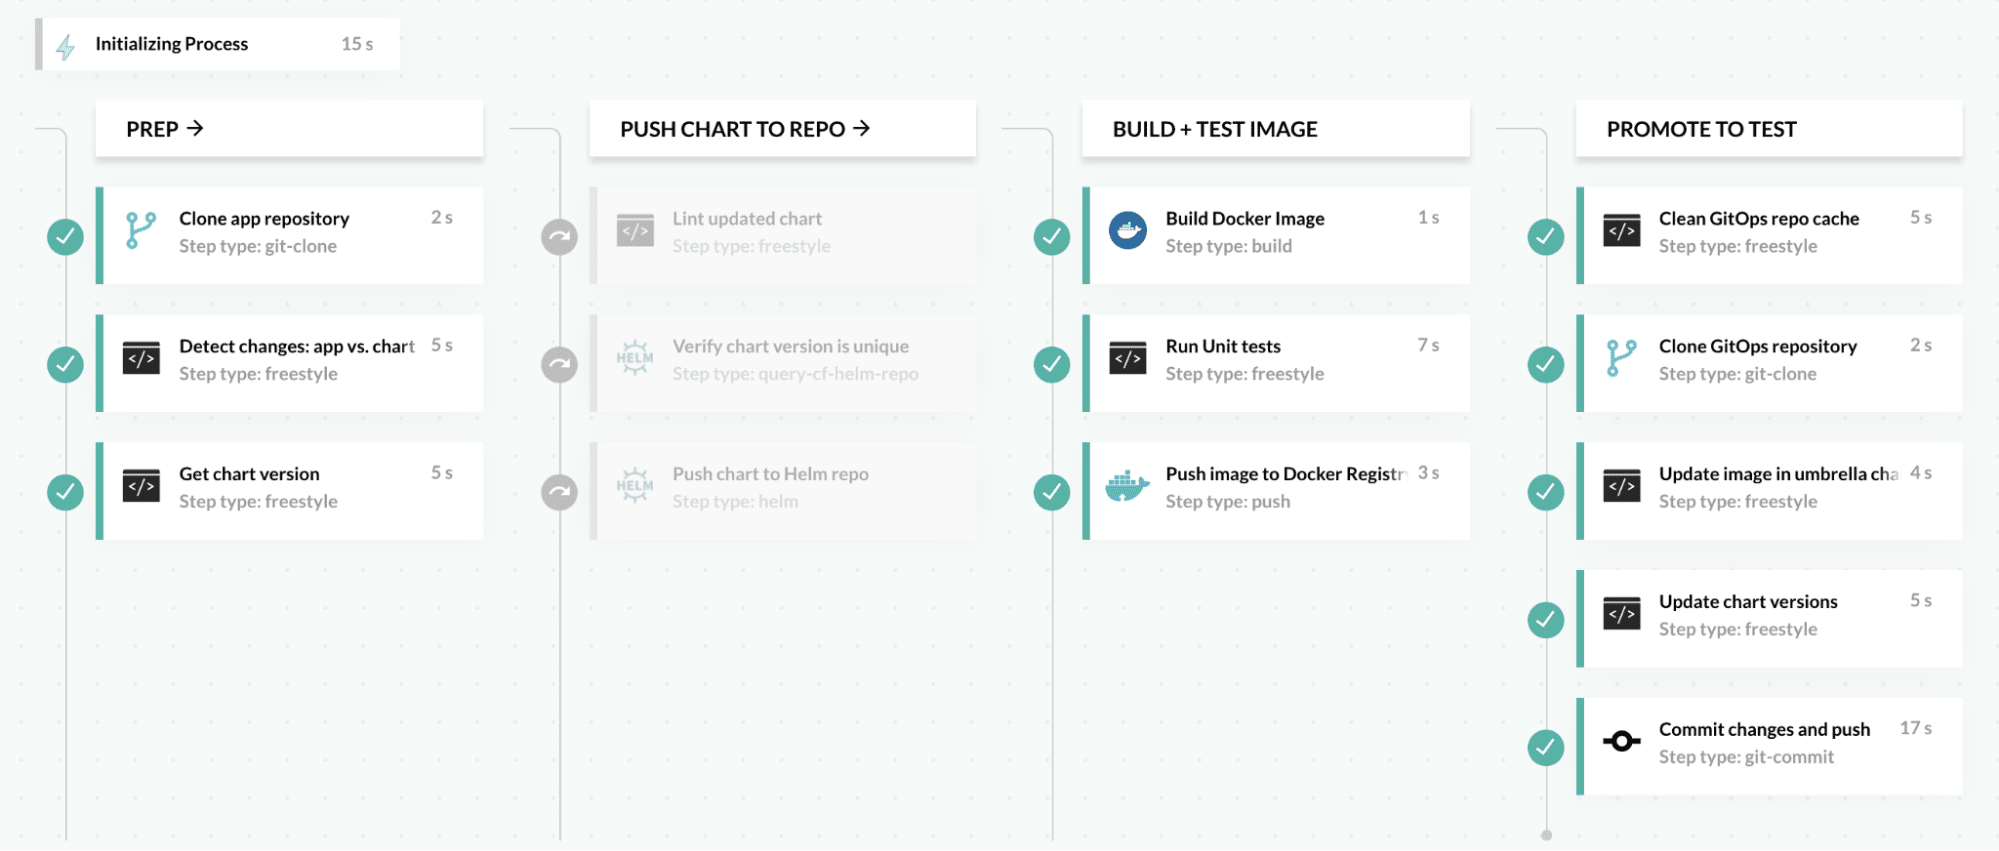
In the PREP stage, you can see that there is a Detect Changes step, which checks to see if any of the Helm chart’s files have changed. You can check for this with a git show command, similar to:
git show --name-only --oneline | grep "$DIRECTORY_OF_CHART"
    && export CHART_CHANGED=true || export CHART_CHANGED=false
If the chart’s files have not changed (as will be the case most of the time), you can see that the entire PUSH CHART TO REPO stage is greyed out, indicating that it is skipped. Then you can see that the pipeline moves on to build the new Docker image. Finally, in the PROMOTE TO TEST stage, it updates the umbrella chart for the Test environment with the new image tag. Afterwards, our CD process should pick up the updated umbrella chart, and deploy it to Test. You can view the whole pipeline YAML for this example in GitHub.
If you’re a fan of Helmfile, you may be thinking at this point that you can achieve all the things I’ve just described with Helmfile as well. And you’d be right! Helmfile is a solid tool. However, I’m recommending umbrella charts here because of their excellent compatibility with other tools. Right now the GitOps movement is gaining a ton of momentum and industry focus/development. The major GitOps sync tools like Argo CD (to which Codefresh contributes) and Flux CD are not compatible with Helmfile. If you’re already an Argo CD user, then you can easily point your Argo CD applications at Git deployment repos containing umbrella charts. Your CI and promotion pipelines can concentrate their changes on the umbrella charts, and shouldn’t ever need to touch the Argo CD application specs.
Now on to the next goal…
Easily compare differences between environments
If we use an umbrella chart and Helm chart repo to specify the whole deployment for each of our environments, then we can shrink the number of files to compare per environment down to 2: Chart.yaml and values.yaml. Not bad, eh!? If we’re using a separate Git branch for each of our deployment environments, then we can use git diff to compare these 2 files between branches/environments. Now in my opinion, keeping environments separated into branches like this is still kind of a pain, which takes me to the next technique…
Technique #3: Use a deployment monorepo
Many of us have spent years working with various Git branching strategies that have encouraged us to create a separate branch for each deployment environment. So when we transitioned into doing CD for microservices, it seemed only natural to keep using branches for environments. But for most deployment repositories, separating environments into branches has very little value. Most of the time, it just adds restrictions, like needing to use git diff for comparisons, as mentioned above. Instead, it would be a lot more straightforward if we used subdirectories for each environment, thus creating a sort of monorepo for deployments.
For example, here is what one of my Git deployment repos with subdirectories looks like:

You can see that I have directories for 4 environments: test, qa, stage, and prod. And because I don’t have to traverse different Git branches to see everything, the task of comparing and manipulating these files is a lot easier. For example, I can now look at all my environments in my Git system’s web UI, or compare them with any standard text editor. It took me about 10 seconds to compare my Test and QA environments from my trusty VS Code window (below), and no esoteric Git or VS Code knowledge was required!

As you can see, I have 1 chart version and 3 image tags that are different between my environments.
Or if I fancy diff, I can use that just as easily. I love options!

Using a Git deployment repo with subdirectories for environments also helps us accomplish the final goal of this article…
Easily automate promotions from one environment to another
Since all of our environments are easily readable / updateable without having to change branches, the process of promoting an image or chart from one environment to the next is super simple. We can do this with just 2 lines of shell code, using the excellent yq v4 tool. For example, to promote my buslog image from Test to QA:
# Copy image tag from the source environment (test)
IMAGE_TO_PROMOTE=$(yq eval .buslog.image.tag test/values.yaml)

# Paste image tag into the destination environment (qa)
yq eval --inplace .buslog.image.tag="$IMAGE_TO_PROMOTE" qa/values.yaml
And since the promotion process is now simplified, it’s also really straightforward to automate it via a pipeline in your CI/CD tool of choice – hopefully Codefresh! In which case, you could simply use the helm-promote step from our Step Marketplace. While you’re at it, you might also want to gate your promotion pipeline with an approval step, or have it generate a Pull Request.
Summary
In conclusion, we looked at 3 different techniques to help us simply our Helm deployments:
- Use a Helm Chart Repository
- Use Umbrella Charts
- Use a Deployment Monorepo
Taken individually, they each provide value, and help us solve some of the goals presented at the beginning of this article. Taken together, however, I think these techniques can have a synergistic effect on one another, and can go a long way toward simplifying one’s Helm deployments. I hope you’ve been able to find at least one of them, if not all 3, useful in your situation!
Happy automating!
New to Codefresh? Create your free account today!