
Progressive delivery is an advanced deployment method that allows you to gradually shift production traffic to a new version with zero downtime. Argo Rollouts is a Kubernetes controller that enables you to perform progressive deployments such as blue/green and canaries on your Kubernetes cluster.
At Codefresh, we love Argo Rollouts and have covered several use cases so far such as smoke tests, metrics, config-maps and even performing deployments for multiple microservices. A very popular question that we haven’t explored yet is the use of Argo Rollouts for Stateful services.
Using Argo Rollouts with queues, caches, and databases
Using Argo Rollouts with stateless applications is straightforward. Argo Rollout already supports several popular traffic providers including the Kubernetes API Gateway. This means that the Argo Rollouts controller can automatically enable/disable production traffic in the new version (in the case of blue/green deployments) or even gradually shift traffic with custom strategies (in the case of canaries).
But what happens if your application is not stateless and instead depends on a database or a queue? Unfortunately, this scenario won’t work out of the box using just Argo Rollouts.
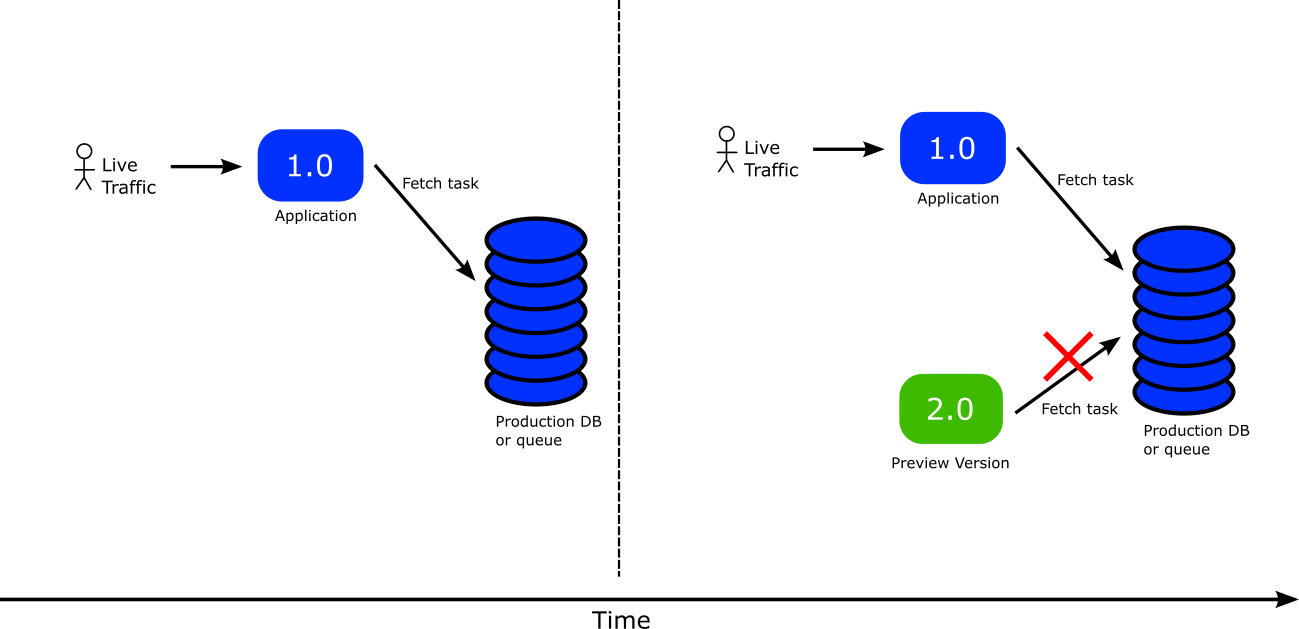
The problem is obvious. Your stable/active application is monitoring a production queue (or production database). Then as soon as you launch the preview version of the application it will also pick up workloads from the production queue which is something you most probably never want.
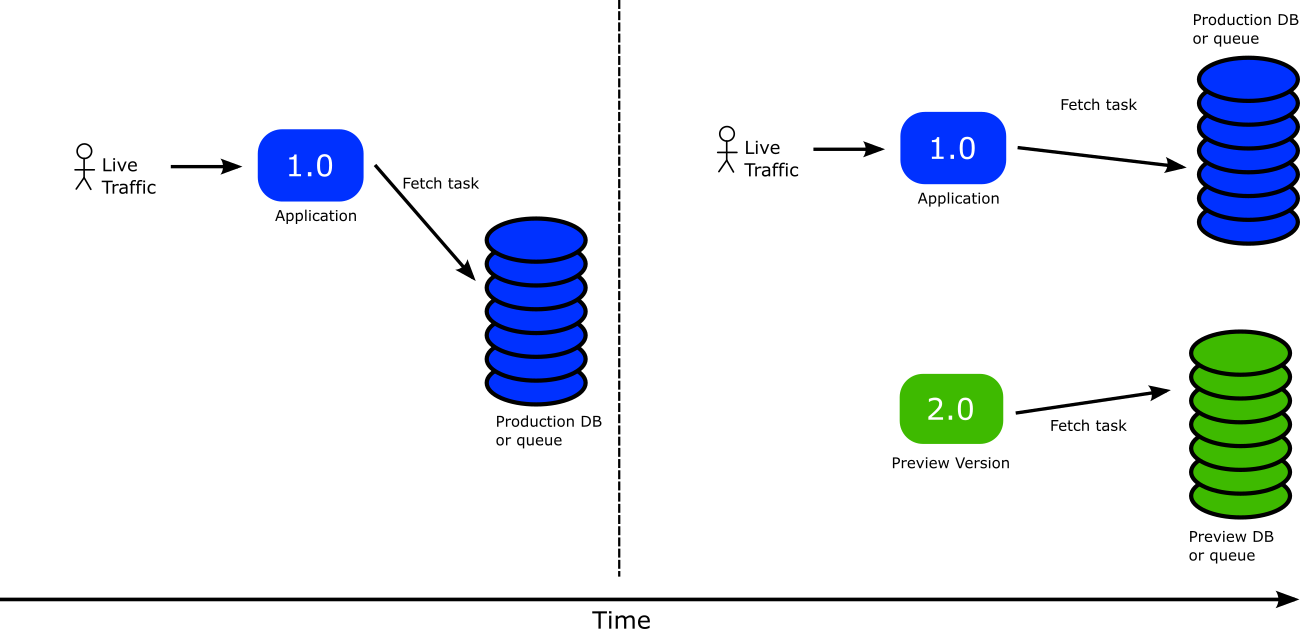
Ideally you would want the production queue untouched, still used only by the active/stable version. And then the preview version should either do nothing or pick workloads from another queue specifically designed for this purpose.
Now, you might think that you can just pause the rollout and manually call your application API to “direct it” to a different queue. This solution might work but it is very cumbersome. There is a better way that is also fully automated and declarative.
Making smarter applications with the Kubernetes Downward API
The “ideal” scenario that we described above would be perfectly possible if our application was smart enough to understand when it is running in “preview” mode and when in “active/stable” mode so that it reads only from the respective queue.
We can make our applications smarter by using three different building blocks:
- The Kubernetes Downward API
- Argo Rollouts Ephemeral labels
- Configuration libraries that automatically reload their settings when they detect a change.
The Kubernetes Downward API is a built-in Kubernetes mechanism that allows you to pass any Pod labels to your application by mounting them as files (or environment variables).
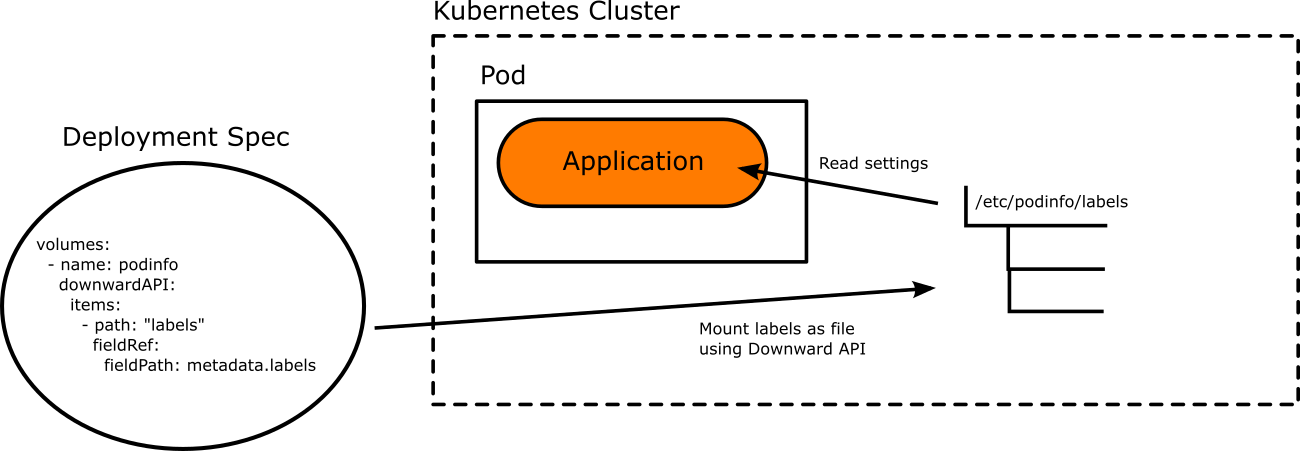
This feature couples perfectly with Argo Rollouts ephemeral labels where you instruct your controller to automatically add/remove certain labels to the rollout according to the current promotion state. And naturally, these labels can be converted to application configuration using the Downward API
The final piece of the puzzle is to make your application aware of those changes. This part needs implementation from the application developers to make sure that configuration settings are automatically reloaded when the files that contain them are updated. This is a good practice to do even before using Argo Rollouts. The process is different for each programming language so you need to find the appropriate library according to the framework used in the application.
Once all building blocks are in place we can finally have our “preview” application not using the production database (or queue).
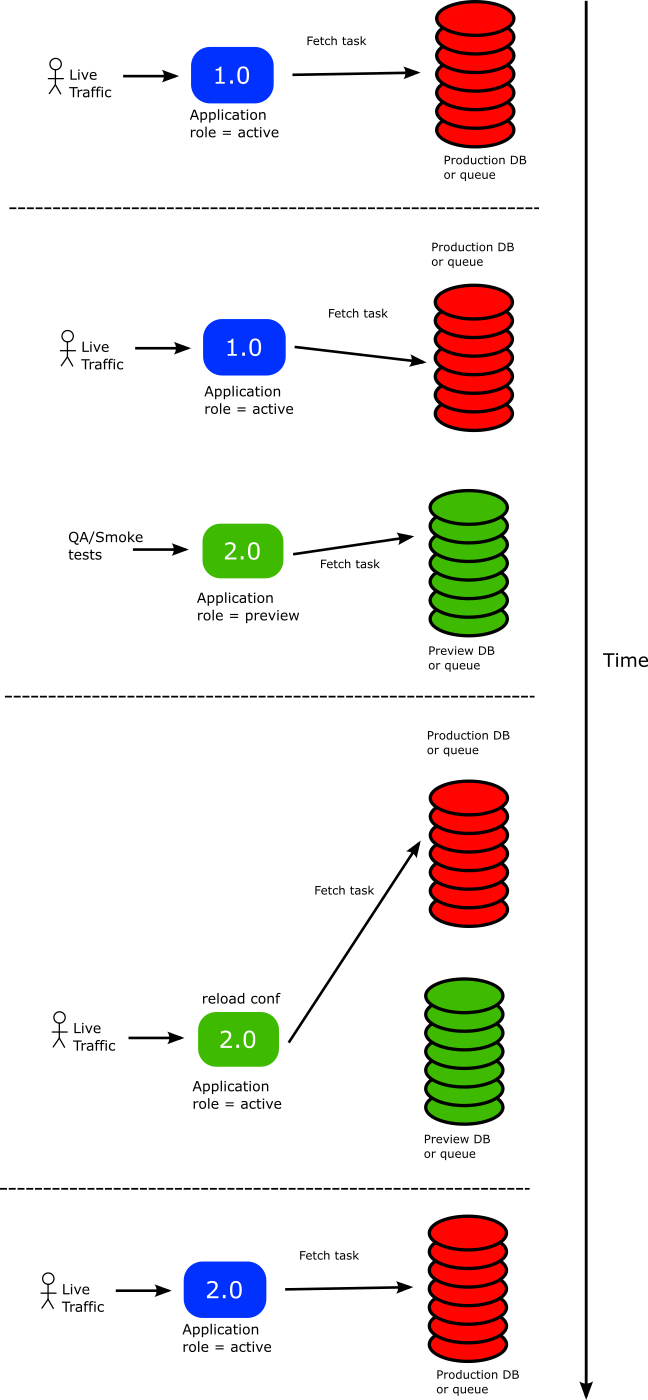
Here is how it works:
- The stable version is currently active
- Argo Rollouts has added labels that describe the “production” database and therefore the stable version uses the production DB
- A new version of the application is launched.
- Argo Rollouts sees the new version and attaches a set of ephemeral labels that instruct the pods about the “preview DB”. These labels are passed to the application as files. The application now reads those files and interacts only with the preview DB
- At this state, you can run QA tests on the preview application either manually or automatically without affecting at all the production app or database
- The new version is deemed to be safe for promotion. You promote the new version
- The old stable version disappears completely. The preview version takes over
- Argo Rollouts changes the ephemeral labels on the fly to instruct the application that it is no longer in preview
- The Kubernetes downward API is used to pass the new configuration to the new version as configuration file
- The application code notices that there is a configuration change and automatically reloads it.
- Now the new version points back to the production DB and the cycle can start again in the next deployment.
We have described the blue/green process for simplicity reasons, but the same process can be followed for canary deployments as well.
Using Argo Rollouts with RabbitMQ
Let’s look at an actual example.
We will examine a simple Kubernetes application using RabbitMQ as a worker. You can find all the source code as well as the manifests at https://github.com/kostis-codefresh/argo-rollouts-stateful-example
Get access to a Kubernetes cluster and make sure to install the Argo Rollouts controller. Then you can deploy the initial version of the application:
cd manifests/stateful-rollout
kubectl apply -f .
This deploys RabbitMQ and the first version of the application. Notice that the installation manifest of RabbitMQ is strictly for demo purposes. Do NOT deploy RabbitMQ like this in production.
To view the UI of the application run:
kubectl port-forward svc/worker-active 8000:8080
Navigate to http://localhost:8000. You should see the following:
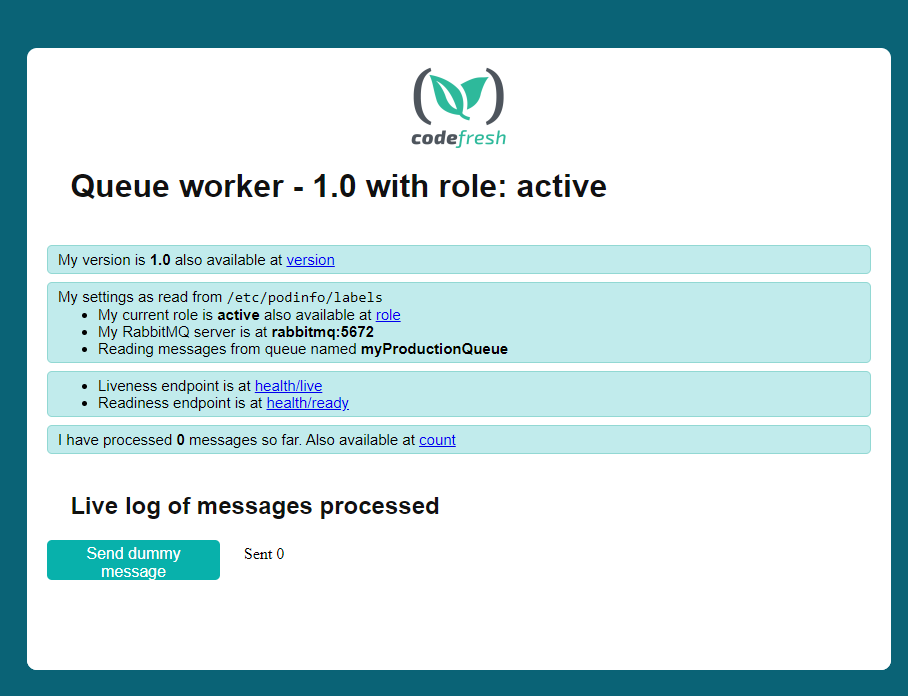
You can test the connection with RabbitMQ by clicking the “send dummy message” button. This makes the worker send a message to itself.
We also view the UI of RabbitMQ with:
kubectl port-forward svc/rabbitmq 15672:15672
Then visit http://localhost:1576 in your browser and go to the “queues’ tab (use guest/guest as username/password)
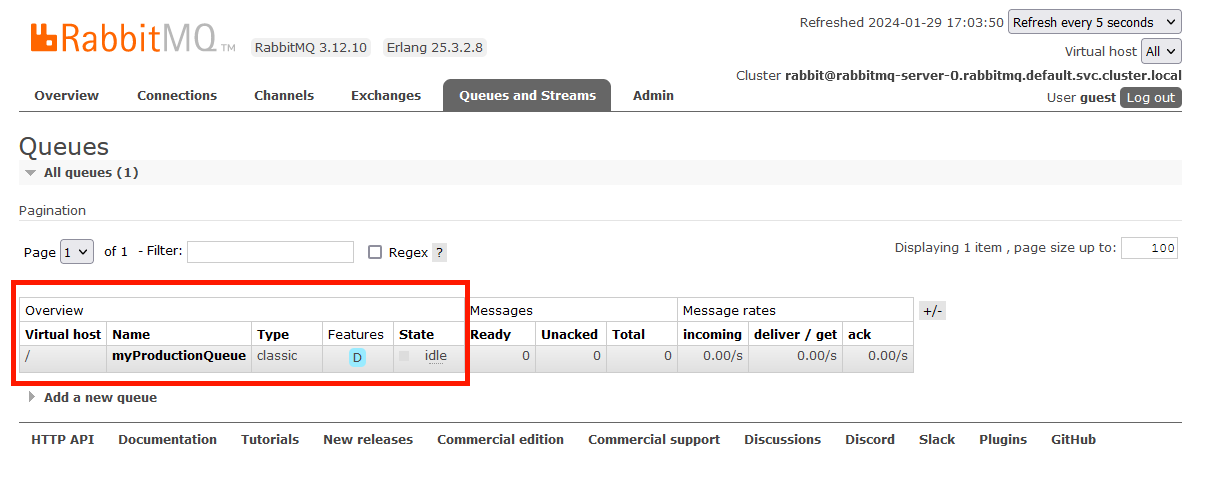
We can see the production queue is the one used right now. This concludes the initial installation of the worker.
Now let’s deploy a new version. Edit your manifest and change the version in line 48 from “1.0” to “2.0”. Reapply the manifest with
kubectl apply -f worker.yml
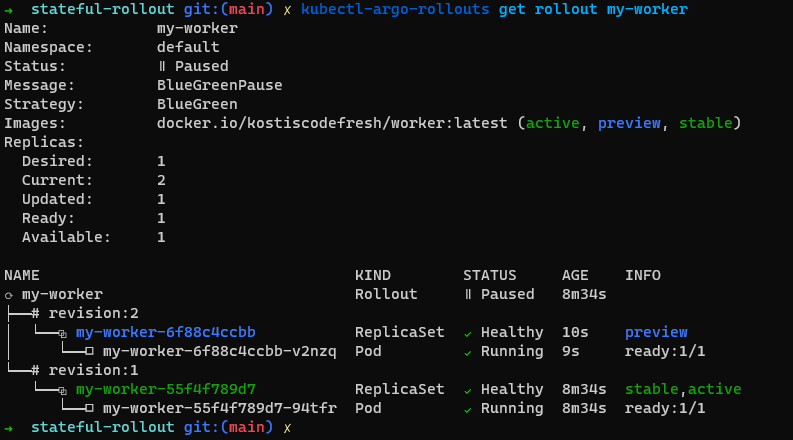
After a while Argo Rollouts will create a second replica with the new version. You can see all the details with
kubectl-argo-rollouts get rollout my-worker
As you can see both versions are running
So does that mean that we have 2 application instances pulling from the same queue? Fortunately the preview application does not use the production queue. We can verify this with multiple ways.
First of all let’s look at the application itself
Run:
kubectl port-forward svc/worker-preview 9000:8080
And then visit http://localhost:9000 to see the preview version
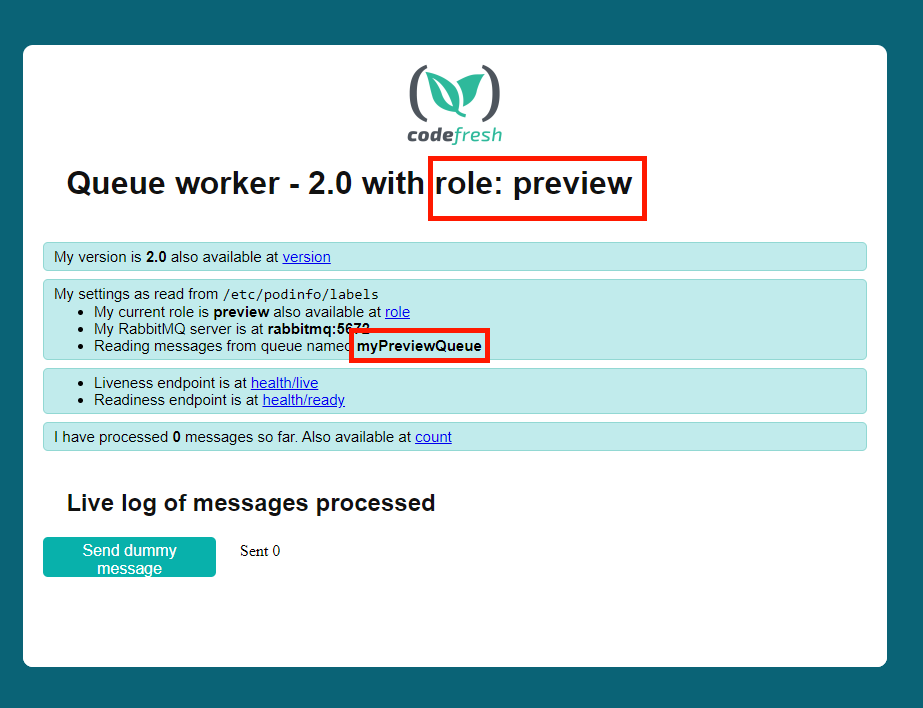
You can see that apart from the updated version, this application uses a different queue. So it doesn’t pick any work from our “production” queue.
We have also included a simple queue tester to showcase this. First, port-forward your rabbitMQ instance:
kubectl port-forward svc/rabbitmq 5672:5672
Then run the tester with
cd source/tester
go run .
And finally visit http://localhost:7000
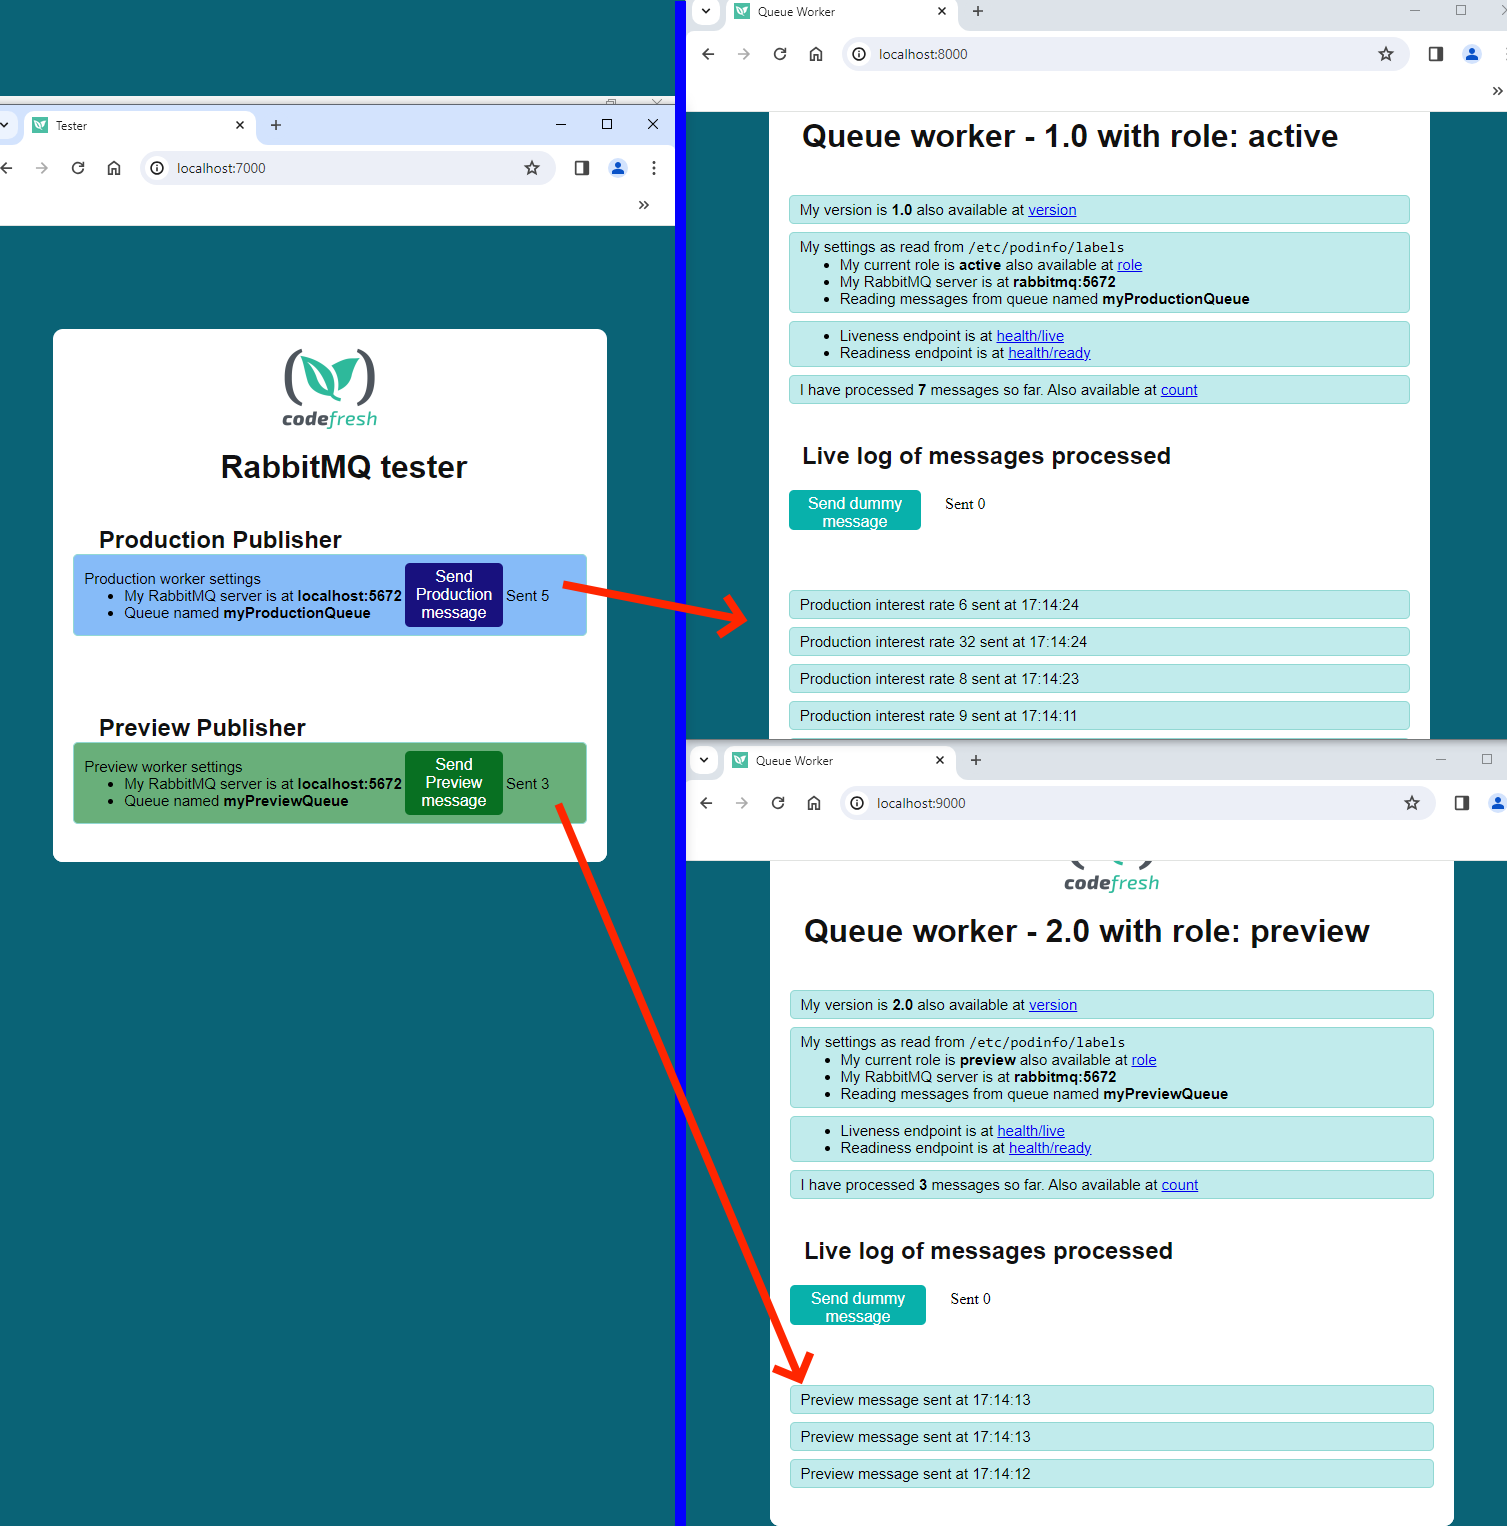
You will see two buttons (one for stable and one for preview apps) for sending messages to the respective queues. If you send multiple messages you can also visit the dashboards of both applications to verify the receiving of each message.
You can also visit the RabbitMQ dashboard at http://localhost:15762 to verify the fact that different queues exist now.
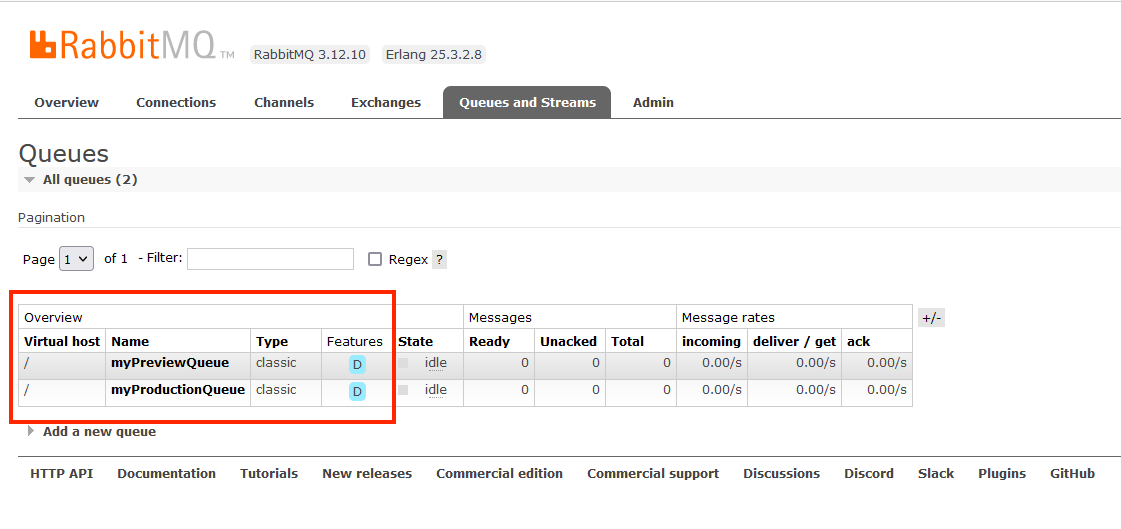
Notice that in this case and for simplicity we use a different queue in the same RabbitMQ instance. There is also the option to use a completely different RabbitMQ server for the preview application. The example source code accounts for this scenario as well if you look at the application’s settings.
Promoting a release with Argo Rollouts
Our rollout is now in an intermediate state where both old and new versions are up. This is also the time that you can run QA tests against the new version, or look at the metrics or manually do verifications and so on. But we are not finished yet. The final goal is to promote the new version to be the stable one.
After we promote we need the following to happen in a single step.
- The previous version should disappear completely
- The new version should understand that it is now “active”
- It should automatically switch on picking workloads from the production queue
Let’s see this in practice. Promote the rollout with
kubectl-argo-rollouts promote my-worker
And then visit in your browser http://localhost:8000. You should see the following:
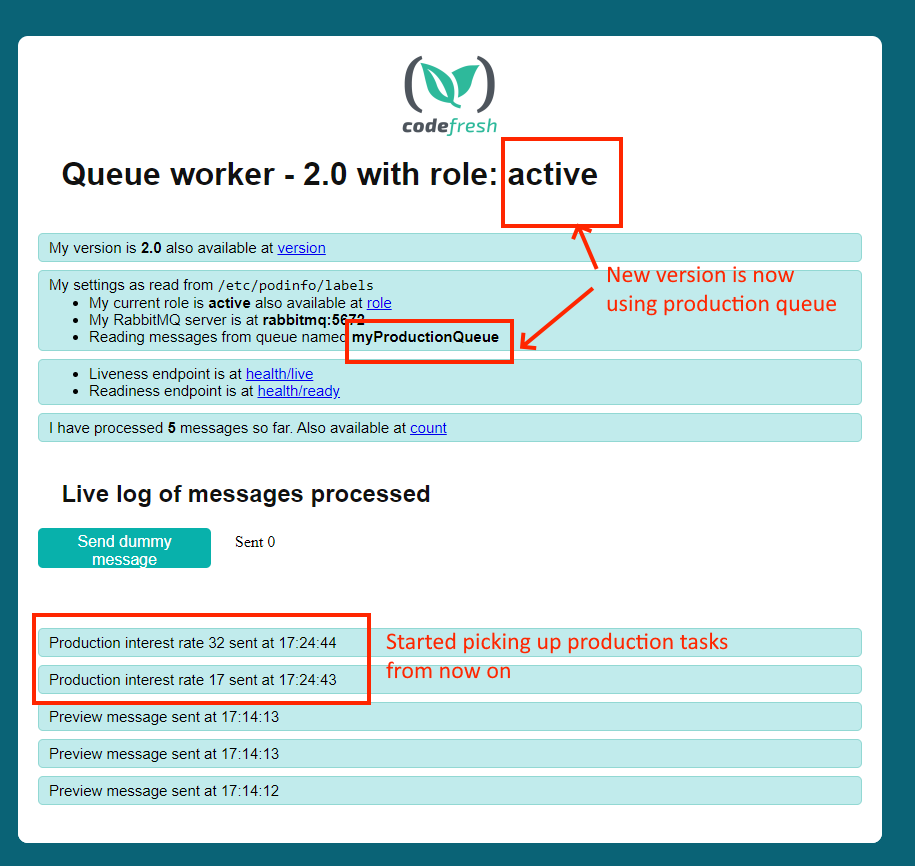
Success! Our active version is the new one and as you can see it is picking the production queue as well.
So where is the magic here? The tricky part is that our application is set to automatically reload its configuration when it changes. The example application is written in Go and this feature is already present in the viper conf library
	//Reload configuration when file changes
    viper.OnConfigChange(func(e fsnotify.Event) {
   	 fmt.Println("Config file changed:", e.Name)
   	 interestApp.stopNow()
   	 interestApp.reloadSettings()

    }).
Therefore when we promoted our application, Argo Rollouts changed the labels that describe which queue to use in the Rollout resource, the changes we mounted again as a file by the Kubernetes downward API in the configuration file, and our application code automatically “discovered” that it should now use the production queue. Isn’t this great? 🙂
Level up your applications with intelligent Rollouts
The combination of the downward API + ephemeral labels + automatic reloading is a very powerful one. Even though we used it here for just a basic queue, the possibilities are endless when it comes to your application.
Other possible use cases might be:
- Coordinating multiple Rollouts as shown in the next article of the series
- Sending custom notifications/events when an application changes roles
- Running self-checks or other smoke tests
- Reading common queues with different weights
- Starting another rollout or deployment in sequence
Of course, the most critical requirement is to have access to the source code of the application and make sure that the configuration framework it uses is set to automatically reload its settings when a change is made.
Happy deploying!
Photo by Maxim Melnikov on Unsplash