
In the previous article of the series, we explained how to use the Kubernetes Downward API in order to use Progressive Delivery with queue worker applications (and not just HTTP services). In this post, we will also cover another popular question: how to use Argo Rollouts with multiple services.
Argo Rollouts is a Kubernetes controller that allows you to perform advanced deployment methods in a Kubernetes cluster. By default, it only supports a single service/application. A Lot of people, however would like to orchestrate progressive delivery workflows between multiple applications.
We will examine two use cases in detail
- The ideal scenario where each microservice is backwards and forwards compatible with each other
- The legacy scenario is when all microservices need to be deployed at the same time with the same version while still getting all the benefits from progressive delivery
We name the second scenario as “legacy” because it is only applicable to existing/old applications. If you are developing a brand new application that has multiple microservices that all must be deployed at once, then that is a distributed monolith and you should rethink your architecture. We understand, however that moving existing applications to Kubernetes will force you to deal with scenarios where microservices are tightly coupled.
The example application – backend and frontend
Let’s see a practical example. An application with a backend and frontend. Even though it has only 2 parts, the same principles will apply to applications with N parts (but of course, with extra complexity)
All resources are at https://github.com/kostis-codefresh/multi-service-argo-rollouts-example . You can see there
- Source code of front-end
- Source code of back-end
- Initial Kubernetes manifests
- Codefresh pipeline for building the container images and pushing them
To deploy the application on your own manually first clone the Git repository and then use
cd manifests/plain
kubectl create ns plain
kubectl apply -f . -n plain
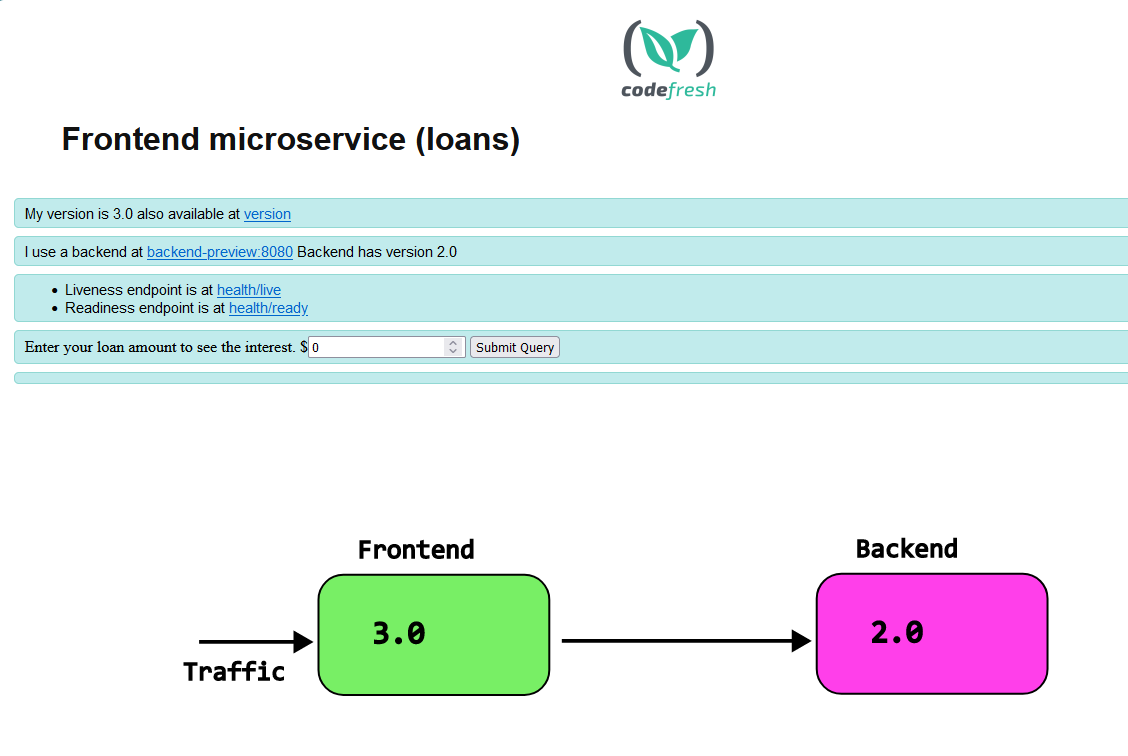
The main attraction of the application is that both the front-end and the backend tell their versions. The front-end specifically queries the back-end as well for its version
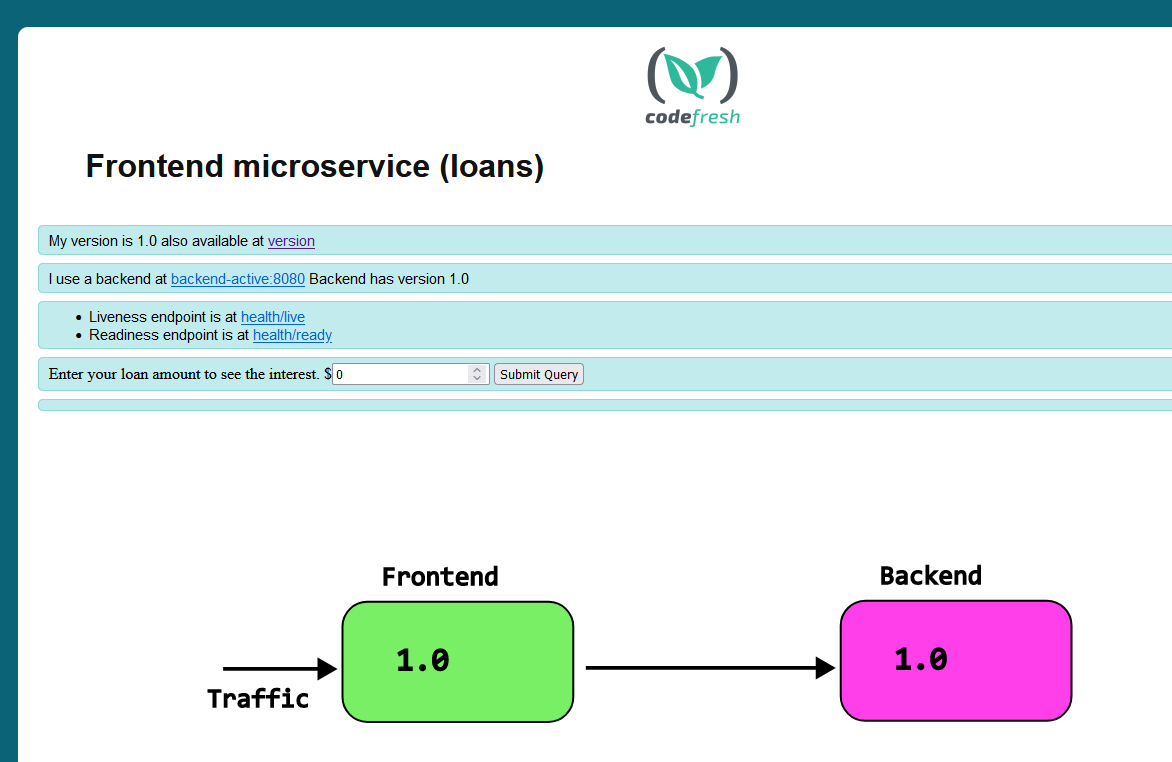
Both services use ClusterIP for networking. In order to view the Web UI you need to expose it
kubectl port-forward svc/my-plain-backend-service 8000:8080 -n plain
kubectl port-forward svc/my-plain-frontend-service 9000:8080 -n plain
And then visit localhost:8000 for the backend and localhost:9000 for the front-end
Best case scenario – modern application
As explained in the introduction, ideally, all your microservices should be capable of running different versions at the same time. This makes progressive delivery super simple as you can convert your deployments to Rollouts and orchestrate the whole process using your CI system.
Let’s say that you have a new change for both microservices and you know in advance that the frontend can work with both versions (old and new) of the backend. For simplicity reasons, we will use the Blue-Green strategy of Argo Rollouts but the same principles apply to Canary deployments.
Let’s see the baseline first. You convert the deployments to Rollouts and then perform the following pattern with your CI system:
- You deploy the backend first. A new version of backend is launched
- You can perform smoke tests or manual tests at your leisure to the new backend
- Once you are happy you promote the backend. Now the front-end only sees the new version of the backend
- You now deploy the front-end. A new version of the front-end is created (live users still see the old one)
- You can perform smoke tests or manual tests at your leisure to the new front-end
- Once you are happy you promote the front-end as well
Here is a graphical representation of the whole process
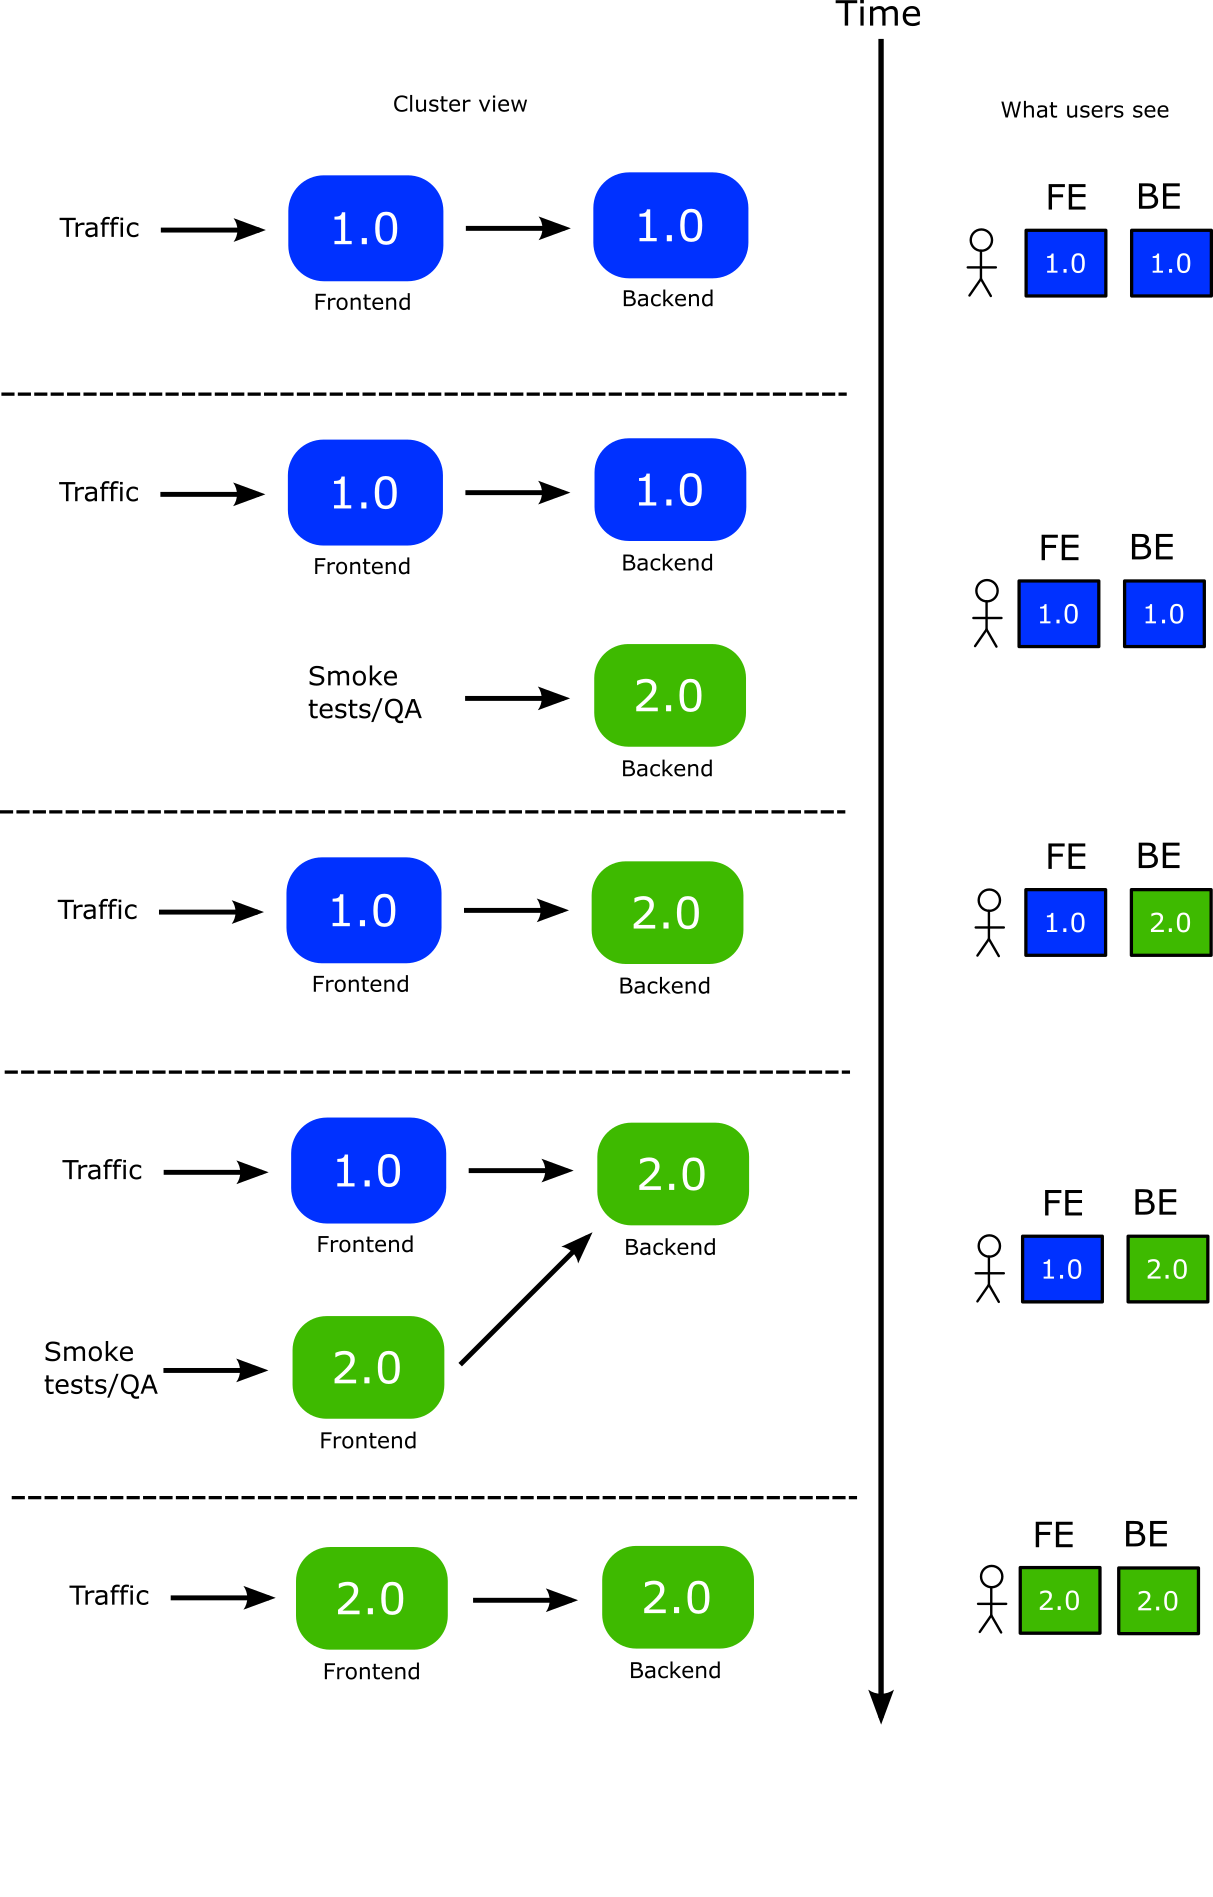
The crucial point of course, is the time period where you have promoted the backend and live traffic goes to old front-end and new backend
Notice that with this scenario, you have a lot of flexibility on where to perform rollbacks if something goes wrong. Essentially you can rollback individually the backend or front-end without affecting any existing users.
Best case scenario – frontend first
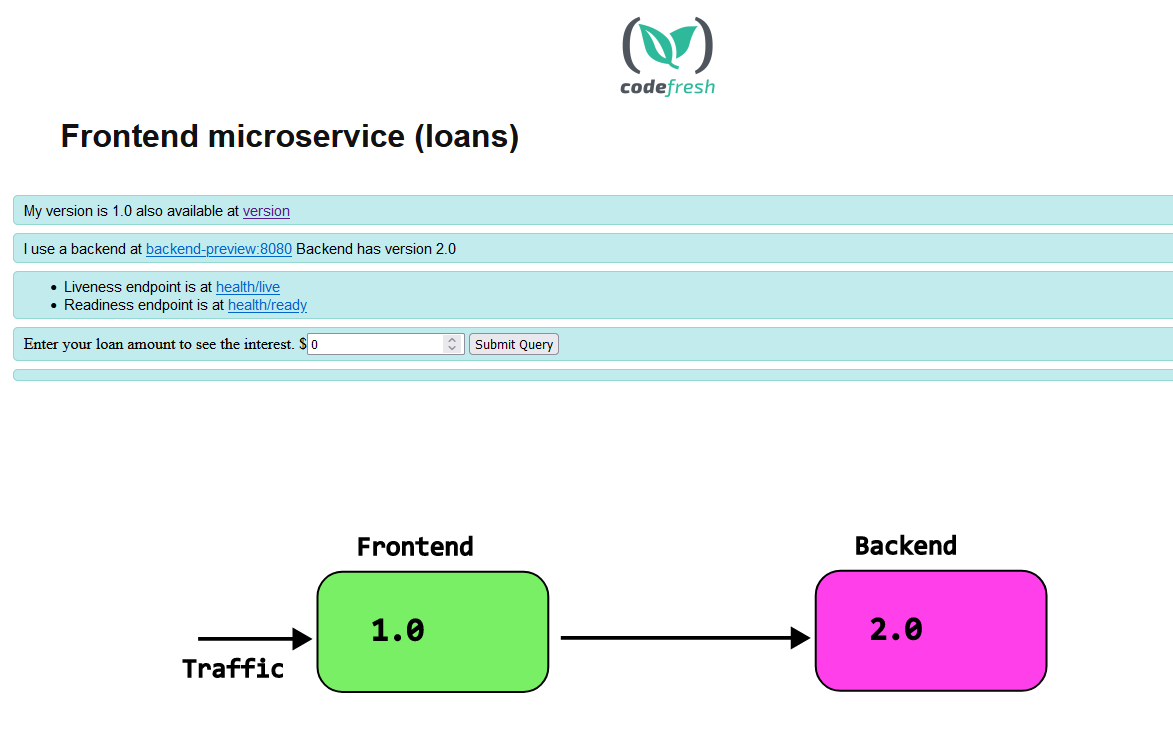
Sometimes, you might want to update the front-end first. Again, this is only possible if you already know that the new front-end version can still work with the old backend. The process is similar
You convert the deployments to Rollouts and then perform the following pattern with your CI system
- You deploy the frontend first. A new version of front-end is launched
- You can perform smoke tests or manual tests at your leisure to the new front-end
- Once you are happy you promote the frontend. Now the old backend works with the new version of the front-end
- You now deploy the back-end. A new version of the back-end is created (live users still see the old one)
- You can perform smoke tests or manual tests at your leisure to the new back-end
- Once you are happy you promote the backend as well
Here is a graphical representation of the whole process
The crucial point of course, is the time period where you have promoted the frontend and live traffic still sees the old backend.
So, things are really simple if your application is modern. Let’s see the legacy scenario.
Legacy scenario – same version at all times
This is the most problematic scenario and the reason you are probably reading this article. Let’s say that for the example application we want to avoid the case where the version between front-end and back-end are different. The technical requirement is that they should always be in the same version even under scenarios that involve Progressive delivery.
- In the case of blue/green this means that a “blue” frontend should always talk with a “blue” backend and a “green” frontend should always talk with a “green” backend.
- In the case of canaries it means that at all time periods, the canaries must be communicating with the respective versions. If 10% of traffic goes to the new front-end version, then it should also pass from the 10% canary that is already started in the backend. The rest of traffic (90%) should always talk with the stable version of the backend (also 90% of traffic).
So, can we achieve this scenario?
We can, but you still need to make 3 essential changes in your legacy app.
- The URL that the frontend uses to find the backend should be configurable and not hard-coded. It should be loaded from a settings file
- The application should monitor this setting file for changes, and reload it if it has changed
- The setting of the URL should be configured via Argo Rollouts Ephemeral labels.
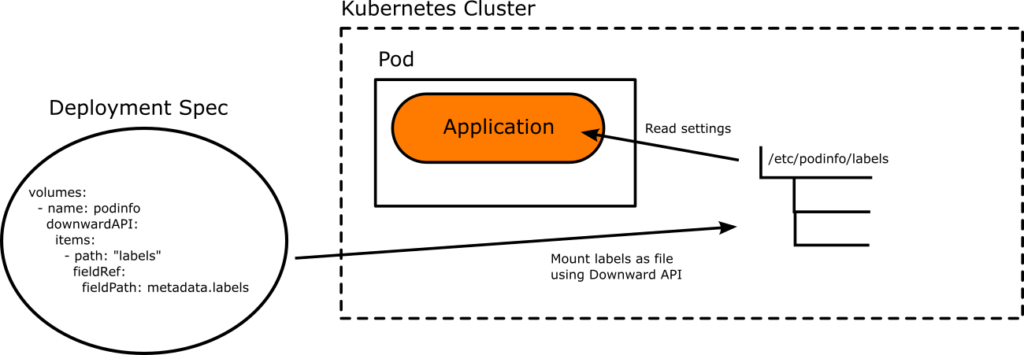
If you are not familiar with the Kubernetes Downard api and how it works with Argo Rollouts, see the previous article that explains how they work in detail. In summary, you can use the Kubernetes Downard API to mount a file in your application with settings that are passed from Argo Rollouts depending on the state of the application (preview or stable).
For two of these changes, you will need to coordinate with the developers of the application. Our example microservice is already written like this. The URL of the backend is configurable and also shown in the UI of the frontend as well
viper.SetDefault("backendHost", "localhost")
We have also placed a different value depending on the current state of the application (it is the stable or preview instance).
   activeMetadata:
    	labels:
      	  backendHost: backend-active
      	  backendPort: "8080"
      	  role: active
  	previewMetadata:
    	  labels:
      	    backendHost: backend-preview
      	    backendPort: "8080"
      	    role: preview
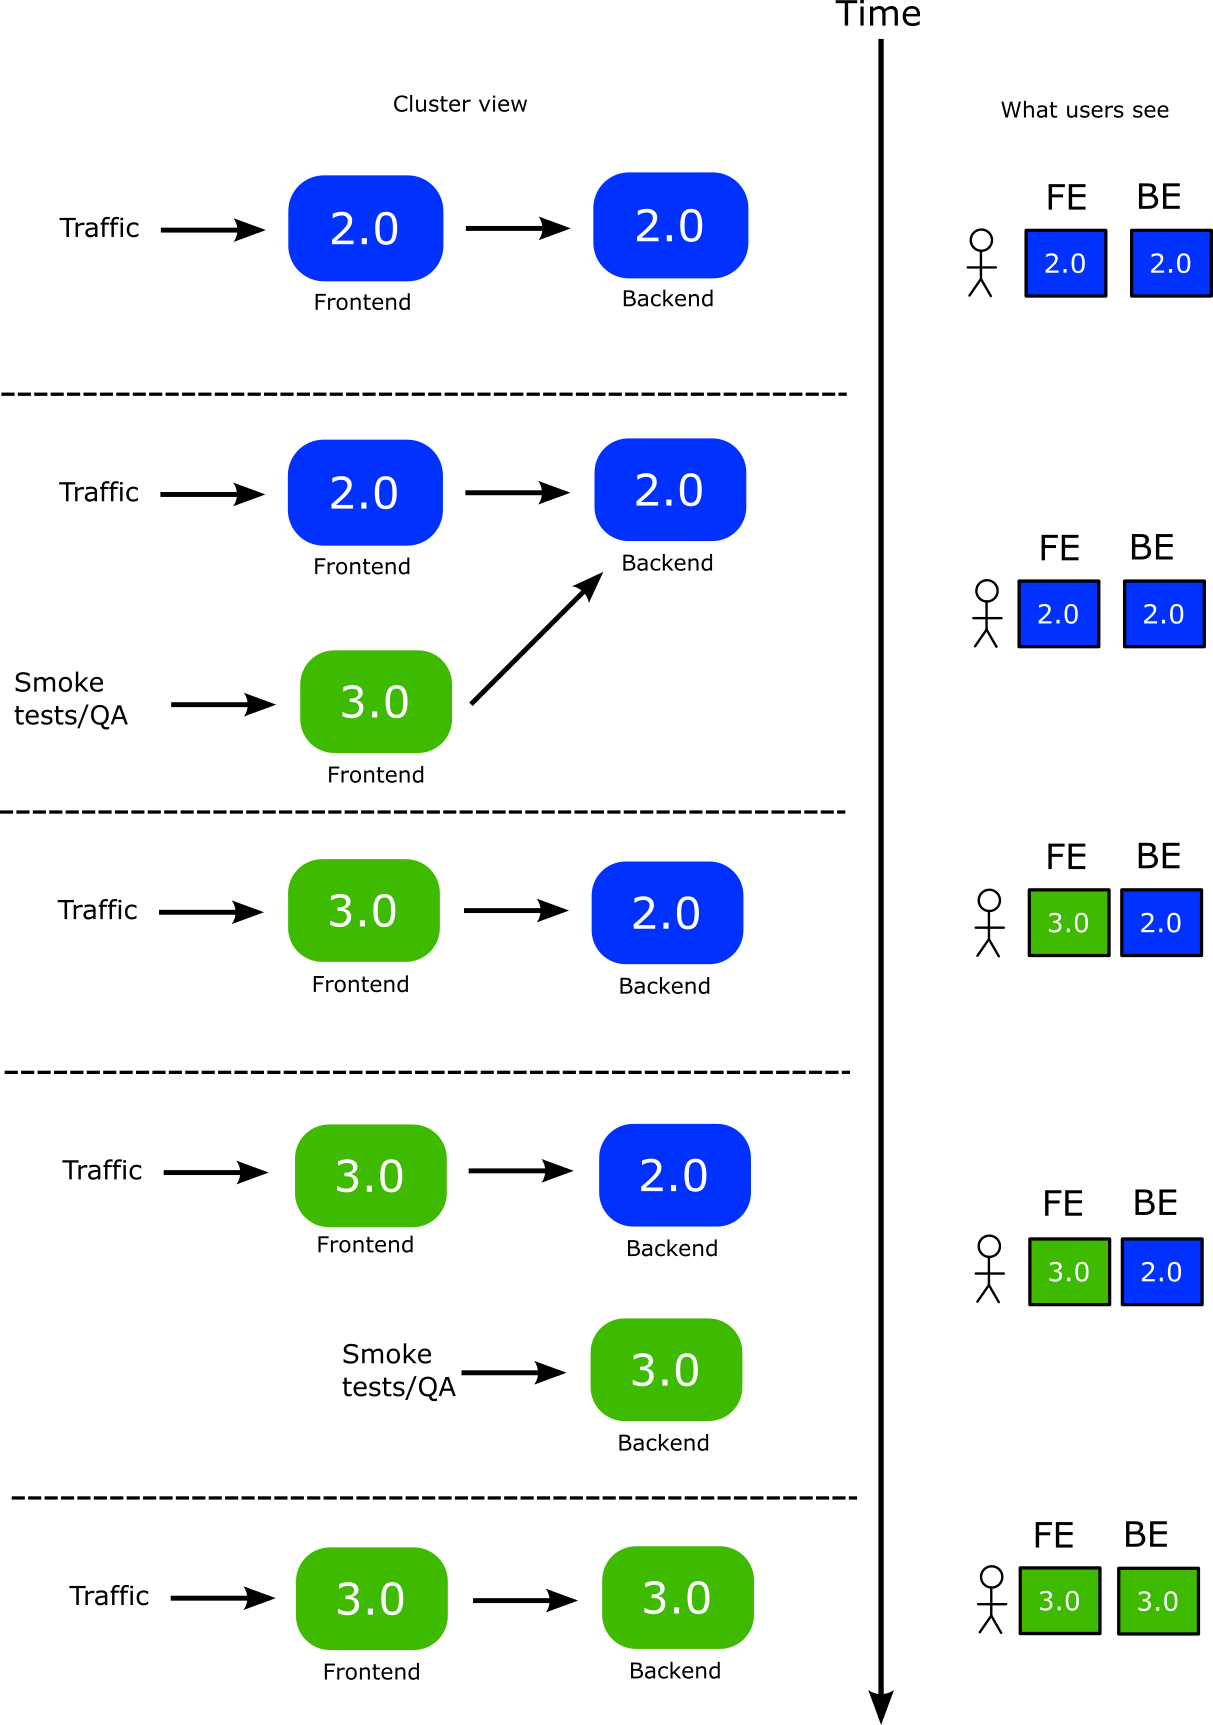
Now we are ready to perform the Blue green deployment with the following process.
- You deploy the backend first. A new version of backend is launched
- You can perform smoke tests or manual tests at your leisure to the new backend
- While the backend is still unpromoted, you also deploy a new version of the frontend. Argo Rollouts applies the “preview” label to the new version. This setting is loaded by the application. So now the new version of the frontend points to the new version of the backend.
- Now live users are still in older versions of both services. The new front-end you launched only talks with the new backend as well.
- You can perform smoke tests or manual tests at your leisure to the new frontend PLUS the new backend.
- Once you are happy you change the traffic flow to use the new frontend. Now users instantly get access to both the new backend and frontend at the same time.
- You then promote the new backend. This has no impact on users at all. It simply makes the old backend to disappear.
- You finally promote the front-end
He is a graphical representation of the whole process
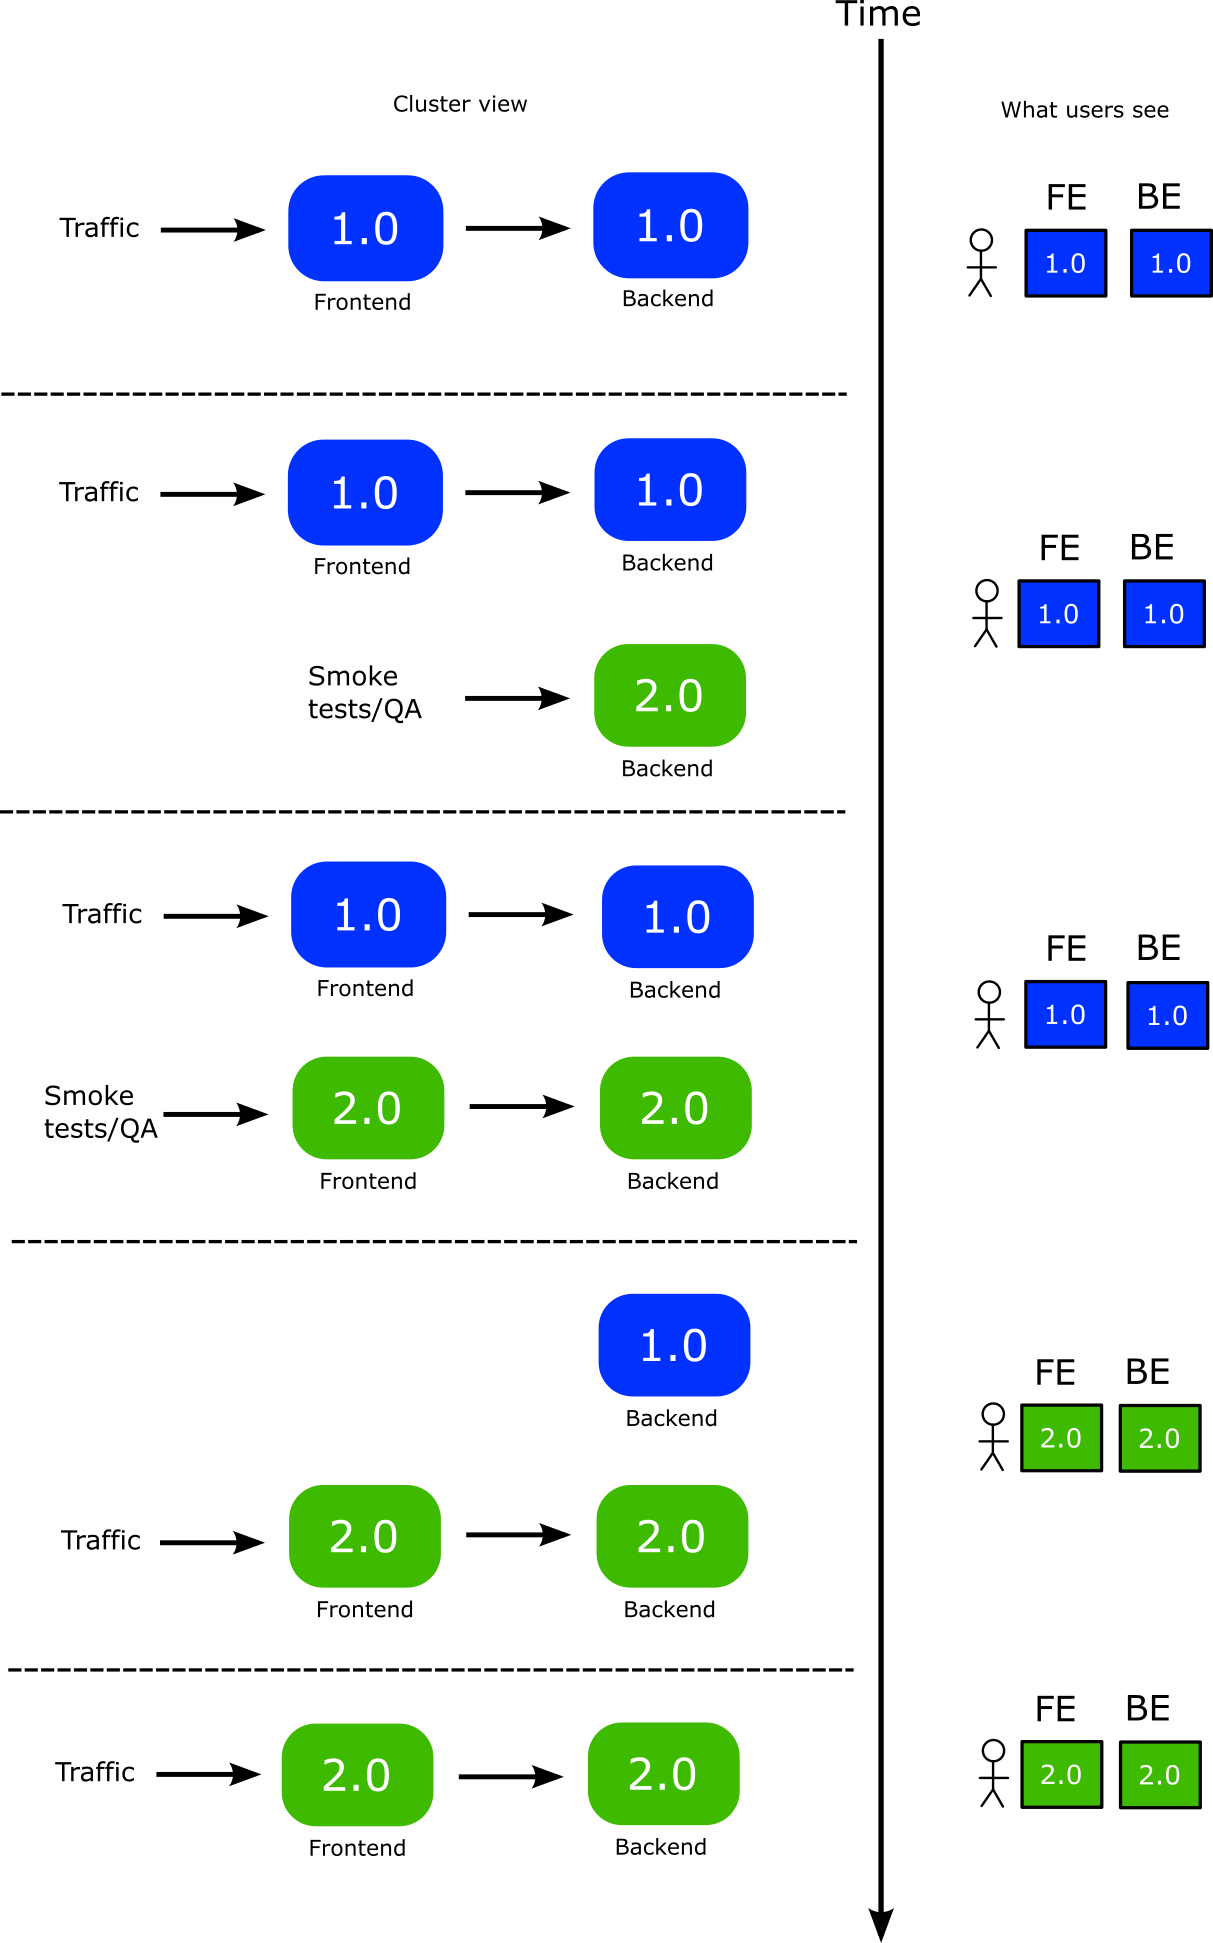
Notice the complexity of this process
- You need to manually keep track of dependencies and deploy/promote in the correct order.
- You have less choices for rollbacks. As far as live users are concerned, you can only rollback/promote both versions at once which might be disruptive for open sessions.
- The complexity sky-rockets with a large number of microservices as you need to find the dependency graph between them and create a promotion order where the service that is not used by anybody is deployed first while the service that is using everything else is promoted first
Despite all these limitations, the initial requirement is satisfied. During the rollouts, active users see the same versions in both services, while your internal QA team has access to the new versions of both services.
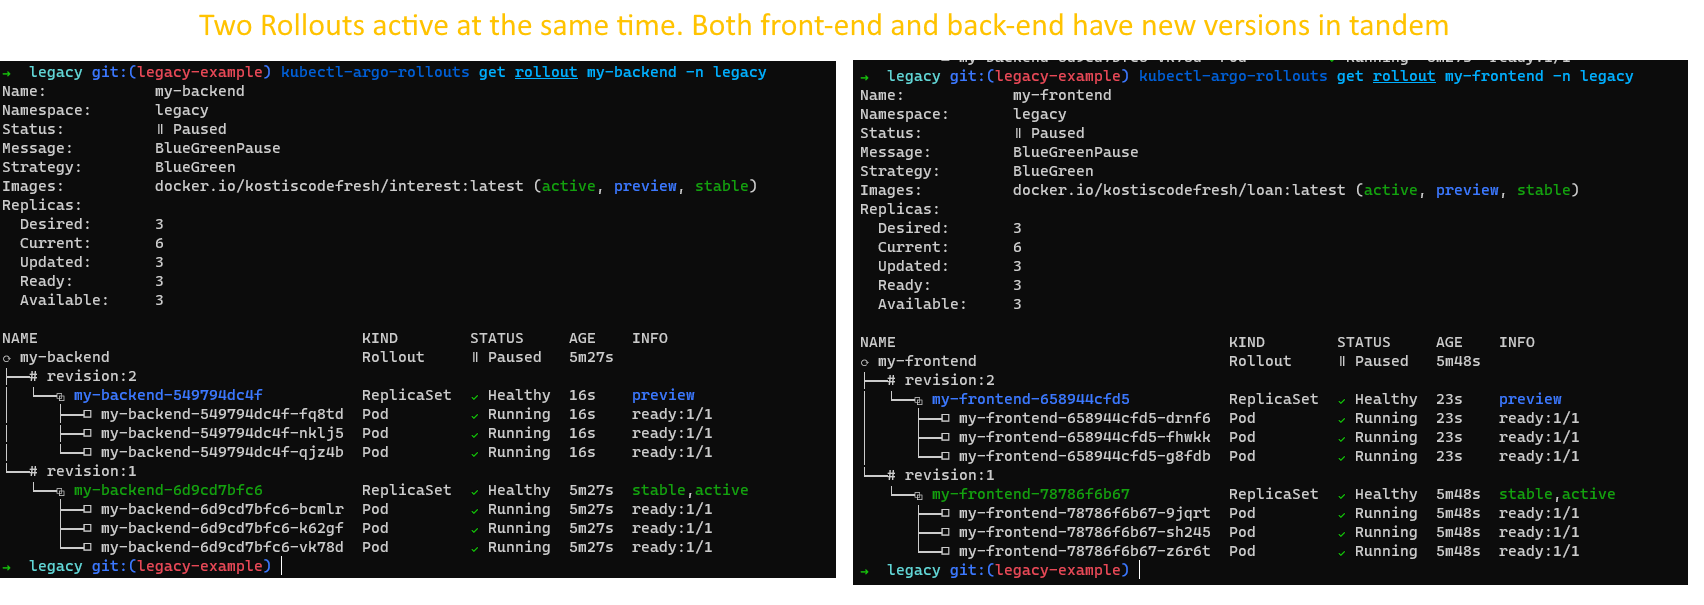
You can inspect both Rollouts at any time with
kubectl-argo-rollouts get rollout my-frontend -n legacy
kubectl-argo-rollouts get rollout my-backend -n legacy
To see what users see versus what is running in the cluster use
kubectl port-forward svc/frontend-active 9000:8080 -n legacy
kubectl port-forward svc/frontend-preview 9050:8080 -n legacy
And then, visit in your browser localhost:9000 for the live application and localhost:9050 for the next deployment.
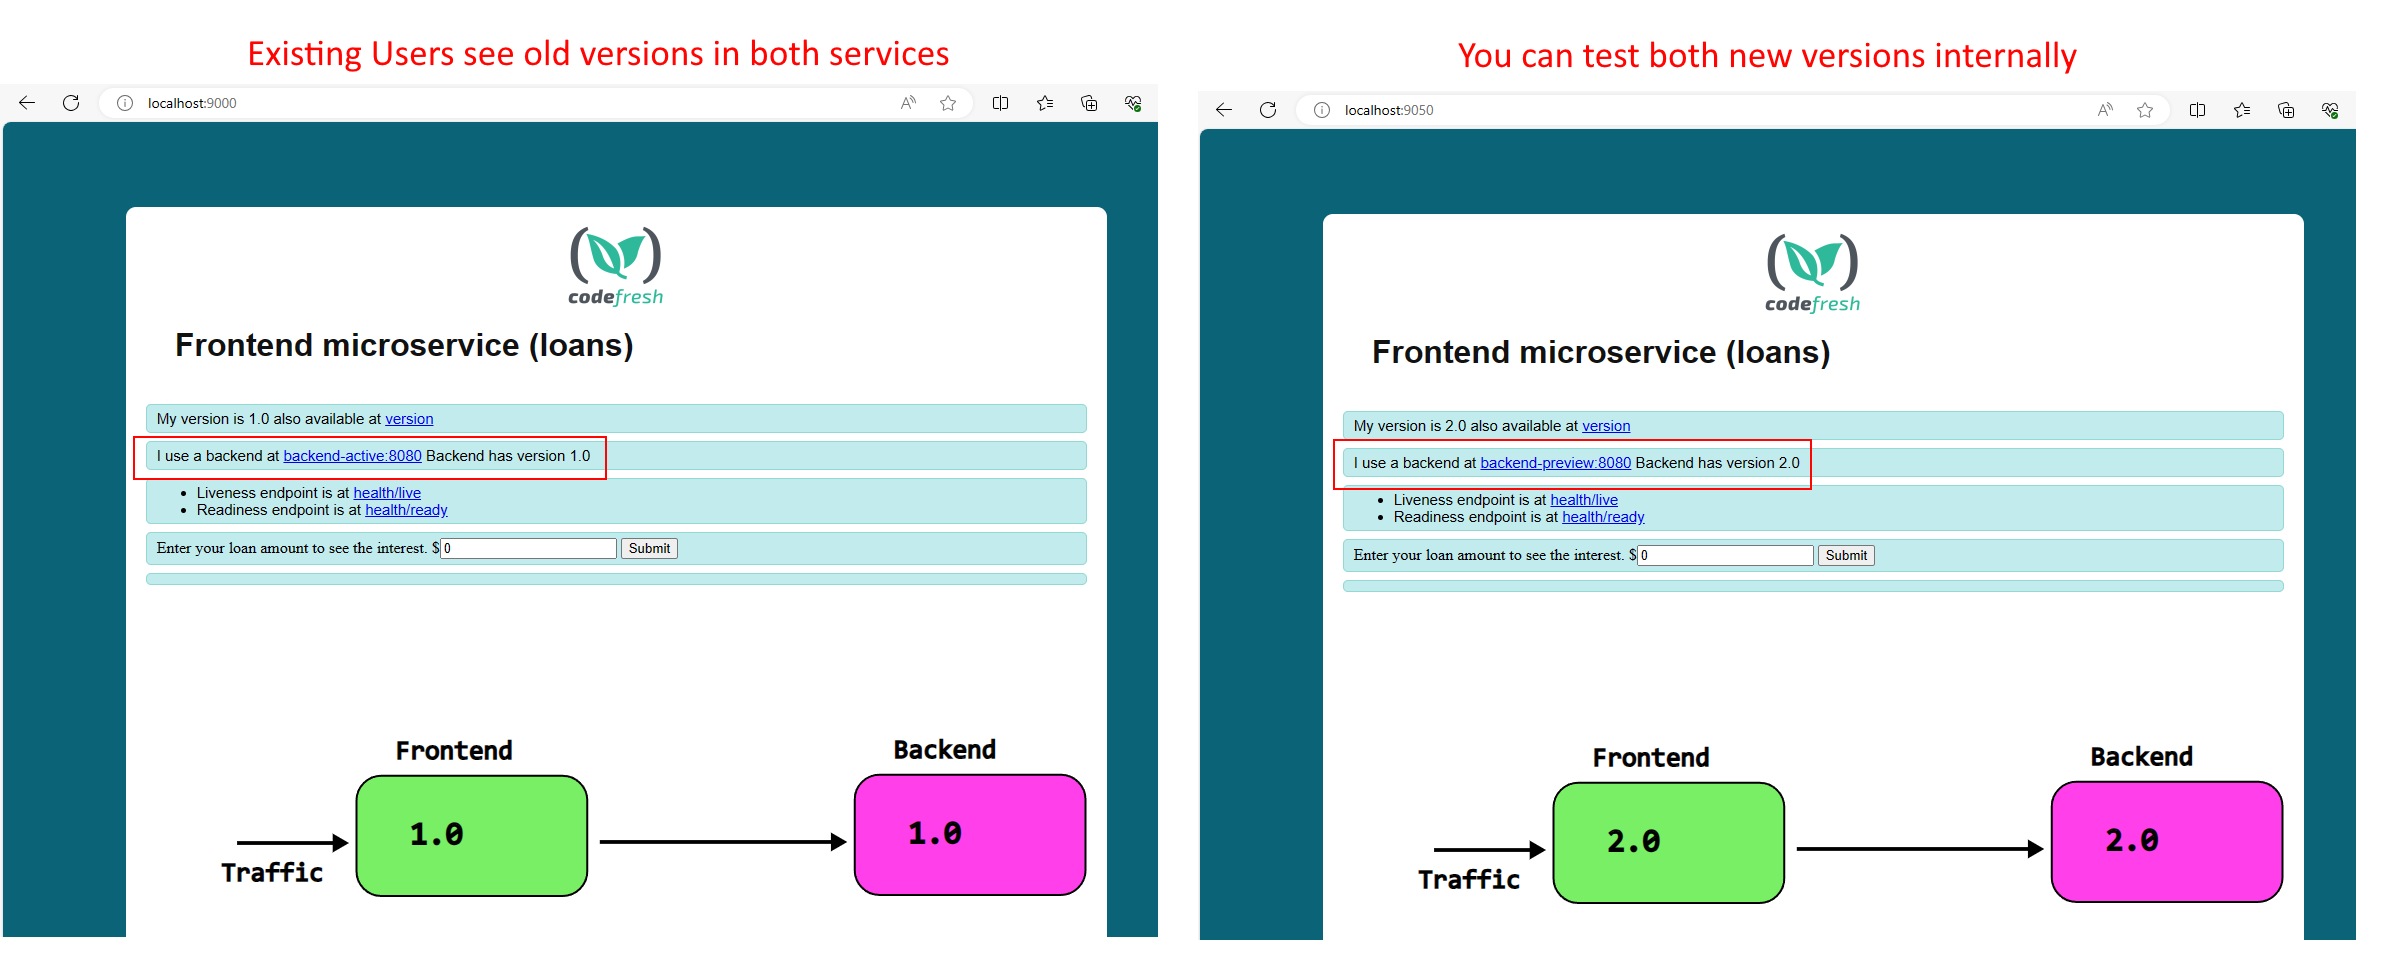
At the critical point we have 2 active Rollouts at the same time:
Here is an example of a Codefresh pipeline that does the promotion.
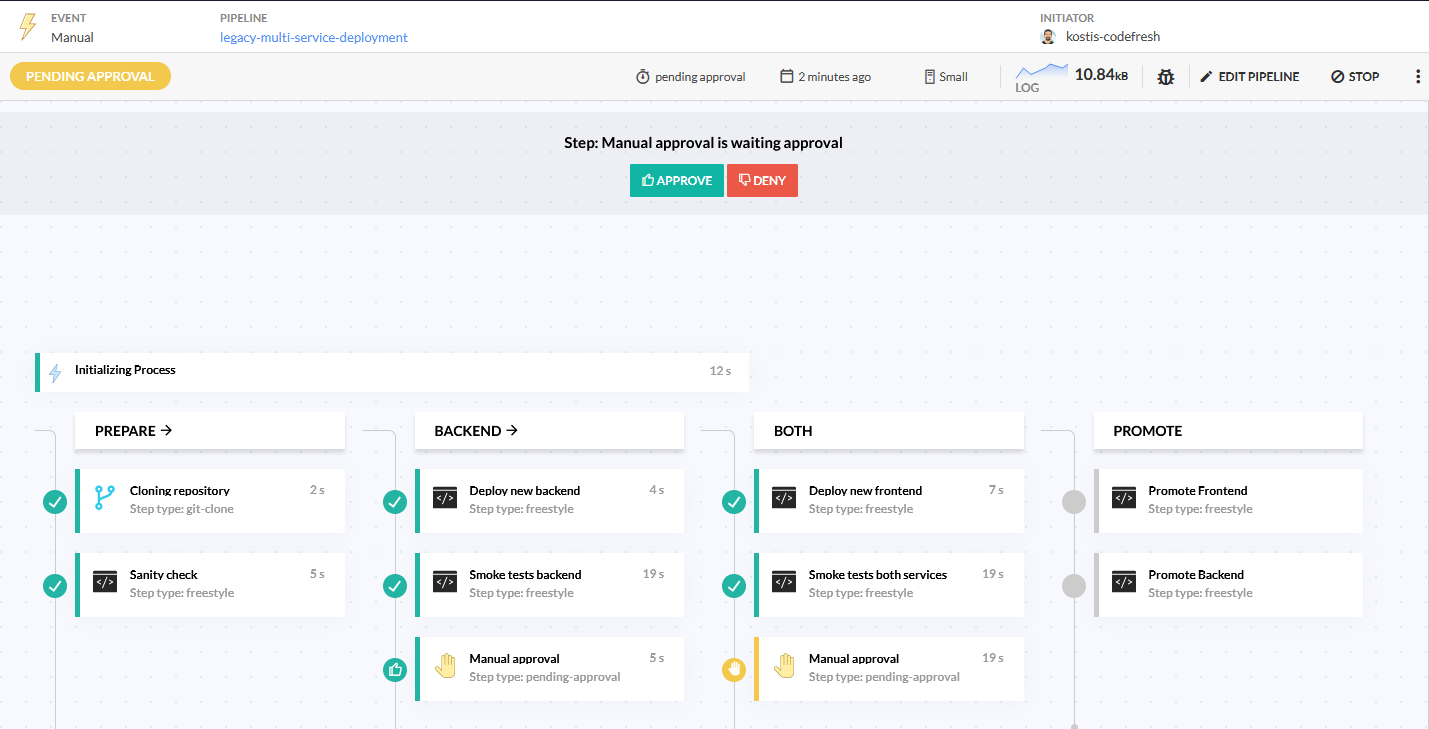
We have placed approval steps in the crucial points where you might want to stop the process because your manual or automated tests have failed.
Conclusion
From the previous example, it should now be clear why the legacy method is complex. Even with just 2 services there is a lot of complexity. With many more services you need to manually decide the dependencies of them and how they interact, and organize the deployment/promotion graph in the correct way as well as make sure that each application uses the correct URLs for the resources it needs. The process becomes even more complex if your application also needs different versions of stateful services such as queues or databases/caches.
If on the other hand, your application falls under the modern scenario, the complexity is kept at a minimum as you can just promote a single service one by one.
Therefore we see the legacy pattern as a temporary solution until developers of the application can decouple all the microservices and make them independent. The whole point of using microservices in the first place is to be able to deploy any of them at any time.
See also our guide for Kubernetes deployment anti-patterns.
If you are not using Codefresh yet, get started today by creating an account, and we would love to hear from you!
Photo by Marcin Jozwiak on Unsplash