So, as I was further educating myself on the different orchestration solutions available (Kubernetes, Mesos, Swarm) I realized it would be useful to share my experience and simplify (as much as it can be simplified) the path for whomever wants to kick the tires and learn. Here’s a good head start for working with Kubernetes AKA K8s.
Prerequisite , You should already by familiar with the concept of containers/docker, if you’re new to docker checkout our container academy for an intro to Docker.
So why snowboarding?
If you’ve tried snowboarding you probably remember the first few days on the slopes. Unlike skiing, where beginners can usually avoid falling too often, snowboarders are more likely to plant their faces directly into snow at least a few dozens times their first day. But this quite changes fast if you keep snowboarding for at least one or two more days. Once you get a few face plants under your belt snowboarding becomes much easier, faster to learn and above all fun! My experience with Kubernetes was very similar. The first few days, I was puzzled I wasn’t quite sure I understood all the different components, how to use them, and even more why I need them. Then, as I started to play around I ended up not only understanding the moving parts but also realizing just why Kubernetes is so powerful.
My intention in this blog is to make the very first few days with Kubernetes as easy as possible. Once you get the basics you can easily start benefiting from a platform that allows you to deploy microservices smoothly, scale your application, and rollout changes on the fly….
What we will cover in this blog?
- The 3 basic entities you must know to run a simple micro-services application on kubernetes.
- Then, we will setup a local Kubernetes cluster that you can easily work with on your own Mac (most of these instructions will transfer to Linux or Windows).
- Lastly, we will run a simple app called Demochat built with two microservices: a Node.js webserver and MongoDB.
By the end of this blog, you will know how to run and scale an application that is composed of two services on Kubernetes.
Entities you must know
Pods
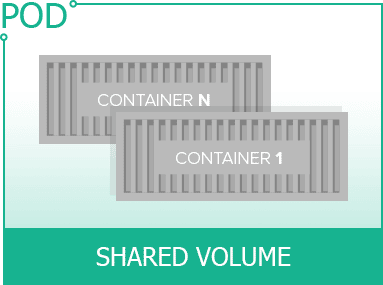
A pod is the smallest deployable entity in Kubernetes and it is important to understand the main principles around pods
- Containers always run inside a Pod.
- A pod usually has 1 container but can have more.
- Containers in the same pod are guaranteed to be located on the same machine and share resources
Why you might want to run more than one container in a pod
If you have containers that are tightly coupled and share a lot of I/O then you may want them on the same machine and allow them to share resources.
Deployment
Here is when the fun begin, while you can obviously run Pods manually, monitor them, stop them etc… you don’t really want to do that. Deployment is a key object in Kubernetes that simplifies these operations for you. The simple way to think of Deployment is as an entity that manages Pods, either a single Pod or a replica set (set of instances of the same Pod configuration).
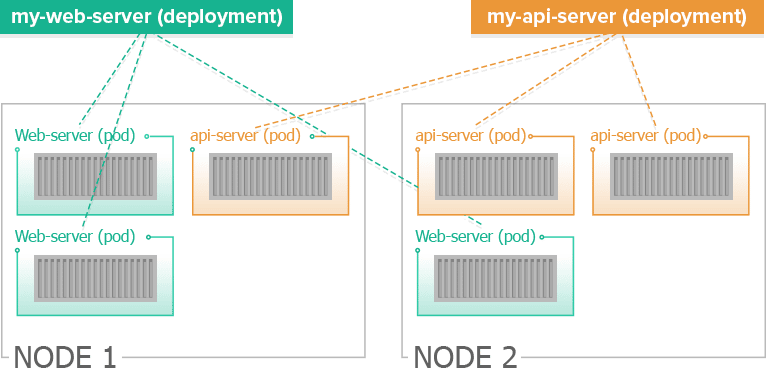
It is also key to understand the relationship between Pods and Deployments. Say for example, your application has two microservices: a web server and an api server. You will need to define a Pod and Deployment for each microservice. In the Pod you will define which image to run and in the Deployment you will define how many instances of this Pod you will want to have at any given point (for scalability, load balancing, etc…).
The Deployment object will then
- Create the pod (or multiple instance of it) for your microservice
- Monitor these pods to make sure they are up and and healthy. If one fails, the Deployment object will create a new pod to take it’s place.
After the creation of the Deployment object. You can then
- Further scale up or down your pods.
- Rollout new changes to the pods (say you want to run a newer image of your microservice in your pods)
- Rollback changes from pods
In the illustration below you can see two deployment objects. One for each microservice (a web server and an api server). Each deployment object is managing 3 instances of the same pods. The pod instances can span more than one node (for scalability and reliability).
Services
Services allow you to expose your microservices (that run in pods) both internally and externally between the other running pods.
The service object exposes a consistent IP and port for the microservice. Any call to that IP will be rouited to one of the microservice’s running Pods.
The benefit of services is that while each and every pod is assigned an IP, Pods can be shut down (due to failure or rollout of new changes) and the pod’s ip will no longer be available. Meanwhile the service IP and port will not change and always accessible to the other pods in your cluster.
By default, the DNS service of Kubernetes exposes the service name to all pods so they can refer to it simply by its name. We will see this in action in the Demochat application.
Setup Kubernetes locally
We will use minikube to work with kubernetes cluster locally.
Disclaimer: These guidelines have been tested on OS X. If you are following these on Windows it might be slightly different
Installation
There are the 3 component you need to have installed.
- Download & Install the latest Docker Toolbox (this is not the same thing as just installing Docker)
- Install Kubectl (command line tool for kubernetes) by running the following
curl -Lo kubectl https://storage.googleapis.com/kubernetes-release/release/v1.5.2/bin/darwin/amd64/kubectl && chmod +x kubectl && sudo mv kubectl /usr/local/bin/
- Download & install VirtualBox for OS X. Direct link to the binaries here (minikube relies on some of the drivers)
- Install Minikube
curl -Lo minikube https://storage.googleapis.com/minikube/releases/v0.16.0/minikube-darwin-amd64 && chmod +x minikube && sudo mv minikube /usr/local/bin/
you can find the latest installation guide for minikube here
Test your environment
Start minikube (might take a min or two) by running “minikube start”
bash-3.2$ minikube start
Starting local Kubernetes cluster...
Kubectl is now configured to use the cluster.
bash-3.2$
Run “kubectl get nodes” to test that minikube setup successfully
bash-3.2$ kubectl get nodes
NAME       STATUS    AGE
minikube   Ready     6d
To work directly with the Docker deamon on the minikube cluster run
bash-3.2$ eval $(minikube docker-env)
bash-3.2$
Running demochat on our local minikube cluster
The Demochat application requires two services to run
- MongoDB
- Demochat webserver that is implemented in Node and can be found here
First let’s pull the docker image
docker pull containers101/demochat:2.0
and then
docker pull mongo:latest
Now, once we have the images locally let’s run a pod to deploy the MongoDB service. While you can use the kubectl create command to create pods and deployment, in this example we will simply use the kubectl run command which will result in creating a pod and deployment to manage this pod.
bash-3.2$ kubectl run mongo --image=mongo:latest --port=27017
deployment "mongo" created
This will create a pod for our MongoDB, based on mongo:latest using port 27017 and add it to a deployment named “mongo”.
Lets verify we have mongo running the way we want.
bash-3.2$ kubectl get deployments
NAME      DESIRED   CURRENT   UP-TO-DATE   AVAILABLE   AGE
mongo     1         1         1            1           4m
Now lets see the running pods.
bash-3.2$ kubectl get pods
NAME                    READY     STATUS    RESTARTS   AGE
mongo-261340442-44gg1   1/1       Running   0          5m
Even though we have our service, it’s not yet exposed and available to other pods. For that we will use the kubectl expose command which will create a service.
bash-3.2$ kubectl expose deployment mongo
service "mongo" exposed
We can view our running services
bash-3.2$ kubectl get services
NAME         CLUSTER-IP   EXTERNAL-IP   PORT(S)     AGE
kubernetes   10.0.0.1     <none>        443/TCP     7d
mongo        10.0.0.99    <none>        27017/TCP   1m
By default the service is listening on the port specified by our pod (in this case 27017). We could define it differently using the –port flag and then redirect to the pod’s port using –target-port but for now this is good and we will keep it simple 😉
The mongo service we just created is now discoverable for any future pod by either using the alias ‘mongo’ (this happens automatically with the DNS plugin for Kubernetes which is on by default) or by using the environment variable that will be set for any future pod.
In our example the demochat web server microservice will use the alias to connect to the mongo service.
You can see it referenced in our code for the demochat web server microservice
...
33 database:
34  uri: mongodb://mongo:27017/hp_mongo
...
Now let’s run a pod and deployment for the demochat web-server microservice. Here we’ll specify port 5000.
bash-3.2$ kubectl run demochat --image=containers101/demochat:2.0 --port=5000
deployment "demochat" created
We can use kubectl get deployment and kubectl get pods again to see that we both our pods running.
bash-3.2$ kubectl get deployment
NAME       DESIRED   CURRENT   UP-TO-DATE   AVAILABLE   AGE
demochat   1         1         1            1           7s
mongo      1         1         1            1           2h
bash-3.2$ kubectl get pods
NAME                       READY     STATUS    RESTARTS   AGE
demochat-586007959-mj0pp   1/1       Running   0          12s
mongo-261340442-44gg1      1/1       Running   0          2h
Great! now we have our application running. The last step is to expose our web server microservice and try it out. Run kubectl expose --type=NodePort . The new flag tells minikube to assign a port for each node we add and map it back.
Disclaimer: if you run this example on GKE (Google Container Engine) or on any cloud based Kubernetes and you want to expose it to the internet you will use --type=LoadBalancer . However, in our example we are running it locally on our minikube cluster so we use the --type=NodePort
bash-3.2$ kubectl expose deployment demochat --type=NodePort
service "demochat" exposed
Lets see all of our services our up and running
bash-3.2$ kubectl get services
NAME         CLUSTER-IP   EXTERNAL-IP   PORT(S)          AGE
demochat     10.0.0.9     <nodes>       5000:31793/TCP   9s
kubernetes   10.0.0.1     <none>        443/TCP          7d
mongo        10.0.0.99    <none>        27017/TCP        23m
Take note of the port assigned to demochat. In my example it’s been assigned port 31793 but it will be different every time you run it. This port is maps to port 5000 on the pod (as we configured previously).
To access our application through the browser we need to figure out the minikube host IP and add the assigned port. We will use the minikube ip command to retrieve the IP.
bash-3.2$ minikube ip
192.168.99.101
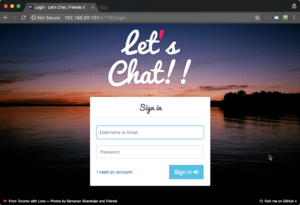
and now we can open a browser and put the IP and port (in the example above it came up as 192.168.99.101:(the port set for your application).
Super! Our application is running!
Lets practice one more thing before shutting it down.
Scaling a microservice
Lets see how we can scale our web server microservice and run replicas. We will run two pods with our demochat web server microservice. To do that we will update the deployment and let it know it needs to keep two pods of this service running. If for some reason one of the pods will fails, the deployment object will automatically add a new one.
bash-3.2$ kubectl scale --replicas=2 deployment/demochat
deployment "demochat" scaled
Now lets run kubectl get pods again
bash-3.2$ kubectl get pods
NAME                       READY     STATUS    RESTARTS   AGE
demochat-586007959-c0hkv   1/1       Running   0          12s
demochat-586007959-mj0pp   1/1       Running   0          2h
mongo-261340442-44gg1      1/1       Running   0          5h
We can see there are 2 pods of demochat running now. From now on, the demochat service we created will load balance the calls between these two pods.
Turning our application down
To shut down the application we can simply use the kubectl delete command
bash-3.2$ kubectl delete services,deployments demochat mongo
service "demochat" deleted
service "mongo" deleted
deployment "demochat" deleted
deployment "mongo" deleted
Now we can see that there are no mongo or demochat services, deployments or pods running. When you start using this in production you’ll use a yaml file to save everything so you can put it up and pull it down. We’ll cover that in another blog post.
bash-3.2$ kubectl get pods
No resources found.
bash-3.2$ kubectl get deployments
No resources found.
bash-3.2$ kubectl get services
NAME         CLUSTER-IP   EXTERNAL-IP   PORT(S)   AGE
kubernetes   10.0.0.1     <none>        443/TCP   7d
Thats it for today, I’ll be writing a few more guides soon. I hope you found it useful. Please feel free to leave comments or questions here and I will try to answer.
Here are some resources to learn more on these entities (keep in mind the Kubernetes documentation is constantly being updated/restructures/moved so these links might need to get updated every now and then)
Additional resources
- More about Deployments
- More about Pods
- More about Services
Whats next?
In the next blog we will cover how to rollout and rollback changes to microservices, manage secrets and more…


