In the previous article of this series, we described two solutions for local Kubernetes development on Windows
Update: the third part of the series for Mac is also available.
In this article, we will focus on Linux. Minikube is still a contender here. Unfortunately, Docker desktop is not available for Linux. Instead we are going to look at MicroK8s, a Linux only solution for a lightweight local Kubernetes cluster.
We are evaluating these solutions and providing a short comparison based on ease of installation, deployment, and management.
Minikube
Minikube runs a single-node Kubernetes cluster inside a VM (e.g. Virtualbox ) in your local development environment. The result is a local Kubernetes endpoint that you can use with the kubectl client. Minikube supports most typical Kubernetes features such as DNS, Dashboards, CNI, NodePorts, Config Maps, etc. . It also supports multiple hypervisors, such as Virtualbox, kvm, etc.
Installation
In order to install Minikube to Linux, you can follow the steps described in the official documentation. In our evaluation we used Ubuntu 18.04 LTS with VirtualBox support using the following commands:
sudo apt install virtualbox virtualbox-ext-pack //vbox requirements
wget https://storage.googleapis.com/minikube/releases/latest/minikube-linux-amd64
chmod +x minikube-linux-amd64
sudo mv minikube-linux-amd64 /usr/local/bin/minikube
After installation of Minikube, the kubectl tool needs to be installed in order to deploy and manage applications on Kubernetes. You can install kubectl by adding a new APT repository using the following command:
curl -s https://packages.cloud.google.com/apt/doc/apt-key.gpg | sudo apt-key add
echo "deb http://apt.kubernetes.io/ kubernetes-xenial main" | sudo tee /etc/apt/sources.list.d/kubernetes.list
sudo apt update
sudo apt install kubectl
Finally, after successful installation, you can start your minikube by issuing the command:
minikube start
Management and Deployment
Managing a Minukube cluster on Linux is exactly the same as managing it on Windows. (See the previous article on Windows for an Nginx deployment example).
Microk8s
Microk8s is a new solution for running a lightweight Kubernetes local cluster. It was developed by the Kubernetes team at Canonical. It is designed to be a fast and lightweight upstream Kubernetes installation isolated from your local environment. This isolation is achieved by packaging all the binaries for Kubernetes, Docker.io, iptables, and CNI in a single snap package (available only in Ubuntu and compatible distributions).
By installing Microk8s using snap, you are able to create a “clean” deploy of the latest upstream Kubernetes on your local machine without any other overhead. The Snap tool is taking care of all needed operations and can upgrade all associated binaries to their latest versions. By default, Microk8s installs and runs the following services:
- Api-server
- Controller-manager
- scheduler
- kubelet
- cni
Additional services such as the Kubernetes dashboard can be easily enabled/disabled using the microk8s.enable and microk8s.disable command. The list of available services are:
- Dns
- Dashboard, including grafana and influxdb
- Storage
- Ingress, Istio
- Registry
- Metrics Server
Installation
Microk8s can be installed as a single snap command, directly from the Snap store.
sudo snap install microk8s --classic
This will install the microk8s command and an api-server, controller-manager, scheduler, etcd, kubelet, cni, kube-proxy, and Docker. To avoid any conflicts with existing installation of Kubernetes, Microk8s adds a microk8s.kubectl command, configured to exclusively access the new Microk8s install. When following any generic Kubernetes instructions online, make sure to prefix kubectl with Microk8s. To verify that installation was successful, you can use the following commands to retrieve available nodes and available services respectively:
microk8s.kubectl get nodes
microk8s.kubectl get services
Management
As mentioned above, Microk8s installs a barebones upstream Kubernetes. This means just the api-server, controller-manager, scheduler, kubelet, cni, and kube-proxy are installed and run. Additional services such as kube-dns and the dashboard can be run using the microk8s.enable command.
microk8s.enable dns dashboard
You can verify that all services are up and running with the following command:
pliakas@zouzou:~$ microk8s.kubectl get all --all-namespaces
NAMESPACE     NAME                                                  READY     STATUS    RESTARTS   AGE
kube-system   pod/heapster-v1.5.2-84f5c8795f-n8dmd                  4/4       Running   8          11h
kube-system   pod/kube-dns-864b8bdc77-8d8lk                         2/3       Running   191        11h
kube-system   pod/kubernetes-dashboard-6948bdb78-z4knb              1/1       Running   97         11h
kube-system   pod/monitoring-influxdb-grafana-v4-7ffdc569b8-g6nrv   2/2       Running   4          11h

NAMESPACE     NAME                           TYPE        CLUSTER-IP       EXTERNAL-IP   PORT(S)             AGE
default       service/kubernetes             ClusterIP   10.152.183.1             443/TCP             12h
kube-system   service/heapster               ClusterIP   10.152.183.58            80/TCP              11h
kube-system   service/kube-dns               ClusterIP   10.152.183.10            53/UDP,53/TCP       11h
kube-system   service/kubernetes-dashboard   ClusterIP   10.152.183.77            443/TCP             11h
kube-system   service/monitoring-grafana     ClusterIP   10.152.183.253           80/TCP              11h
kube-system   service/monitoring-influxdb    ClusterIP   10.152.183.15            8083/TCP,8086/TCP   11h

NAMESPACE     NAME                                             DESIRED   CURRENT   UP-TO-DATE   AVAILABLE   AGE
kube-system   deployment.apps/heapster-v1.5.2                  1         1         1            1           11h
kube-system   deployment.apps/kube-dns                         1         1         1            0           11h
kube-system   deployment.apps/kubernetes-dashboard             1         1         1            1           11h
kube-system   deployment.apps/monitoring-influxdb-grafana-v4   1         1         1            1           11h

NAMESPACE     NAME                                                        DESIRED   CURRENT   READY     AGE
kube-system   replicaset.apps/heapster-v1.5.2-84f5c8795f                  1         1         1         11h
kube-system   replicaset.apps/kube-dns-864b8bdc77                         1         1         0         11h
kube-system   replicaset.apps/kubernetes-dashboard-6948bdb78              1         1         1         11h
kube-system   replicaset.apps/monitoring-influxdb-grafana-v4-7ffdc569b8   1         1         1         11h
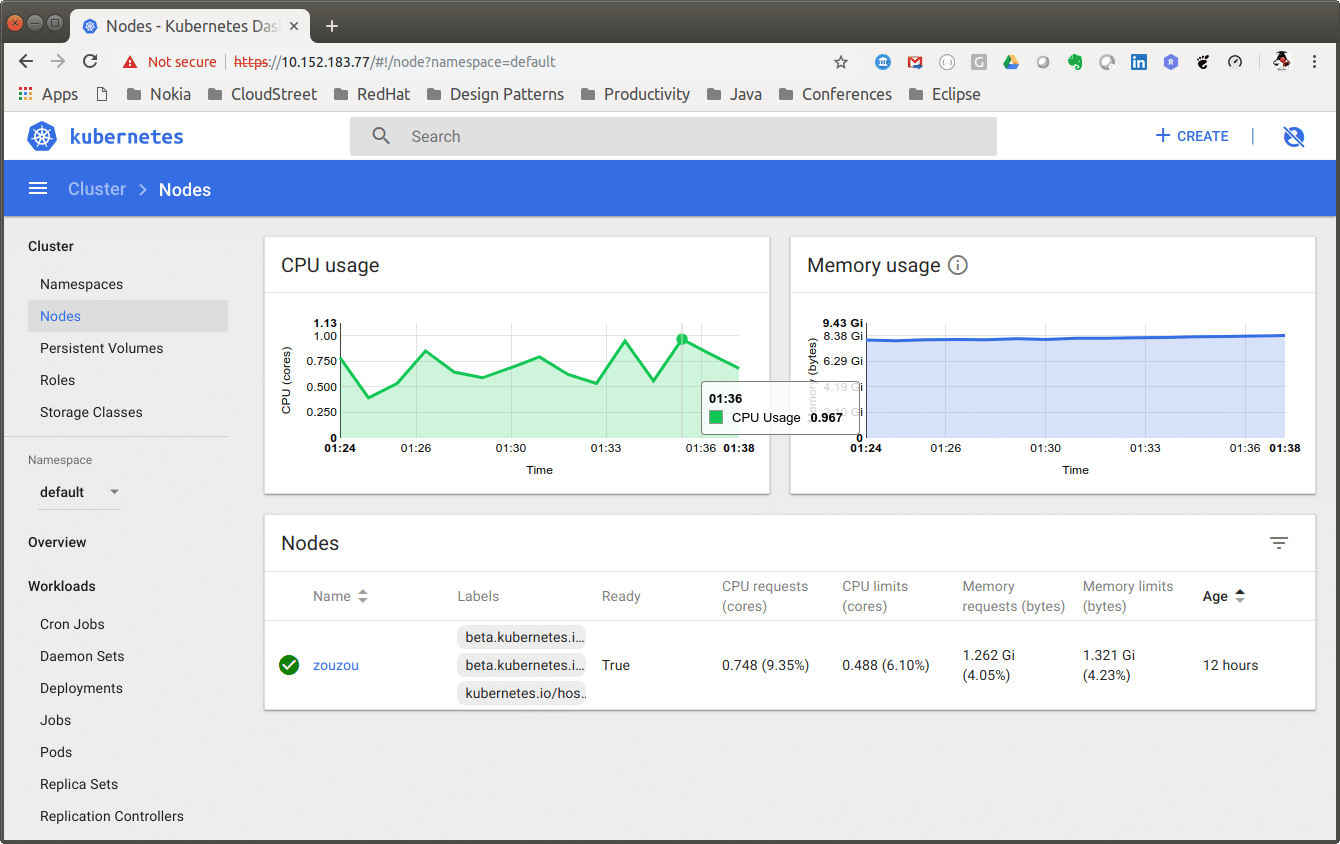
You can access any service by pointing the correct CLUSTER_IP to your browser. For example, you can access the dashboard by using the following web address, https://10.152.183.77. See image below for the dashboard:
At any time, you can pause and restart all Kubernetes services and installed containers without losing any of your configurations by issuing the following command. (Note that this will also disable all commands prefixed with Microk8s.)
snap disable microk8s
Removing Microk8s is very easy. You can do so by first disabling all Kubernetes services and then using the snap command to remove the complete installation and configuration files.
microk8s.disable dashboard dns
sudo snap remove microk8s
Deployment
Deploying a nginx service is what you would expect, with the addition of the Microk8s prefix:
microk8s.kubectl run nginx --image nginx --replicas 3
microk8s.kubectl expose deployment nginx --port 80 --target-port 80 --type ClusterIP --selector=run=nginx --name nginx
You can monitor your deployed services using the command:
pliakas@zouzou:~$ microk8s.kubectl get all
NAME                         READY     STATUS    RESTARTS   AGE
pod/nginx-64f497f8fd-86xlj   1/1       Running   0          2m
pod/nginx-64f497f8fd-976c4   1/1       Running   0          2m
pod/nginx-64f497f8fd-r2tsv   1/1       Running   0          2m

NAME                 TYPE        CLUSTER-IP       EXTERNAL-IP   PORT(S)   AGE
service/kubernetes   ClusterIP   10.152.183.1             443/TCP   13h
service/nginx        ClusterIP   10.152.183.125           80/TCP    1m

NAME                    DESIRED   CURRENT   UP-TO-DATE   AVAILABLE   AGE
deployment.apps/nginx   3         3         3            3           2m

NAME                               DESIRED   CURRENT   READY     AGE
replicaset.apps/nginx-64f497f8fd   3         3         3         2m
Now you are ready to access your deployed web service by pointing the following web url to your preferred web browser: http://10.152.183.125
Conclusions
After looking at all solutions, here are our results…
Minikube is a mature solution available for all major operating systems. Its main advantage is that it provides a unified way of working with a local Kubernetes cluster regardless of operating system. It is perfect for people that are using multiple OS machines and have some basic familiarity with Kubernetes and Docker.
Pros:
- Mature solution
- Works on Windows (any version and edition), Mac and Linux
- Multiple drivers that can match any environment
- Can work with or without an intermediate VM on Linux (vmdriver=none)
- Installs several plugins (such as dashboard) by default
- Very flexible on installation requirements and upgrades
Cons:
- Installation and removal not as streamlined as other solutions
- Can conflict with local installation of other tools (such as Virtualbox)
MicroK8s is a very interesting solution as it runs directly on your machine with no other VM in between.
Pros:
- Very easy to install, upgrade, remove
- Completely isolated from other tools in your machine
- Does not need a VM, all services run locally
Cons:
- Only available for Snap supported Linux Distributions (update: no longer true)
- Relatively new, possible unstable
- Minikube can also run directly on Linux (vm=driver none), so MicroK8s value proposition is diminished
Let us know in the comments which local Kubernetes solution you are using and why.