
The most well-known security flaw in Docker is that it requires root access to build your Docker images with the Docker daemon.
We have all read at least once that you should be careful using root access. This tutorial will take a look at the downsides of using Docker and Docker alternatives to combat those, namely:
What’s the Problem?
To understand why the Docker Daemon is running with root access and how this can become a problem, we first have to understand the Docker architecture (at least on a high level). Container images are specified with the Dockerfile. The Dockerfile details how to build an image based on your application and resources. Using Docker, we can use the build command to build our container image. Once you have the image of your Dockerfile, you can run it. Upon running the image, a container is created.
Below is a simplified diagram of the Docker architecture, taken directly from the official documentation.
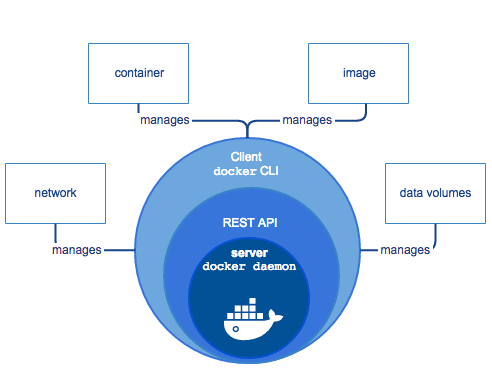
The problem with this is that you cannot use Docker directly on your workstation. Docker is composed of a variety of different tools. In most cases, you will only interact with the Docker CLI. However, running an application with Docker means that you have to run the Docker Daemon with root privileges. It actually binds to a Unix socket instead of a TCP port. By default, users can only access the Unix socket using sudo command, which is owned by the user root.
The Docker Daemon is responsible for the state of your containers and images, and facilitates any interaction with “the outside world.” The Docker CLI is merely used to translate commands into API calls that are sent to the Docker Daemon. This allows you to use a local or remote Docker Daemon.
Running the Docker Daemon locally, you risk that any process that breaks out of the Docker Container will have the same rights as the host operating system. This is why you should only trust your own images that you have written and understand.
The next section will discuss alternatives to Docker. All of the alternatives discussed below can build OCI compatible container images. OCI stands for Open Container Initiative, which is a project by the Linux Foundation with the goal to define open standards for operating system-level virtualization; more specifically, Linux containers. This includes the runtime specification and the image specification of containers. Scott McCarty discusses in detail how different container standards fit together; here are some of the benefits of using container standards:
- Higher flexibility between tools. If you can just replace the Docker Daemon in your Kubernetes cluster without noticing a difference, does it matter which tool you are using?
- Gain a better understanding of containers — what actually happens when you run a container?
- Higher reliability on your infrastructure. The work that you have put into your existing infrastructure does not become obsolete when you decide to switch to different tools.
Alternative: Buildah & Podman
Buildah provides a CLI tool that allows users to build OCI or traditional Docker images. Buildah can be used to create and run images from a Dockerfile and without. In our case, we are going to use Buildah to build the image and Podman to run the image.
Relationship between Buildah & Podman
Buildah and Podman are complementary tools to build and run containers. The main differentiation between the two tools is that Buildah focuses on building OCI container images while Podman specializes in the management of the entire container lifecycle. The commands used in Buildah are quite similar to Docker commands. Buildah replicates the same commands that are found within a Dockerfile to allow users to build images without a Dockerfile.
In comparison, Podman is focused on the entire container lifecycle of OCI images but also supports other container standards. Summarising, it helps you to maintain and modify OCI images, such as pulling and tagging, and allows you to run, and maintain containers created from those images.
The main difference to note between both tools is the concept of a container. Buildah is highly similar to Docker in the way containers are built and managed. Comparing this to Podman, in Podman containers are meant to be long-lived. This difference makes both tools complementary; Buildah can be used to create containers and Podman to manage those.
Furthermore, you cannot commit a Buildah container from within Podman nor vice versa. This is reflected in the way that commands of both tools are used. For instance, the commit command works differently in Buildah and Podman containers.
| Buildah | Podman | |
| Focus | Container Creation | Manage Containers; Entire Container Lifecycle |
| Container Management | Similar to Docker | Containers are meant to be long-lived |
| Commands | Mirroring Docker Commands in functionality | Some commands might be similar but have different functionality |
| Image Standards | Support OCI images | Support OCI images |
Getting started with Buildah and Podman
Buildah has a variety of different installation options (that you can easily get lost in). We run on Ubuntu 20.04 and followed these installation instructions:
. /etc/os-release

sudo sh -c "echo 'deb http://download.opensuse.org/repositories/devel:/kubic:/libcontainers:/stable/xUbuntu_${VERSION_ID}/ /' > /etc/apt/sources.list.d/devel:kubic:libcontainers:stable.list"

wget -nv https://download.opensuse.org/repositories/devel:kubic:libcontainers:stable/xUbuntu_${VERSION_ID}/Release.key -O Release.key

sudo apt-key add - < Release.key

sudo apt-get update -qq

sudo apt-get -qq -y install buildah
Make sure that you replace the Version ID with your Ubuntu version (in case you are on Ubuntu) — in our case, this was 20.04.
To check that the installation was successful, check for Buildah images:
buildah images
Next, we will install Podman:
. /etc/os-release

echo "deb https://download.opensuse.org/repositories/devel:/kubic:/libcontainers:/testing/xUbuntu_${VERSION_ID}/ /" | sudo tee /etc/apt/sources.list.d/devel:kubic:libcontainers:testing.list

curl -L https://download.opensuse.org/repositories/devel:/kubic:/libcontainers:/testing/xUbuntu_${VERSION_ID}/Release.key | sudo apt-key add -

sudo apt-get update -qq

sudo apt-get -qq -y install podman
Once done we can run the following to verify that our installation was successful:
podman --help
Let’s go ahead and build an image with Buildah. For this, we are using the following repository. The repository already has a Dockerfile that we can use. However, you can also create or use your own.
# clone the repository
git clone [email protected]:anais-codefresh/docker-alternatives
# cd into the cloned repository
cd docker-alternatives/buildahandpodman
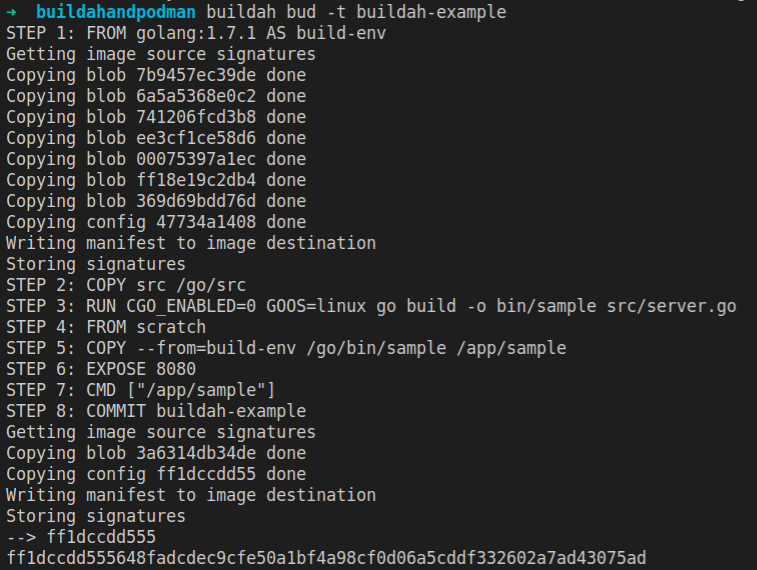
Next, we are going to use Buildah to build the image based on our Dockerfile.
buildah bud -t buildah-example
You should now see the different steps of the Dockerfile executed.
We can see the images built with Buildah by running:
podman images
And run the container using Podman:
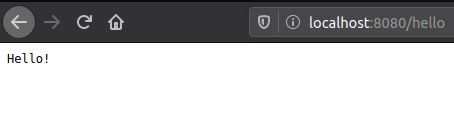
podman run -dt -p 8080:8080/tcp
We can now view our application on localhost:8080. All Podman commands are listed in their documentation.
Alternative: Kaniko
Kaniko was started and is maintained by Google. In short, it is an open source tool that allows users to build images even without granting it root access. These images are built inside a container or a Kubernetes cluster. Unlike the Docker daemon, Kaniko executes all commands inside the userspace.
There are several different ways to deploy and run Kaniko:
To run a container, Kaniko needs three arguments:
- A Dockerfile
- A Build Context: The directory containing a Dockerfile which Kaniko can use to build your image — e.g. COPY in the Dockerfile should refer to a file in the build context
- The name of the registry to which the final image should be pushed
Getting started with Kaniko
We will use Kaniko inside a local Kubernetes Cluster, using MicroK8s. To get started with Kaniko and to follow the next steps, we assume that you have the following set-up:
Either a local Kubernetes Cluster or you are able to access a remote cluster on your machine.
We are going to test Kaniko with an existing Dockerfile. The application we are going to use is a basic Go application. You can either clone the application or use your own app and Dockerfile.
# Clone the repository
git clone [email protected]:anais-codefresh/docker-alternatives
# cd into the kaniko repository
cd docker-alternatives/kaniko
Create a file called volume.yaml that will specify our PersistentVolume. This is used to run Kaniko inside of Kubernetes locally.
touch volume.yaml
Go ahead and paste the following into your file:
apiVersion: v1
kind: PersistentVolume
metadata:
 name: dockerfile
 labels:
   type: local
spec:
 capacity:
   storage: 10Gi
 accessModes:
   - ReadWriteOnce
 storageClassName: local-storage
 hostPath:
   path:  # replace with local directory, such as "/home//kaniko"
You will have to replace the path to your directory (the one where the files are at). The easiest way to do this is to run:
pwd
And copy and paste the file path.
Next, we need a second file that volume is mounted to:
touch volume-claim.yaml
Paste the following content:
kind: PersistentVolumeClaim
apiVersion: v1
metadata:
 name: dockerfile-claim
spec:
 accessModes:
   - ReadWriteOnce
 resources:
   requests:
     storage: 8Gi
 storageClassName: local-storage
Lastly, we need to give Kubernetes the specifications on the pod it is supposed to run.
Add the pod.yaml file:
touch pod.yaml
And paste the following content:
apiVersion: v1
kind: Pod
metadata:
 name: kaniko
spec:
 containers:
 - name: kaniko
   image: gcr.io/kaniko-project/executor:latest
   args: ["--dockerfile=Dockerfile",
           "--context=dir://workspace",
           "--destination=/"] # replace with your dockerhub account
   volumeMounts:
     - name: kaniko-secret
       mountPath: /kaniko/.docker
     - name: dockerfile-storage
       mountPath: /workspace
 restartPolicy: Never
 volumes:
   - name: kaniko-secret
     secret:
       secretName: regcred
       items:
         - key: .dockerconfigjson
           path: config.json
   - name: dockerfile-storage
     persistentVolumeClaim:
       claimName: dockerfile-claim
Modifications that you have to make to the pod.yaml file:
- Please provide your Docker Hub account name and the repository to which you want to push.
"--destination=user-name/repo"
- Make sure that you include the right location to your Dockerfile. In our case, the Dockerfile is in the same repository as the yaml files.
“--dockerfile=Dockerfile”
Now that we have all of this prepared, we need to create the Kubernetes secret to allow Kaniko to push the Docker image to the Docker Hub; note that you can also use another registry.
kubectl create secret docker-registry regcred --docker-server="https://index.docker.io/v1/" --docker-username="your-name" --docker-password="your-pword" --docker-email="your-email"
- <your-registry-server> is: (https://index.docker.io/v1/ for DockerHub)
- <your-name> is your Docker username.
- <your-pword> is your Docker password.
- <your-email> is your Docker email.
In our case, we had to put the values in quotes e.g. “anaisurlichs” for your username.
Next, we are going to create our persistent volume. Note that it is important that you create the secret first before you create the volumes and the pod.
# create persistent volume
$ kubectl create -f volume.yaml
persistentvolume/dockerfile created
# create persistent volume claim
$ kubectl create -f volume-claim.yaml
persistentvolumeclaim/dockerfile-claim created
# check whether the volume mounted correctly
$ kubectl get pv dockerfile
NAME         CAPACITY   ACCESS MODES   RECLAIM POLICY   STATUS   CLAIM                      STORAGECLASS    REASON   AGE
dockerfile   10Gi       RWO            Retain           Bound    default/dockerfile-claim   local-storage            1m
Lastly, we are creating the pods:
kubectl create -f pod.yaml

You can now view the pod:
kubectl get pods
It took some time for us to figure out how to get started with Kaniko. In our case, we used Kaniko in Kubernetes. Alternatively, you could also use the Docker Daemon to run your container images. However, in this case, there would not be much of a difference between using Docker directly. If you would still like to do this, you do not require any of the files listed above. Instead, you would just run the following command with similar parameters to what we have specified in pod.yaml.
First, we need a config.json file in our current directory that holds our Docker login:
{
   "auths": {
       "https://index.docker.io/v1/": {
           "auth": "xxxxxxxxxxxxxxx"
       }
   }
}
On Ubuntu, you can encode your credentials with:
echo -n “username:password” | base64
Use the encoded credentials within your config.json file. Next, we can build and push our Docker image using:
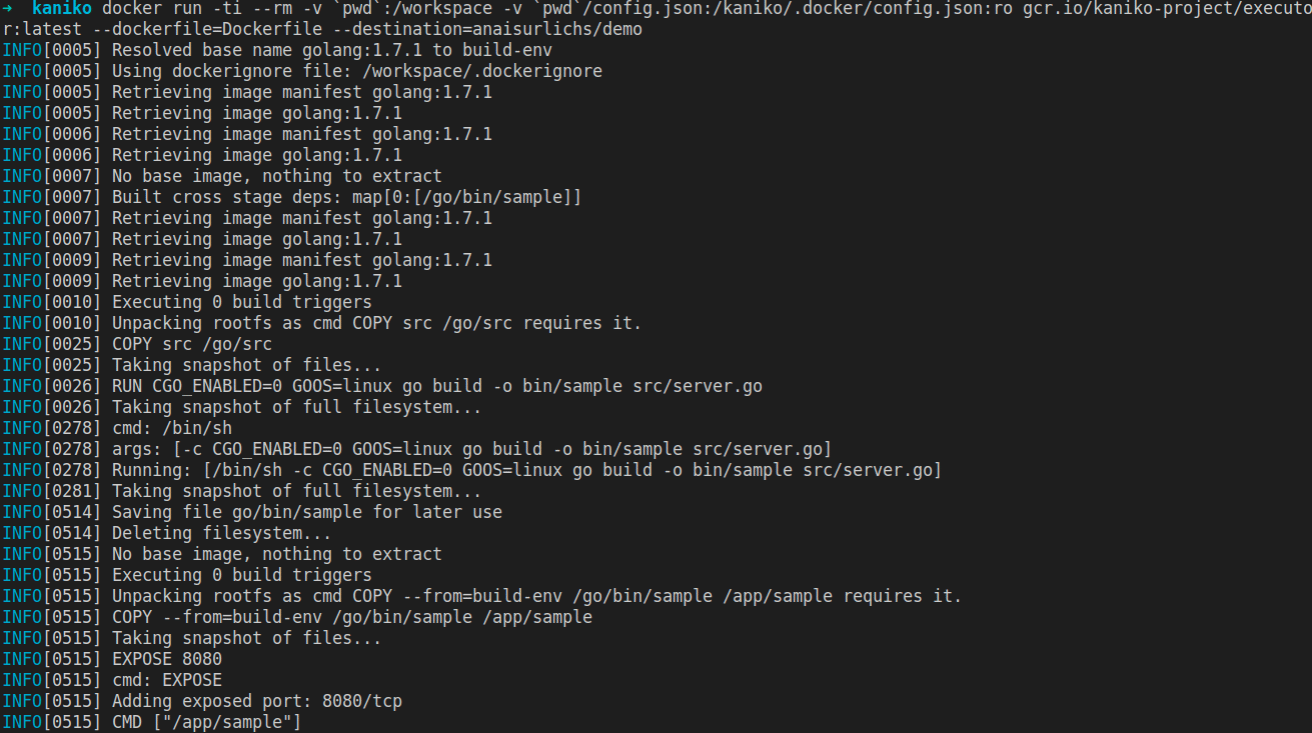
docker run -ti --rm -v `pwd`:/workspace -v `pwd`/config.json:/kaniko/.docker/config.json:ro gcr.io/kaniko-project/executor:latest --dockerfile=Dockerfile --destination=yourimagename
Note that this command might take a while to finish. Below is the expected output:
The Difference between Kaniko and Buildah
Buildah allows you to build images without a Dockerfile. The flexibility of building images without Dockerfiles allows for the integration of other scripting languages into the build process. Since Buildah does not rely on a Daemon but instead on a comprehensive API written in Golang, commands can be translated into other tools.
In comparison, Kaniko can be run with and without root access to build a container image and push it to a registry. While Kaniko is supported by Google, Podman has been developed by RedHat. Both projects are actively maintained.
Additional differences that we have noticed while using both tools:
- Depending on your operating system, it might be quite difficult to install any of the mentioned tools.
- In case you are already using Kubernetes, Kaniko allows you to get started right away. However, you may have to invest some time into setting up the yaml files.
- Podman and Buildah are quite intuitive to use and use similar commands to those that are defined by Docker.
- Additionally, Buildah has better tutorials and further documentation available, which might become handy in the long term.
- You can run both Kaniko and Buildah from within a container. However, it is not as straightforward using Buildah.
- We built the same image using Kaniko and then using Buildah to compare the image size; the image build by Kaniko using Docker is about half the size of the one built by Buildah.
Image built with Buildah and Podman:

Image built with Kaniko:

Overall, it depends on your use case and the tools that you are already using to build and manage your containers. Generally, it would not make much sense to use Kaniko with Docker. However, if you are already heavily using Kubernetes, then it would be an easy integration and a great alternative. In contrast, the combination of Buildah and Podman is a better alternative if you want to directly replace Docker.
Summary
In this tutorial, we compared two different alternatives to using Docker directly. Neither has been as easy to get started with as Docker. In summary, if you are already using Kubernetes, Kaniko would be a good alternative; if not, we would prefer Buildah and Podman. As you can tell, which tool would provide the best alternative depends heavily on your use case.
Are you using Docker or either of the alternatives detailed in this tutorial? Let us know about your experience in the comments!