Code analysis tools are essential to gain an overview and understanding of the quality of your code. This post is going to cover the following
While these tools target similar use cases, they differ in their implementation, ease of use, and documentation just to name a few.
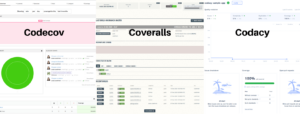
This post provides an overview of each tool as well as a detailed comparison to help analyse and decide which tool is best suited for your needs.
Overview
Code analysis tools make it possible to access, group, and merge analysis reports of your application. Test coverage reports used in combination with code analysis tools provide comprehensive insights on the quality of your code.
This allows developers to know their code quality today and improve it tomorrow. Specifically, to
- Improve poorly written code;
- Develop robust and secure applications;
- Receive insights into the code quality over time;
- Ensure test coverage is done throughout the codebase.
In the best case, you would want to have all the insights on your code quality in one place. This is made possible by Codacy, Codecov, and Coveralls.
The next sections will compare distinct aspects of each tool with its competitors. We tried all 3 tools with our own project in order to gain a better understanding of how they work. Here is each blog post if you want to see what we did:
Features
Now that we discovered that all three tools have the same goals in mind, let’s take a look at the features each tool pursues and the ways they differ.
Each tool has been evaluated based on the following criteria
| Feature | Description | Clear Difference |
| Pricing | The flexibility of the pricing options and the extent to which those are justified |
Coveralls is the only tool of the three that charges per repository rather than per user |
| Ease of Use | Whether or not it was intuitive to get started with the tool |
Coveralls was the easiest to integrate within our project |
| Documentation | The quality of the overall documentation, whether examples were provided, integration with CI/CD providers, and the clarity of the conveyed information |
Codecov had the most comprehensive documentation that left little to no room for ambiguity, making it easy set-up and expand the integration with our project |
| Dashboard | The functionality of the Dashboard and the way information is displayed. |
While the Codacy Dashboard is not the easiest to navigate, it did provide the best data visualisation |
| Historical Data | Whether it is possible to access historical data, view trends, and analyse code changes |
All tools enable this feature in a different format |
| CI/CD Integration | Ease of automating the process of creating code coverage reports and forwarding those to a CI platform |
Codecov did not require extensive custom set-up to integrate with Codefresh |
Pricing
Both Codacy and Codecov provide a free version, a pro-version and an on-premises version. In the case of Codecov, all pricing options are detailed on their website. In comparison, Codacy does not clearly state the service provided with the free version. Additionally, both platforms charge per user, who receives access to an organization’s repository.
Coveralls, on the other hand, has more segmented pricing options with 5 different tiers. Additionally, it provides free analysis for open source. The remaining options are priced depending on the number of repositories that receive coverage reports rather than the number of users, who need access to the platform.
Given the information provided by each tool, we would recommend startups and open-source projects to go with Coveralls. While they currently do not provide extensive support to projects, they clearly state their belief in the open-source ethos and provide a flexible pricing model. Additionally, paying Coveralls per repository provides more predictable pricing. Depending on the size of your team and the number of repositories that have to be covered, Codecov will provide the best option for its price. However, if your company would like to receive additional features, it might be worth looking into the enterprise and on-premises solutions provided by Codecov and Codacy since both provide a few more features than Codecov.
Reports and Analysis
All three platforms provide a comprehensive dashboard through which code analysis reports can be accessed. This section will look at the features of each platform before providing a comparison. Note that we uploaded to each platform the same coverage report.
The coverage reports uploaded to each platform were based on a Typescript application. Thus, reports had to be in either of the following formats: json, xml, or txt.
Both Codecov and Coveralls suggest different testing and coverage report frameworks depending on the language used throughout a comprehensive list of examples. In comparison, Codacy provides a list of suggestions that are not directly managed by Codacy. This makes it a bit more difficult to understand the potential and implementation of Codacy. Once we have uploaded our coverage report, we can view the information in the respective Dashboards.
Codecov
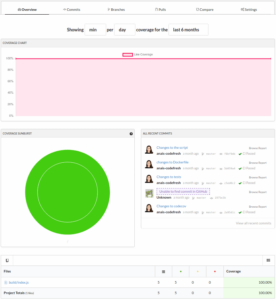
The Codecov Dashboard is divided into several sections with a top menu bar. Each coverage report is classified in either of the following categories:
- hit indicates that the source code was executed by the test suite.
- partial indicates that the source code was not fully executed by the test suite; there are remaining branches that were not executed.
- miss indicates that the source code was not executed by the test suite.
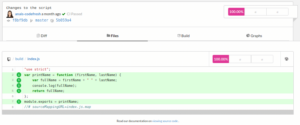
This is visible in the files section of the Dashboard in the form of a street-light system.
Coveralls
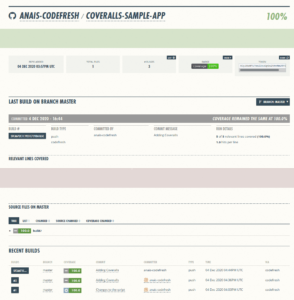
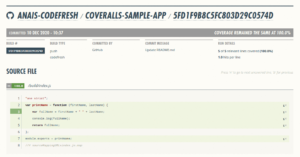
Coveralls follows a unique style throughout its platform. Similar to Codecov, Coveralls uses the percentage of the project covered by tests to analyze its code quality. Furthermore, with every new code coverage upload, Coveralls makes a separate entry into the recent builds section of the Dashboard. This entry includes the coverage percentage of the repository. While a graph for enhanced visualisation of code coverage improvements would be nice, it is not necessary to understand the coverage change over time.
Codacy
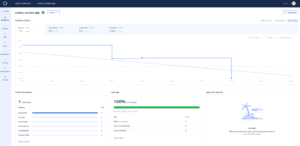
Similar to Codecov, Codacy focuses on enhancing its code analysis by connecting coverage reports with the information recorded on your git repository. This includes issues, pull requests and commits. From the main Dashboard, users can access specific information on the repository, such as file coverage. However, Codacy does not provide you with an option to view coverage reports directly. The pro version allows users to set-up security alerts, which is a feature that is unique to Codacy.
Separately, Codacy provides additional tools such as user management, separate configuration for file support, and setting quality standards.
Comparison
- Coveralls was the most intuitive platform of the three. However, this can be considered a positive side-effect of Coveralls focusing on the core features needed to create curated coverage reports rather than providing too many options that might confuse users.
- In contrast, both Codecov and Codacy place more focus on the visualisation of the coverage reports that enhance the Dashboard.
- An additional feature worth highlighting is the option to compare branches directly within the Codecov UI.
- In the case of Codacy, the complex UI used to accommodate all features was a problem. The Codacy UI has two settings taps with similar features. When setting up the integration, it was not clear which API token should be used. More on this in the integration section.
- Overall, there is not much to set-up or to customise within the UI, which results in a similar workflow while using each tool.
Historical Trends
Historical Trends are necessary to reason between events, changes done to the code base and the results of the code coverage. Depending on the way historical trends are displayed, it becomes easier for developers to identify good practices that led to higher code quality.
All platforms provide historical trends. While Codacy provides the best visualisation of reports over time as an average, it makes it difficult to access coverage reports directly from within the tool. Looking at Codecov and Coveralls, also the simplified Dashboards makes it possible to reason about changes in code coverage within respective files and repositories.
Summarising, the information provided by Codacy is better when looked at high-level but does not provide an advantage when users want to analyse specific files.
Code Analysis
Using a code coverage solution makes it possible for users to access additional information on the quality of their code. The following screenshots showcase the analysis interface of the file that we ran tests on. It is worth highlighting that Codacy analyses the code quality of all files within the git repository by default. Resulting, also files that are not part of the code coverage report are automatically analysed.
Codecov
Coveralls
Codacy
Note that Codacy has some additional logic that did not allow us to access the js file created from the ts file. Thus, we used the ts file instead to analyse our code quality.
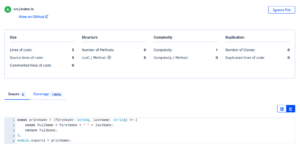
In this category, Codacy clearly provided the most information on each line of code, highlighting the improvements that can be made. However, by doing so, the platform enforces specific practices onto your codebase. For instance, in the case of JavaScript, there is no need to provide semicolons but their tool will flag those as missing and downgrade the code quality. By not flagging distinct coding styles, Codacy could be used to enforce a coding style within the organisation.
Documentation
Your need for good documentation will vary, depending on the way you want to use the tools and access code coverage reports. Sadly, the documentation is often that part of a product that is least taken care of. Good documentation allows users to get started quickly, avoid ambiguity, and optimise the use of the platform over time.
When comparing the documentation by Codecov, Coveralls and Codacy, the following became apparent
- Codecov has the most comprehensive documentation since it covers every aspect of the product with great detail.
- Coveralls’ documentation was the easiest to navigate given that it focuses on the essential operations that users would want to do.
- Both Codecov and Coveralls provide a comprehensive list of examples that users can choose from depending on the programming language and framework used in their application. This was greatly missed within Codacy, which is further detailed in the next section.
Use and Ease of Implementation
The use and ease of implementation is arguably the most important aspect of each platform. Depending on the tool that is added to your existing workflow, you do not want to change your entire processes to accommodate one tool. Thus, it is necessary for code coverage and analysis tools to understand at what point coverage reports are created in the development lifecycle. This will allow the tool to provide seamless integration into the testing and coverage process that a team has already established.
Using Codefresh to connect our code coverage reports to the respective tool makes it possible to automate the process of running tests, creating coverage reports, and uploading those to the code analysis tool. This section will detail our experience integrating each analysis tool within our Codefresh pipeline.
Integrate with each tool
The connection between the tool and your application is made through a repository token. Independent of the tool you are using, you will be provided with a repository token once you grant the platform access to a new git repository. The repository token is set as an environment variable either in your local installation or within your CI/CD platform.
In the case of Coveralls, it was necessary to install a node package and a script was added to the repository. The script can be modified to provide additional information on the application. Further details are provided in the Coveralls specific blog post.
Codecov merely required a specific set-up of the code coverage tool used.
Codacy was a bit special in this regard. Instead of installing a script or package within the application, users have to call a remote script. While it might seem more user friendly at the beginning, it has several disadvantages. Namely:
- The script has to be called every time that the code coverage report is pushed to the Codacy account. If the script changes, it might result no longer be compatible with the coverage reports used and fail to upload those.
- In case of an error, users do not have insights on what has gone wrong. In our case, Codacy was unable to access the right file within the repository and as a result, did not display coverage resorts. However, the script behaved as if it ran successfully.
Pipeline Creation
One heavily promoted feature within each code coverage tool is the possibility to integrate it directly within your existing CI/CD platform. To evaluate the use of each tool, we set-up a CI/CD pipeline for each tool within Codefresh. The process was highly similar across tools and resulted in the following pipeline for Codecov:
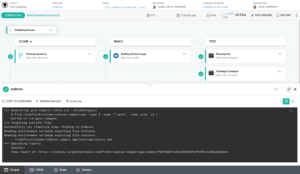
Note that we have access to the live logging through the ‘Output’ section in the Codefresh UI.
This section specifically details the use of integrating either of the code coverage tools into Codefresh pipelines. The first steps of the Codecov pipeline are provided as an example. In Codefresh, each step is its own Docker image. At the beginning of standard pipelines, the git repository is cloned, a container image created and pushed to the user’s container registry. These steps were the same for each tool.
version: "1.0"
# Stages can help you organize your steps in stages
stages:
  - "clone"
  - "build"
  - "test"

steps:
  clone:
    title: "Cloning repository"
    type: "git-clone"
    repo: "codefresh-contrib/codecov-sample-app"
    # CF_BRANCH value is auto set when pipeline is triggered
    # Learn more at codefresh.io/docs/docs/codefresh-yaml/variables/
    revision: "${{CF_BRANCH}}"
    git: "github"
    stage: "clone"

  build:
    title: "Building Docker image"
    type: "build"
    image_name: "codefresh-contrib/codecov-sample-app"
    working_directory: "${{clone}}"
    tag: "${{CF_BRANCH_TAG_NORMALIZED}}"
    dockerfile: "Dockerfile"
    stage: "build"
Next, we had to run the tests, create coverage reports of our projects, and forward those to each platform. This is done in its own container image. For our application, we used the node image within each pipeline. The implementation for forwarding coverage reports between our Codefresh pipeline varied between Codecov, Coveralls, and Codacy.
 test:
    title: "Running test"
    type: "freestyle" # Run any command
    image: "anaisurlichs/codecov-sample-app:master" # The image in which command will be executed
    working_directory: "${{clone}}" # Running command where code cloned
    commands:
      - "npm run test"
    stage: "test"

  upload:
    title: "Pushing to Codecov"
    type: "freestyle" # Run any command
    image: "node:15.2" # The image in which command will be executed
    working_directory: "${{clone}}" # Running command where code cloned
    commands:
      - "ci_env=`curl -s https://codecov.io/env`"
      - "npm install codecov -g"
      - "codecov -t ${{CODECOV_TOKEN}} -f ./coverage/clover.xml"
    stage: "test"
Note that it would have been best if each tool would provide their own container image that can be used within CI/CD pipelines instead of using the generic node image. This would have reduced the need for a custom workaround and makes it possible to optimize the process.
Let’s Recap
This post provided an overview and comparison of three different code analysis tools. Namely, Codecov, Coveralls and Codacy. All three tools have the same goal of accessing code coverage reports and generating curated insights over time.
When explored in more detail it becomes visible that all tools have a different focus on their implementation of features. This results in a tradeoff between access to features and ease of use. While Codacy is the most advanced tool of the three, it was more difficult to set-up and to navigate its UI. In contrast, Coveralls focuses on the minimum functionality needed to access and analyse code coverage reports. Comparing the free version of each tool, there is no significant difference between tools.
If you are interested in each tool specifically, we highly recommend you to have a look at our previous blog posts on:
Each tool can be automated through Codefresh; simply by creating a pipeline for your project that integrates with the respective code coverage tool.
