Codefresh has now added support for Docker Buildkit. If you don’t know what Buildkit is, and you’d like to learn more, read on! Otherwise, you can skip to the example.
What is Buildkit?
Buildkit is a feature offered in Docker since version 18.06. Essentially, it swaps out the traditional image builder with a new builder inside the Docker engine, providing for much faster, optimized Docker builds.
Let’s discuss some of Buildkit’s advantages:
- Parallel Execution: Traditionally, layers in a Dockerfile are built sequentially, one at a time. With Buildkit enabled, you gain several speed improvements, as different layers of your image can now be built in parallel.
- Cache Efficiency and Flexibility: Buildkit will pull layers of the previously built image from a registry as opposed to a local image. Buildkit also gives you the ability to embed cache information into the image itself.
- Secret Storage: Buildkit allows secrets files to be mounted as a part of the build process. These secrets are kept in-memory and not stored within the image.
- SSH Forwarding: SSH agents are mounted into the build without adding the private keys to the image
- Improved Logging: Progress indicators are provided for each step of the Docker build, with options to see the full container log output, which is very useful for debugging your builds.
How to Use Buildkit with Docker
First, let’s go into how to use vanilla Buildkit outside of Codefresh.
To enable Buildkit, you need to export an environment variable:
export DOCKER_BUILDKIT=1
Another way to enable Buildkit, if you don’t wish to export an environment variable, is by using running the following:
DOCKER_BUILDKIT=1 docker build .
You can also set Buildkit to be your default builder, which is recommended if you build a lot of images, by adding to /etc/docker/daemon.json the following:
{ "features": { "buildkit": true } }
Secret Storage with Buildkit
Accessing private repositories or resources has always been an issue with the traditional Docker build engine. Even if you removed secret files after use, the secrets could end up in the metadata of the image. With Docker 18.09, a new –secrets flag was added that allows users to pass secret information to a Docker build, without storing that information in the final image.
Note that the usage of “secrets” here is in terms of temporary secrets needed as part of the build, i.e. private SSH keys needed for cloning a private repository. Do not use this functionality for permanent secrets needed to deploy an application, such as database credentials.
For example, we can create a secret file:
echo “my-test-secret” < secret.txt
Our Dockerfile will consist of the following:
# this allows us to use the new Dockerfile syntax
# syntax = docker/dockerfile:1.0-experimental

FROM alpine

# shows secret from default secret location:

RUN --mount=type=secret,id=mysecret cat /run/secrets/mysecret
Then, to build the image, run:
docker build -t buildkit-secret-demo --secret id=mysecret,src=secret.txt .
This command passes the secret.txt file to the RUN command in the Dockerfile, mounting it at /run/secrets (the default secret location).
If you navigate to the /run/secrets directory in the container, you may be shocked to find your secrets file there, but it is only a blank, 0-byte file.

SSH with Buildkit
Oftentimes, you will need to access a private repository via SSH as a part of your build. Of course, one option is to embed private keys into your image, but if you do that, it obviously cannot be shared.
Buildkit simplifies this by providing an --ssh flag that can forward your private key to the build engine.
Say our Dockerfile consists of the following:
# syntax=docker/dockerfile:experimental
FROM alpine

# install ssh client and git

RUN apk add --update openssh-client git

# download public key for github.com

RUN mkdir -p -m 0600 ~/.ssh && ssh-keyscan github.com >> ~/.ssh/known_hosts

# clone our private repository

RUN --mount=type=ssh git clone [email protected]:anna-codefresh/buildkit-demo.git
You can then build this image by running:
DOCKER_BUILDKIT=1 docker build --ssh default -t buildkit-ssh-demo .
The git clone operation will now successfully clone the private repository, provided you have your private key saved into the local, default ssh-agent. If you have it loaded elsewhere, you can also specify its location by running:
docker build --ssh github=path/to/id_rsa -t buildkit-ssh-demo .
And modifying your Dockerfile SSH mount to:
RUN --mount=type=ssh,id=github git clone [email protected]:anna-codefresh/buildkit-demo.git
Codefresh Built-in Buildkit Support
Codefresh now supports the use of Buildkit within a pipeline’s build steps — all capabilities you have using Buildkit with Docker, you have within Codefresh.
Now that you have an understanding of what Buildkit is, and how to use it with Docker commands, let’s go over how to use the same functionality from a Codefresh pipeline.
The easiest way to enable Buildkit support in your pipeline, is by setting the buildkit field to true from within your build step.
version: '1.0'

steps:
  BuildMyImage:
    title: Building My Docker image
    image_name: my-app-image
    type: build
    arguments:
      buildkit: true
However, using any of the buildkit features enables it by default.
Note, that Buildkit is an opt-in feature, and optional in Codefresh. You can use both Buildkit and non-Buildkit steps without any limitations, from within the same pipeline.
SSH Example Using Codefresh and Buildkit
Here I will guide you on how to easily use Buildkit’s SSH feature within a Codefresh pipeline.
We will first store our SSH key as a Shared Secret (shared meaning we can share this secret amongst different pipelines and projects). From the left-hand panel, navigate to Account Settings > Shared Configuration. Select the Add Shared Values button and from the drop-down, click on Shared Secret.
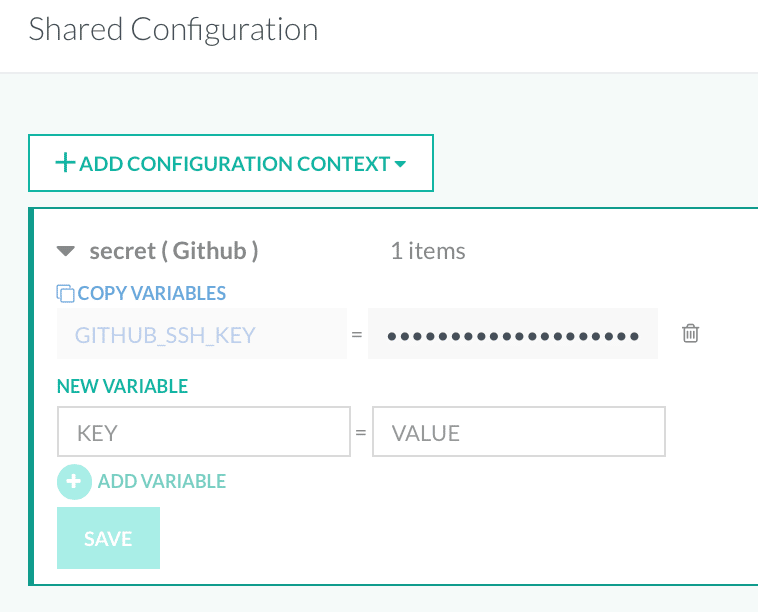
Give your secret a name and click Save. Give it a key, i.e., GITHUB_SSH_KEY and paste your SSH key into the value field and click Save.
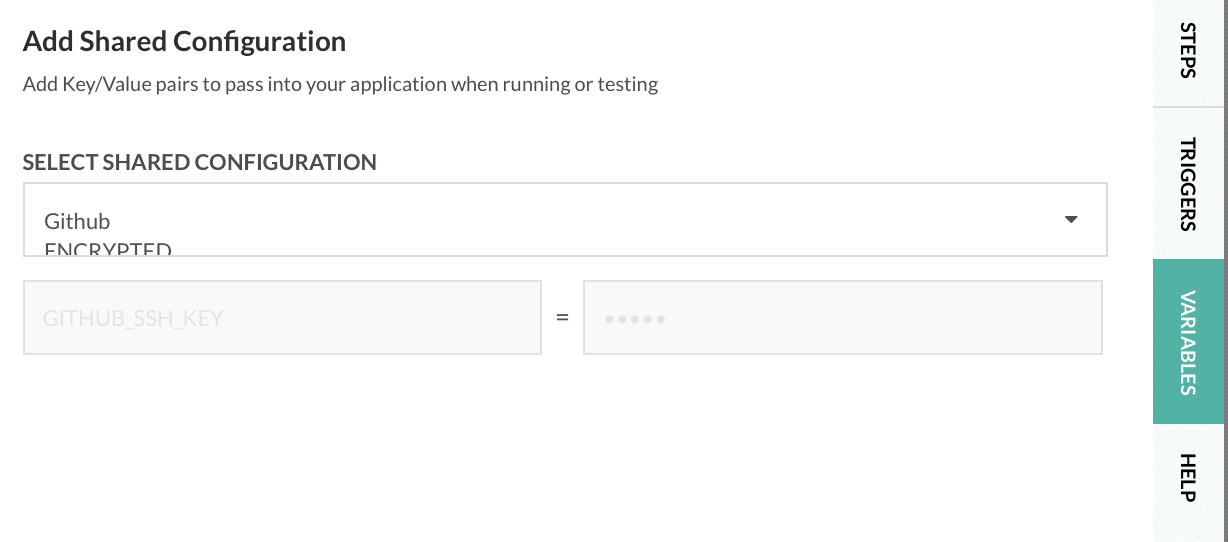
Now, let’s define a pipeline using our Shared Secret and the Inline YAML editor. To the right of the in-line editor, select the Variables tab, the three dots in the upper-right corner, and then Add Shared Configuration. Select the Shared Configuration we created earlier:
Below is a YAML example of the pipeline. Of course, you will need to modify the clone operation in the Dockerfile of the demo repo to your own private repository in order for this pipeline to run.
# More examples of Codefresh YAML can be found at
# https://codefresh.io/docs/docs/yaml-examples/examples/

version: 1.0

stages:
  - clone
  - setup
  - build

steps:
  clone:
    title: Cloning repository...
    type: git-clone
    stage: clone
    arguments:
      repo: https://github.com/anna-codefresh/buildkit-demo.git
      revision: master

  setup_ssh_key:
    title: Setting up SSH key...
    type: freestyle
    stage: setup
    arguments:
      image: alpine:latest
      commands:
        - mkdir /codefresh/volume/keys
        - echo "${GITHUB_SSH_KEY}" | tr  ',' 'n' > /codefresh/volume/keys/github_rsa
        - cat /codefresh/volume/keys/github_rsa

  build:
    title: Building Docker Image,..
    type: build
    stage: build
    working_directory: ${{clone}}
    arguments:
      image_name: buildkit-ssh-demo
      tag: latest
      dockerfile: Dockerfile
      buildkit: true
      progress: tty
      ssh:
        - github=/codefresh/volume/keys/github_rsa
This pipeline does the following:
- Uses a git-clone step to clone the demo project
- Uses a freestyle step to write our SSH key from a shared configuration to the Codefresh Volume
- Builds the Docker image using Buildkit, forwarding our private key to the SSH agent
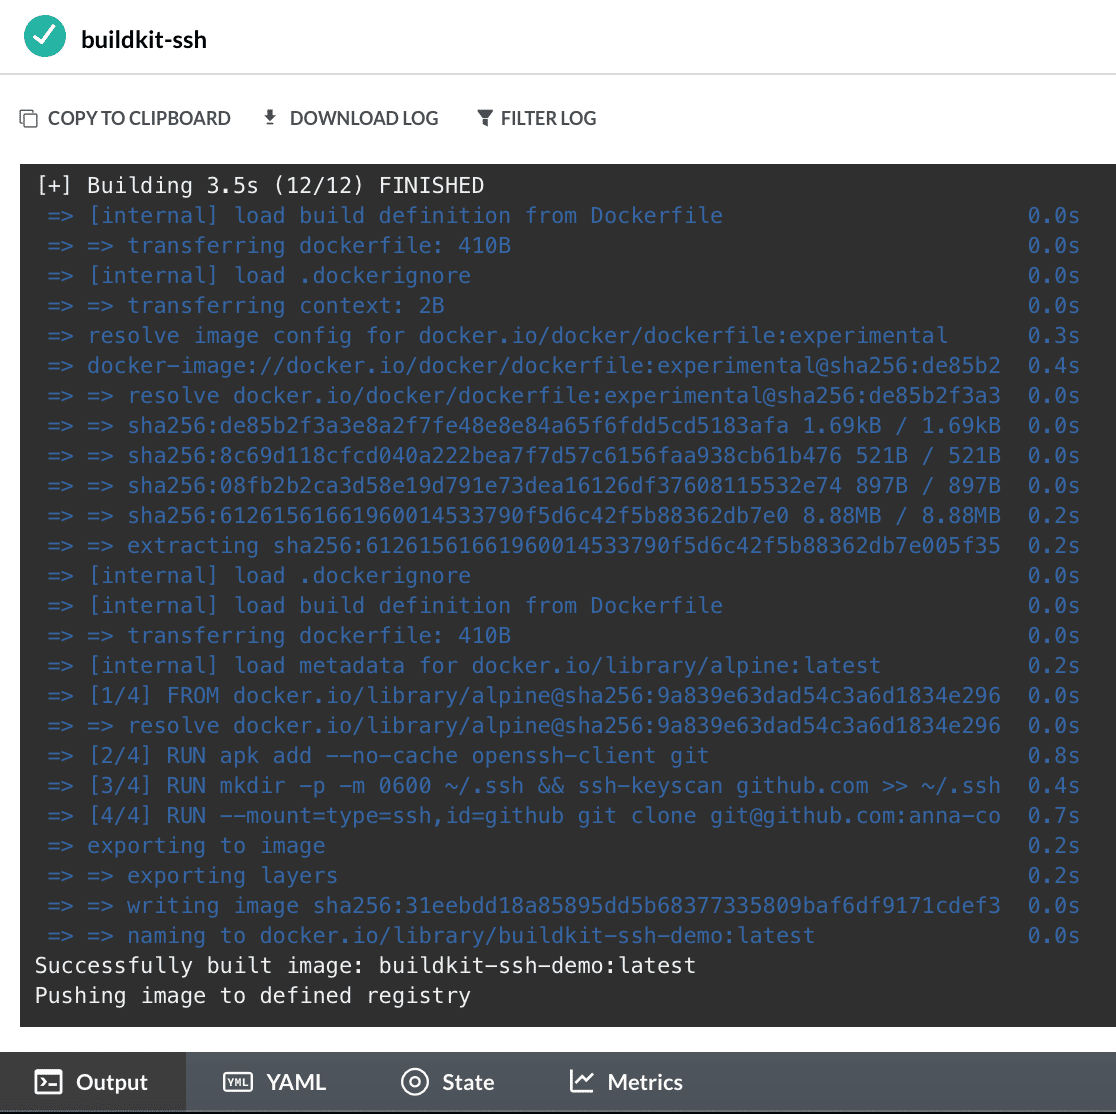
Note the improved logging Buildkit provides, with timestamps and improved output at each step of the Docker build:
To recap, let’s take a look at our Dockerfile:
# syntax=docker/dockerfile:experimental

FROM alpine

# install ssh client and git

RUN apk add --no-cache openssh-client git

# download public key for github.com

RUN mkdir -p -m 0600 ~/.ssh && ssh-keyscan github.com >> ~/.ssh/known_hosts

# clone our private repository

RUN --mount=type=ssh,id=github git clone [email protected]:anna-codefresh/buildkit-private-demo.git
Our Dockerfile downloads the public key from Github and adds it to our known_hosts. Using the public key, it passes our private SSH key to the second RUN command (and only this specific RUN command, nothing else), allowing us to access our private repository, all without storing any confidential information inside the image itself.
Conclusion
While you can use Buildkit’s secret storage for things like SSH keys, check out our new Secrets Storage support! Using the new Secret Store, you can keep all kinds of secrets within your Kubernetes cluster, without storing them as a shared configuration in Codefresh, as we saw in the previous example. This helps alleviate security concerns, keeping your data safe and protected.
Buildkit is the next generation of Docker image building, with improved efficiency and security of your Docker builds. It is definitely the recommended way to go if you are building a lot of images. As it is in its early stages, it still has some growing up to do, but hopefully from this article you can see its many advantages (all of which we did not describe here).
If you’d like to learn more about Buildkit and its many advantages not covered by this article, see some of the official documentation.
Or, for more information on Codefresh Buildkit Support, see the Codefresh documentation.
New to Codefresh? Sign up for your free account today!