In our big series of Kubernetes anti-patterns, we briefly explained that static test environments are no longer needed if you are using Kubernetes. They are expensive, hard to maintain, and hard to clean up.
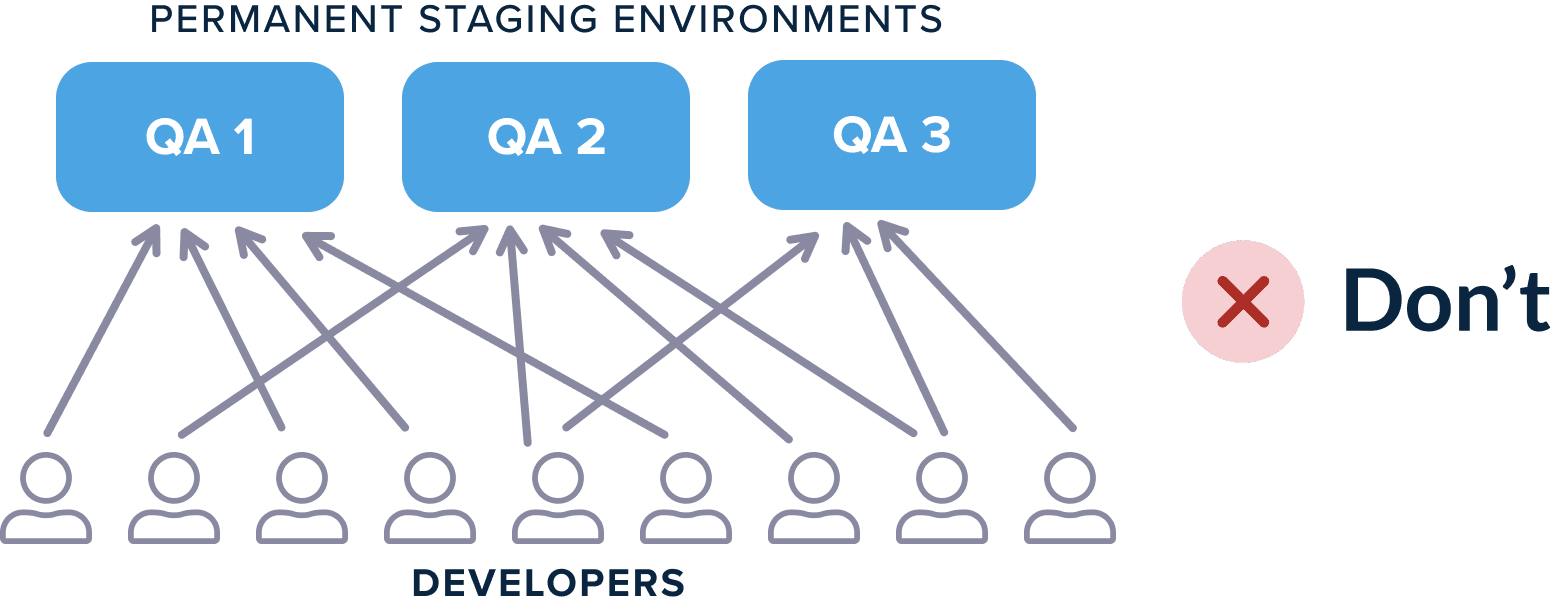
Instead, we suggested the adoption of temporary environments that are created on demand when a pull request is opened.
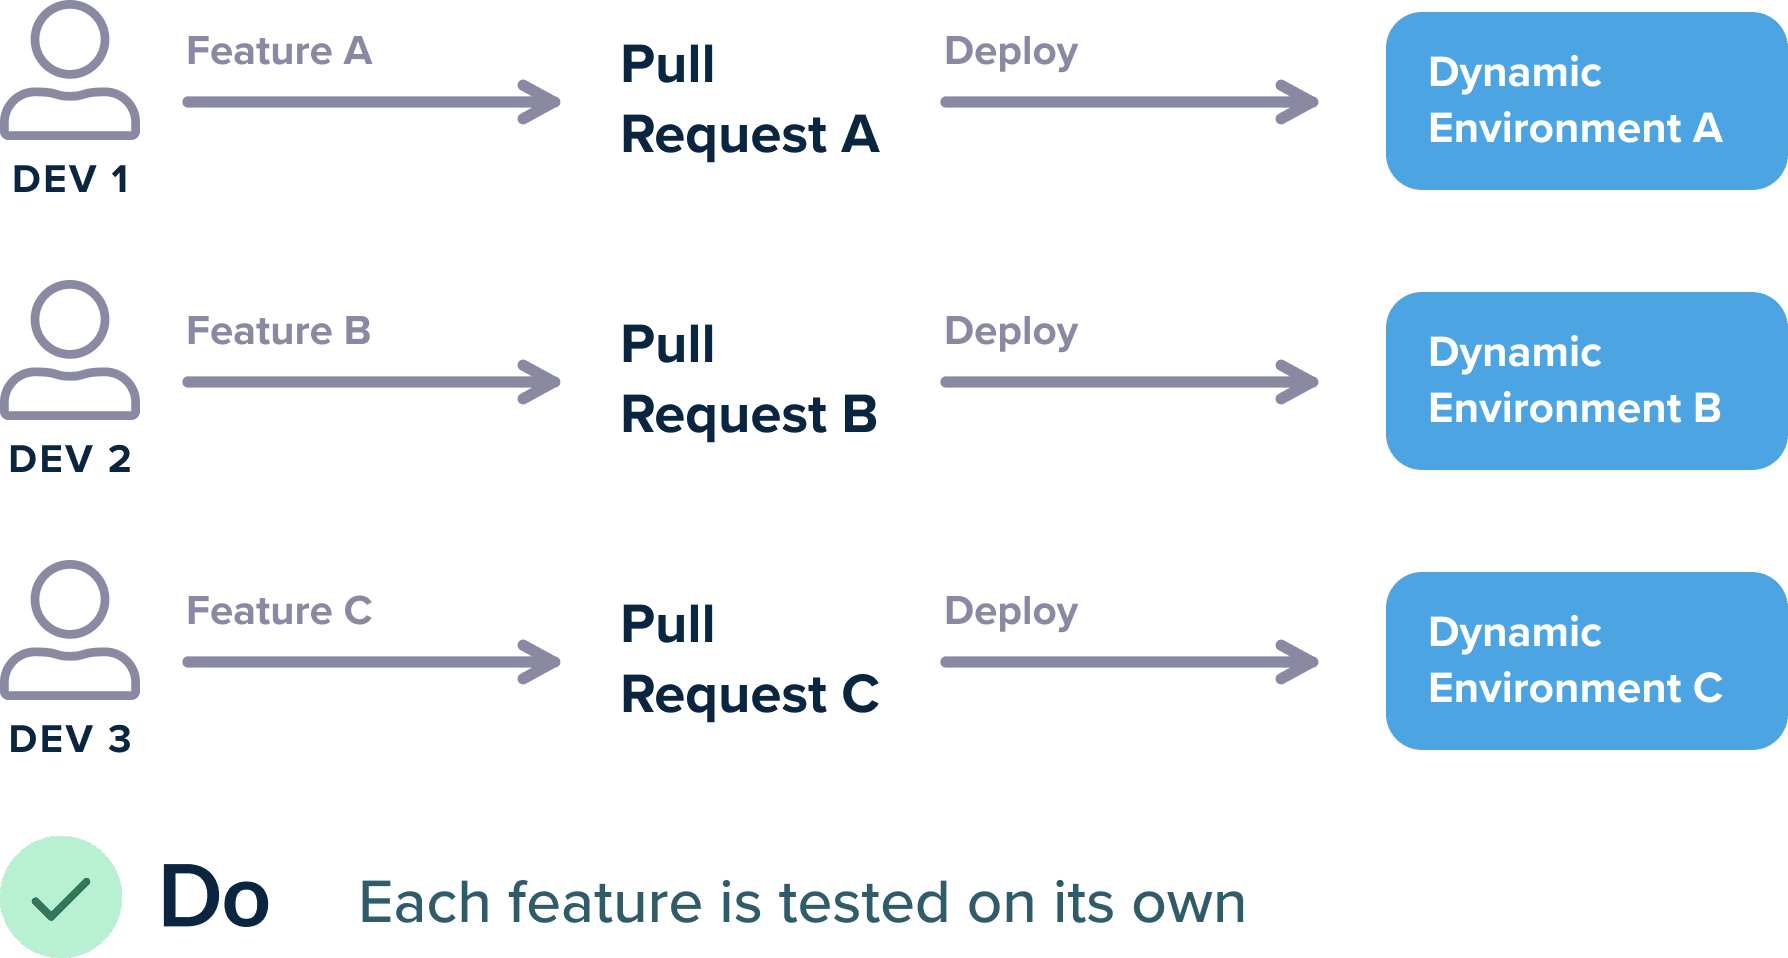
In this article, we will see the practical explanations on how to achieve unlimited temporary environments using Kubernetes namespaces.
Choosing a naming strategy
Since the preview environments will be created and destroyed in a dynamic manner, you need to select a strategy for their names. While several solutions exist for naming, the two most common variations are:
- Using the name of the branch as a context URL. This means
example.com/feature1, example.com/feature2, example.com/feature3, and so on - Using the name of the branch as a host subdomain. This means
feature1.example.com, feature2.example.com, feature3.example.com
The context-URL-based strategy is very easy to set up since it doesn’t need any special DNS settings (or TLS certs/wildcards). On the other hand, not all applications are designed to run with a different root context.
If you are certain that your application will not have issues with the context URL, then that strategy is the easiest to start.
The host-based naming strategy is much more robust, but it requires some configuration in your DNS provider to catch all subdomains and send them to the cluster that will hold all your preview namespaces.
In both cases, we also use an underlying Kubernetes namespace with the same name as the branch. We take advantage of the fact that Git branches have unique names, making sure that there are no clashes between environment names or Kubernetes namespaces.
It is also very common for teams to create branch names that represent specific issues (e.g. with JIRA). This makes it very easy to understand what developers are implementing for each feature environment.
For example, if a developer starts working on “issue 45 for billing”, then:
- A Git branch is created with name issue-45-billing
- A temporary environment is deployed at Kubernetes namespace
issue-45-billing - The environment is exposed at
example.com/issue-45-billingor atissue-45-billing.example.com
Using a Kubernetes Ingress for traffic management
You can create a preview environment in a Kubernetes namespace using any of the available deployment mechanisms (e.g. Helm or Kustomize). In order to distinguish traffic between different pods, you also need to install a Kubernetes Ingress. An Ingress is a special Kubernetes resource responsible for routing requests inside the cluster.
There are several implementations available, and for our example, we will use Ambassador gateway. We will use Ambassador Edge stack 1.13.8 but the open source Emissary Ingress should work as well. Both host-based and context-based naming strategies are supported natively by the Ingress specification.
You can see how we set up our Ingress in the example application for the context-based naming strategy.
kind: Ingress
apiVersion: extensions/v1beta1
metadata:
  name: "simple-java-app-ing"
  annotations:
    kubernetes.io/ingress.class: {{ .Values.ingress.class }}

spec:
  rules:
    - http:
        paths:
          - path: {{ .Values.ingress.path }}
            backend:
              serviceName: simple-service
              servicePort: 80
The most important property is the “path” property that tells the Ingress what URL context to honor when a request comes in the cluster (e.g. example.com/feature1, example.com/feature2, and so on).
We use Helm for making this path property configurable. This means we can pass a Helm value for each deployment that represents the URL of that preview environment.
Apart from the configurable Ingress, our example application is a vanilla Kubernetes application. You can see the full Helm chart in GitHub.
Creating an environment for a pull request
With the application manifests in place and an Ingress installed in the cluster, we are now ready to set up the workflow for the temporary environments.
First we need a pipeline that creates a temporary environment when a pull request is opened (or synced/updated).
Codefresh comes with a rich set of triggers that allow you to define exactly which events will launch the pipeline. Here is the trigger dialog:
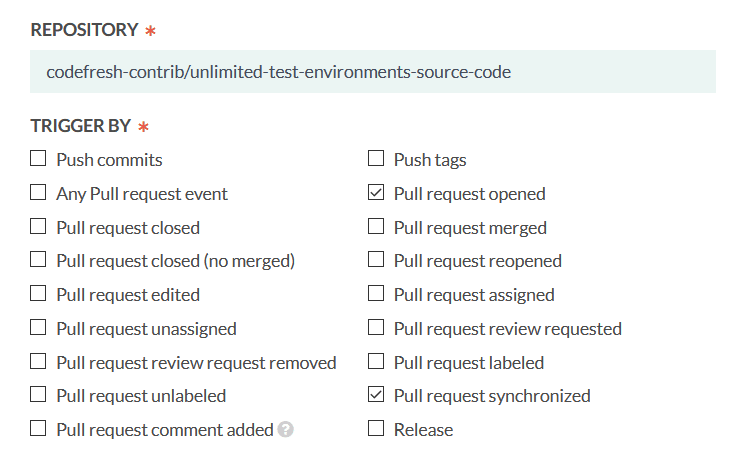
We are only interested in the initial event of opening a pull request along with the “sync” event. In GitHub terms, a pull request is synced when somebody pushes another commit to an already open pull request. We want to update the environment in this case as well.
As for the pipeline itself, it is very simple with just 4 steps:
version: "1.0"
stages:
  - "prepare"
  - "verify"
  - "deploy"

steps:
  main_clone:
    title: "Cloning repository"
    type: "git-clone"
    repo: "codefresh-contrib/unlimited-test-environments-source-code"
    revision: "${{CF_REVISION}}"
    stage: "prepare"
  build_app_image:
    title: Building Docker Image
    type: build
    stage: prepare
    image_name: kostiscodefresh/spring-actuator-sample-app
    working_directory: ./
    tag: '${{CF_BRANCH}}'
    dockerfile: Dockerfile
  clone:
    title: "Cloning repository"
    type: "git-clone"
    repo: "codefresh-contrib/unlimited-test-environments-manifests"
    revision: main
    stage: "deploy"
  deploy:
    title: Deploying Helm Chart
    type: helm
    stage: deploy
    working_directory: ./unlimited-test-environments-manifests
    arguments:
      action: install
      chart_name: simple-java-app
      release_name: my-spring-app
      helm_version: 3.2.4
      kube_context: myawscluster
      namespace: ${{CF_BRANCH_TAG_NORMALIZED}}
      cmd_ps: '--create-namespace --wait --timeout 5m'
      custom_values:
        - 'image_tag=${{CF_BRANCH_TAG_NORMALIZED}}'
        - 'replicaCount=3'
        - 'ingress_path=/${{CF_BRANCH_TAG_NORMALIZED}}/'
The 4 steps are:
- A clone step for checking out the source of the application
- A build step to create a container image and also push it to Docker Hub
- Another clone step for checking out the Helm chart
- The Helm deploy step to deploy the application to a new namespace
The key point here is the CF_BRANCH_TAG_NORMALIZED variable. This variable is provided by Codefresh and represents the Git branch that triggered this pipeline.
We use the variable in the deploy step in the namespace property as well as the ingress_path property.
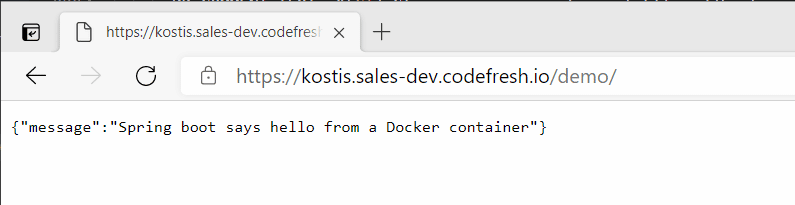
As an example, if I create a pull request for a GitHub branch named “demo” and run this pipeline:
- A namespace called
demowill be created on the cluster - Helm will deploy a version of the application on that namespace
- The Ingress of the cluster will be instructed to redirect all traffic at
/demo/to this deployment
Here is the result deployment in the browser:
And that’s it! Now each time a new pull request is opened, a new deployment will take place in the respective namespace.
Because we also catch the PR sync event in our Git trigger, we can also commit again on a branch where a pull request is already open. Another deployment will take place with all our changes.
Automatic comments on the pull request with the environment URL
Even if you have a naming convention for preview environments that is easy to remember, it would be very helpful for all members of your team to actually have a written history log of the creation of a temporary environment.
One of the most common patterns is adding the environment URL as a comment in the same pull request that created it.
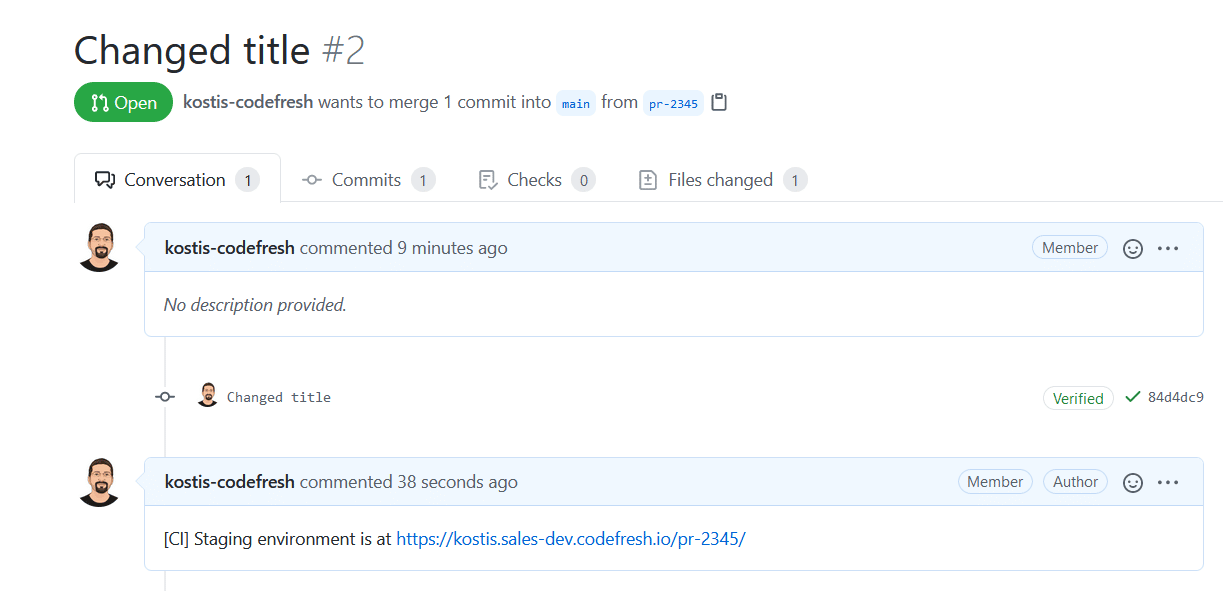
In the example above, I am working on feature 2345 or a branch called pr-2345. After I created the pull request, the environment was deployed to my Kubernetetes cluster, and a comment on the pull request has the exact URL.
This way, anybody who is responsible for reviewing the pull request has, in a single place, both the file changes and the temporary environment for checking how the application looks after the changes.
To achieve this pattern, you can use the Codefresh plugin for adding comments to pull requests.
You can add the following snippet in your Codefresh pipeline:
 add_pr_comment:
    title: Adding comment on PR
    stage: deploy
    type: kostis-codefresh/github-pr-comment
    fail_fast: false
    arguments:
      PR_COMMENT_TEXT: "[CI] Staging environment is at https://kostis.sales-dev.codefresh.io/${{CF_BRANCH_TAG_NORMALIZED}}/"
      GIT_PROVIDER_NAME: 'github-1'
With this pipeline step, we add a comment on a pull request. For the comment itself, we again use the predefined CF_BRANCH_TAG_NORMALIZED variable that provides the name of the pull request.
The plugin knows which pull request will be used for the comment by automatically fetching the pull request from the trigger of the pipeline. This is why we have no need to specify which pull request will be commented on.
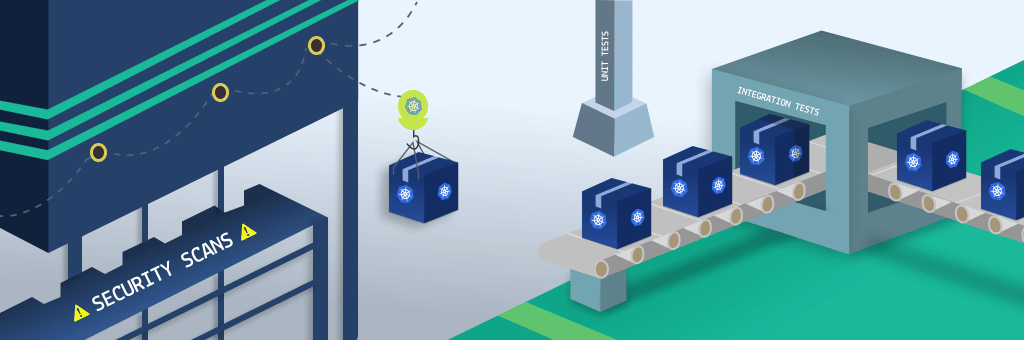
Quality checks and smoke tests
Creating automatic preview environments for each pull request is a capability that is also offered by several other products in the Kubernetes ecosystem. The big power of Codefresh comes with the flexibility to add any verification steps before or after the creation of the environment.
For example, it would be wise to run unit and integration tests before an environment is deployed. After all, if unit tests fail, does it really make sense to create a temporary environment? The developer should instead fix the unit tests and then try to deploy again.
On the other hand, maybe you want to use the temporary environment for integration tests and possible security scans. This way when a pull request is created, the reviewer will have all the information needed at hand:
- The code that was changed
- How the application looks
- If the new code introduces security issues or not
- If the new code passes unit and integration tests.
Making all this information available in a single place results in a much faster review process.
It is also possible to add extra steps in the pipeline that check things after the environment is created. A very common example is running a set of smoke tests on the newly created temporary environment. This gives you even higher confidence about the correctness of the changes.
You can also include other steps after the deployment such as posting a message to a Slack channel, sending an email, updating a dashboard, and so on.
Here is our final pipeline for creating a preview environment when a pull request is opened.
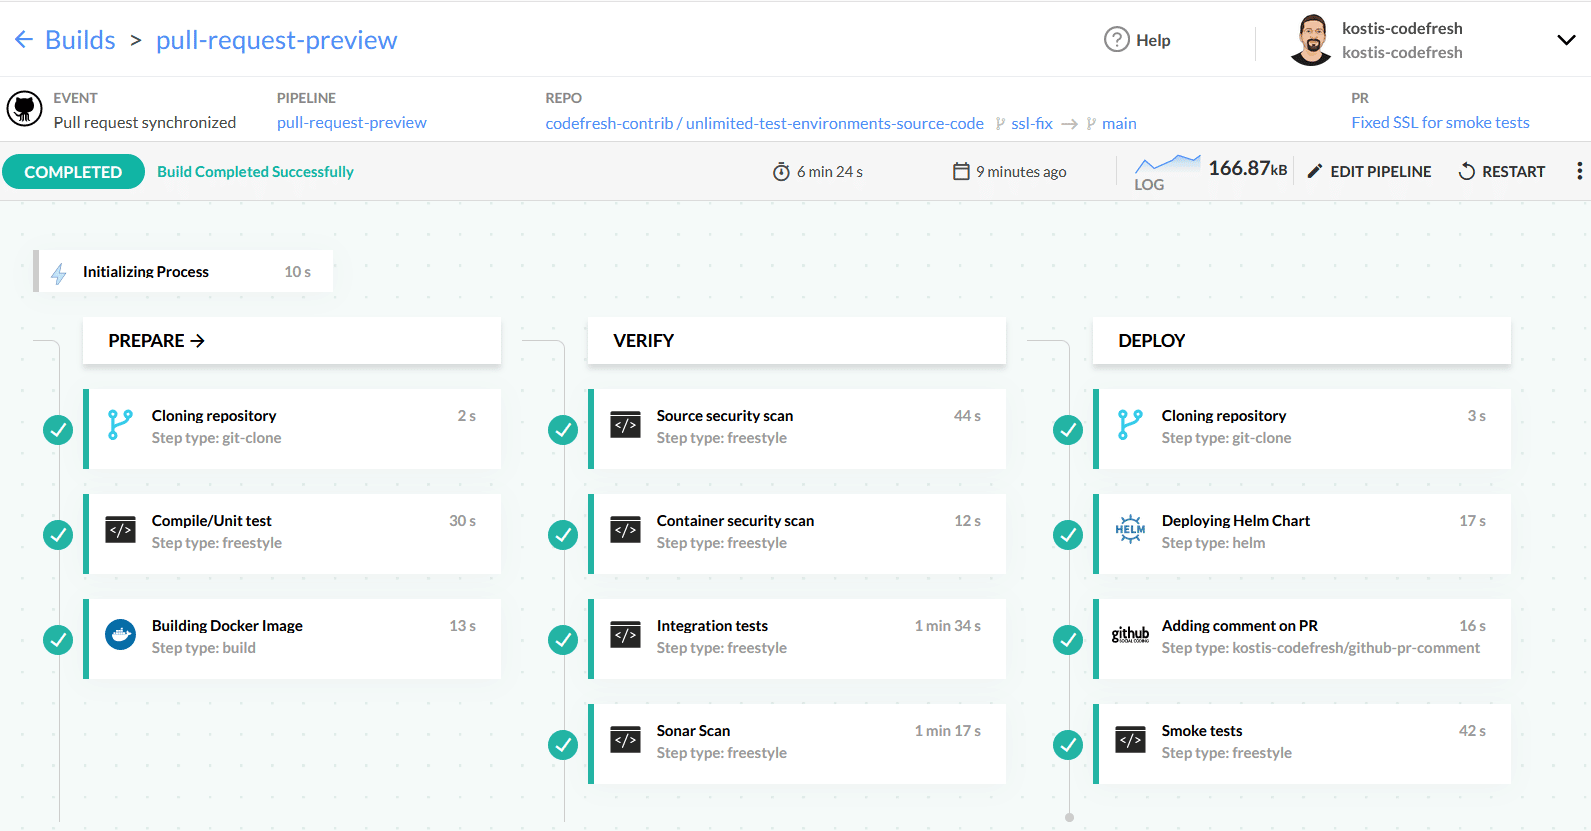
This pipeline has the following steps:
- A clone step to fetch the source code of the application
- A freestyle step that runs Maven for compilation and unit tests
- A build step to create the docker image of the application
- A step that scans the source code for security issues with Snyk
- A step that scans the container image for security issues with trivy
- A step that runs integration tests by launching the app in a service container
- A step for Sonar analysis
- A step that clones a second Git repository that has the Helm chart of the app
- A step that deploys the source code to a new namespace.
- A step that adds a comment on the pull request with the URL of the temporary environment
- A step that runs smoke tests against the temporary test environment
Here is the whole pipeline definition:
version: "1.0"
stages:
  - "prepare"
  - "verify"
  - "deploy"

steps:
  main_clone:
    title: "Cloning repository"
    type: "git-clone"
    repo: "codefresh-contrib/unlimited-test-environments-source-code"
    revision: "${{CF_REVISION}}"
    stage: "prepare"

  run_unit_tests:
    title: Compile/Unit test
    stage: prepare
    image: 'maven:3.5.2-jdk-8-alpine'
    commands:
      - mvn -Dmaven.repo.local=/codefresh/volume/m2_repository package
  build_app_image:
    title: Building Docker Image
    type: build
    stage: prepare
    image_name: kostiscodefresh/spring-actuator-sample-app
    working_directory: ./
    tag: '${{CF_BRANCH}}'
    dockerfile: Dockerfile
  scan_code:
    title: Source security scan
    stage: verify
    image: 'snyk/snyk-cli:maven-3.6.3_java11'
    commands:
      - snyk monitor
  scan_image:
    title: Container security scan
    stage: verify
    image: 'aquasec/trivy'
    commands:
      - trivy image docker.io/kostiscodefresh/spring-actuator-sample-app:${{CF_BRANCH}}
  run_integration_tests:
    title: Integration tests
    stage: verify
    image: maven:3.5.2-jdk-8-alpine
    commands:
     - mvn -Dmaven.repo.local=/codefresh/volume/m2_repository verify -Dserver.host=http://my-spring-app -Dsonar.organization=kostis-codefresh-github
    services:
      composition:
        my-spring-app:
          image: '${{build_app_image}}'
          ports:
            - 8080
      readiness:
        timeoutSeconds: 30
        periodSeconds: 15
        image: byrnedo/alpine-curl
        commands:
          - "curl http://my-spring-app:8080/"
  sonar_scan:
    title: Sonar Scan
    stage: verify
    image: 'maven:3.8.1-jdk-11-slim'
    commands:
      - mvn -Dmaven.repo.local=/codefresh/volume/m2_repository sonar:sonar -Dsonar.login=${{SONAR_TOKEN}} -Dsonar.host.url=https://sonarcloud.io -Dsonar.organization=kostis-codefresh-github
  clone:
    title: "Cloning repository"
    type: "git-clone"
    repo: "codefresh-contrib/unlimited-test-environments-manifests"
    revision: main
    stage: "deploy"
  deploy:
    title: Deploying Helm Chart
    type: helm
    stage: deploy
    working_directory: ./unlimited-test-environments-manifests
    arguments:
      action: install
      chart_name: simple-java-app
      release_name: my-spring-app
      helm_version: 3.2.4
      kube_context: myawscluster
      namespace: ${{CF_BRANCH_TAG_NORMALIZED}}
      cmd_ps: '--create-namespace --wait --timeout 5m'
      custom_values:
        - 'image_tag=${{CF_BRANCH_TAG_NORMALIZED}}'
        - 'replicaCount=3'
        - 'ingress_path=/${{CF_BRANCH_TAG_NORMALIZED}}/'
  add_pr_comment:
    title: Adding comment on PR
    stage: deploy
    type: kostis-codefresh/github-pr-comment
    fail_fast: false
    arguments:
      PR_COMMENT_TEXT: "[CI] Staging environment is at https://kostis.sales-dev.codefresh.io/${{CF_BRANCH_TAG_NORMALIZED}}/"
      GIT_PROVIDER_NAME: 'github-1'
  run_smoke_tests:
    title: Smoke tests
    stage: deploy
    image: maven:3.5.2-jdk-8-alpine
    working_directory: "${{main_clone}}"
    fail_fast: false
    commands:
     - mvn -Dmaven.repo.local=/codefresh/volume/m2_repository verify -Dserver.host=https://kostis.sales-dev.codefresh.io/${{CF_BRANCH_TAG_NORMALIZED}}/  -Dserver.port=443
Now when a preview environment is created, you have the guarantee that it passed the checks defined by your team (quality and security), leaving only the actual business logic as a review item.
This makes the process of reviewing pull requests as fast as possible, since all the common checks are fully automated and reviewers can focus solely on how the application works.
Destroying a preview environment
Creating a preview environment can be a costly operation in a big team. Reducing cloud costs is one of the biggest challenges when it comes to Kubernetes and cloud infrastructure.
You need to have a way to clean up preview environments when they are no longer used. Even though some teams have an automatic job (e.g. via cron) to destroy preview environments that are no longer used, the most cost effective option is to delete a preview environment immediately after the respective pull request is closed.
We can setup a trigger for this event using the Git dialog of Codefresh:
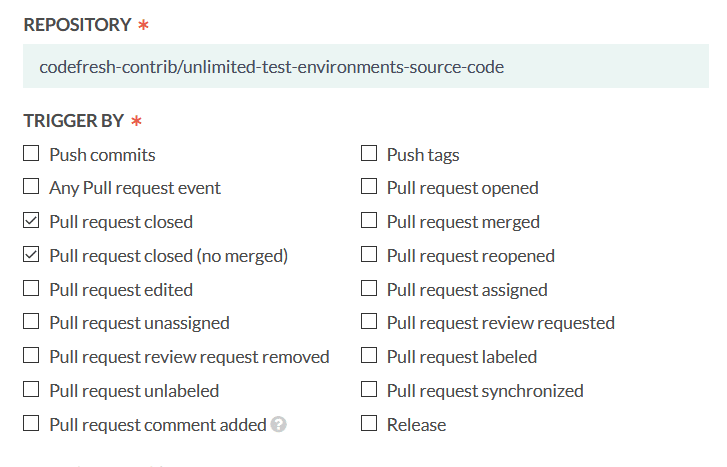
For this pipeline, we capture the pull request closed events. It is not really important if the pull request was merged or not. Since it is closed, we assume that the respective preview environment is no longer needed.
The pipeline that deletes the environment is trivial; it has only one step:
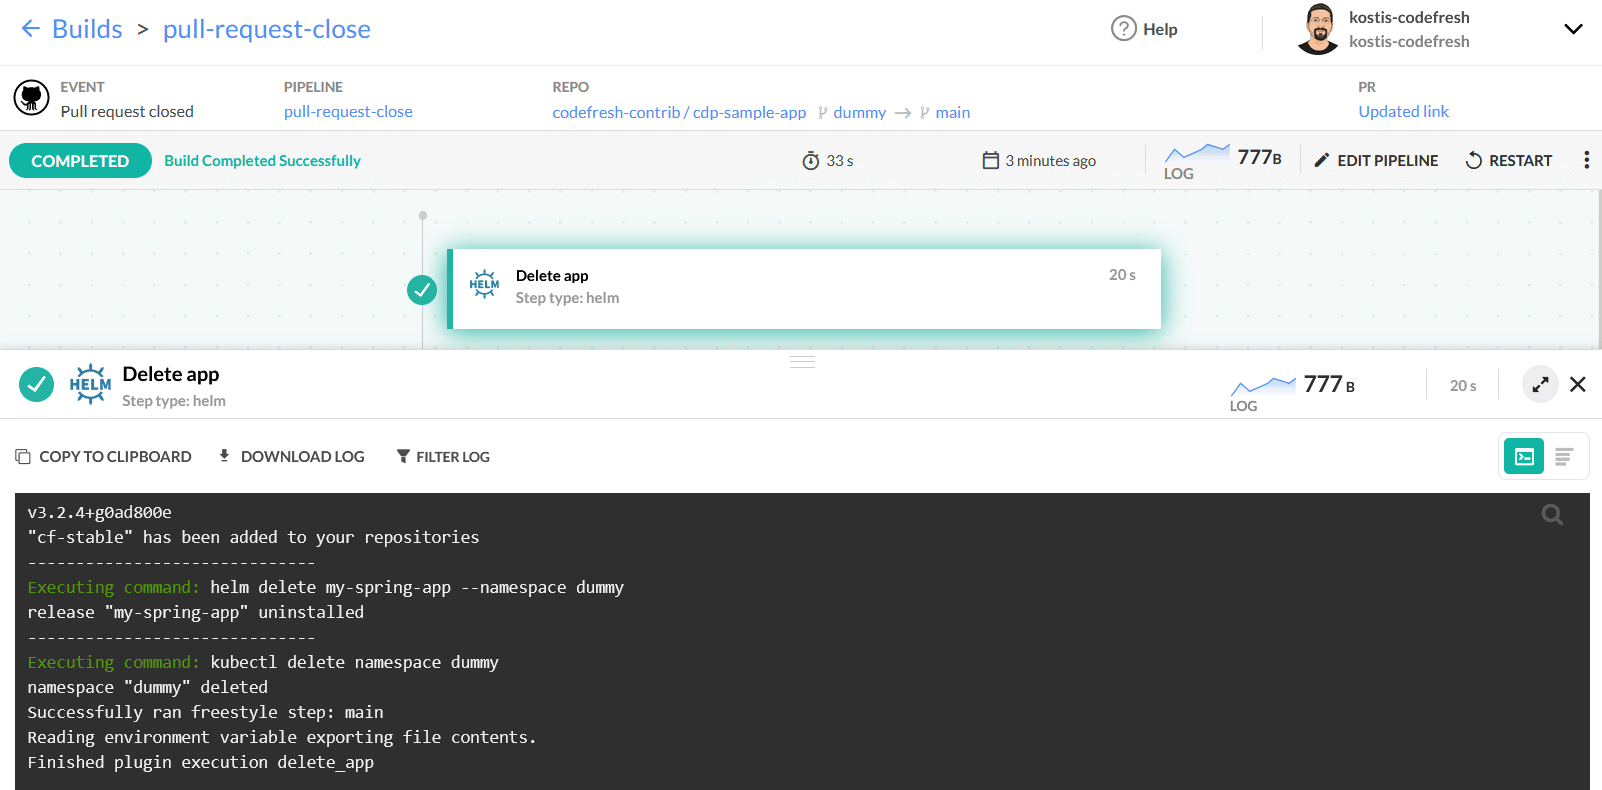
Here is the full definition of the delete pipeline:
version: "1.0"
steps:
  delete_app:
    title: Delete app
    type: helm
    arguments:
      action: auth
      helm_version: 3.2.4
      kube_context: myawscluster
      namespace: ${{CF_BRANCH_TAG_NORMALIZED}}
      commands:
            - helm delete my-spring-app --namespace ${{CF_BRANCH_TAG_NORMALIZED}}
            - kubectl delete namespace ${{CF_BRANCH_TAG_NORMALIZED}}
In the pipeline, we uninstall the Helm application and also delete the respective namespace with the same name.
Adopting the mindset of preview environments
We hope you enjoyed this tutorial for preview environments. Adopting Kubernetes is both a technical challenge and a paradigm shift, as several traditional practices are no longer needed. Stop using predefined test environments and switch to dynamic preview environments today!
For more details, see our documentation for preview environments.
Note that preview environments can affect your billing if they are not properly configured and managed. If you are running an open source project with public infrastructure you need to take precautions to prevent abuse of this mechanism.
New to Codefresh? Create your free account today!