
There are many articles and videos about practicing Continuous Delivery (CD) with applications, but not nearly as many for infrastructure. The same can be said for GitOps applied to infrastructure. That is a bit strange given that applications and infrastructure are almost the same today. Both are defined as code, and everyone stores code in Git repositories. Hence, GitOps is just as good of a fit for infrastructure as for anything else. Since, today, infrastructure is defined as code, there is no reason not to use “good” coding practices. So, making pull requests, validating suggested changes, and applying continuous delivery processes makes just as much sense for infrastructure as for applications.
With that in mind, we’ll explore how to combine Continuous Delivery (CD) with GitOps and apply the processes on infrastructure. We’ll use Terraform as a way to define and apply infrastructure resources and codefresh.io to run CD pipelines. We’ll use Amazon Web Services (AWS) as our playground. Specifically, we’ll create, modify, and destroy an Elastic Kubernetes Service (EKS) cluster.
If you prefer a different cloud provider, please visit the Google Cloud or Azure versions of the article.
If you are new to Codefresh, please Create A Free Account. You’ll get unlimited builds for life for free.
That wasn’t much of an intro. I am probably supposed to explain the benefits of GitOps and Continuous Delivery. I should probably say at least a few words why I chose Terraform, Codefresh, and EKS. But I will not do that, at least not here. I will assume that you have at least a high-level understanding of those concepts, processes, and tools. Instead, we’ll dive straight into practical examples on setting up a Continuous Delivery (CD) process backed by GitOps, and focused on managing your infrastructure.
If you’re interested in doing a review and then coming back, I encourage you to visit our learning center. Here are some helpful links to get started:
How about that? That was probably the shortest introduction to something that aims at combining two processes and, at least, three different tools. I should probably get an award for skipping the theory and jumping straight into the how-to part.
Let’s see whether we can set up and validate everything in 30 minutes or less.
All the commands are available in the 01-02-terraform-eks-cf.sh Gist. Feel free to use it if you’re too lazy to type. There’s no shame in copy & paste.
Getting The Code
I already created a Git repository with Terraform and Codefresh pipeline definitions to skip the tedious part of writing .tf and .yaml files. All we have to do as a start is open the repo in a browser.
If you are a Windows user, I will assume that you are running the commands from a Bourne Again Shell (Bash) or a Z Shell (Zsh) and not PowerShell. That should not be a problem if you followed the instructions on setting up Windows Subsystem for Linux (WSL) explained in the Installing Windows Subsystem For Linux (WSL) YouTube video. If you do not like WSL, a Bash emulator like GitBash should do. If none of those is an acceptable option, you might need to modify some of the commands in the examples that follow.
open https://github.com/vfarcic/cf-terraform-eks
If the open command does not work on your operating system, replace it with echo, copy the output, and paste it in your favorite browser. In this particular case, it might be easier to just copy the address, but, as you will see later, some of the other examples will generate the addresses dynamically. So, get used to echo, at least when going through my examples.
Next, you will need to fork the repo. We’ll soon make some changes to the code, and you wouldn’t be able to push them to my repo. So, it needs to be yours.
If you do not know how to fork a GitHub repo, the only thing I can say is “shame on you”. Google how to do that. I will not spend time explaining that.
Next, we’ll clone the newly forked repository.
Please replace [...] with your GitHub organization in the command that follows. If you forked the repo into your personal account, then the organization is your GitHub username.
# Replace `[...]` with the GitHub organization
export GH_ORG=[...]

git clone https://github.com/$GH_ORG/cf-terraform-eks

cd cf-terraform-eks
Next, we need to copy the Terraform files and Codefresh pipeline from the orig directory into the repository root. That might sound strange, but there is a good reason behind it. I might be experimenting with that repo. The files in the root might be configured with my info. To avoid any potential issues, I stored the “golden” version of the files inside that directory.
cp orig/*.tf .

cp orig/codefresh.yml .
Now that we have all the definitions, we should switch our focus towards setting up AWS pre-requisites.
Getting AWS Credentials
Before we proceed, we need to create AWS credentials. To be more specific, we’ll need access key ID and secret access key.
You can skip this section if you already have AWS keys you’d like to use. If that’s the case, the only thing you’ll need, before jumping into the next section, is to declare the environment variables AWS_ACCESS_KEY_ID, AWS_SECRET_ACCESS_KEY, and AWS_DEFAULT_REGION. Their names should be self-explanatory.
Please open the AWS Console. Register if this is the first time you’re using AWS. Otherwise, log in if your session expired.
Expand the menu with your name.
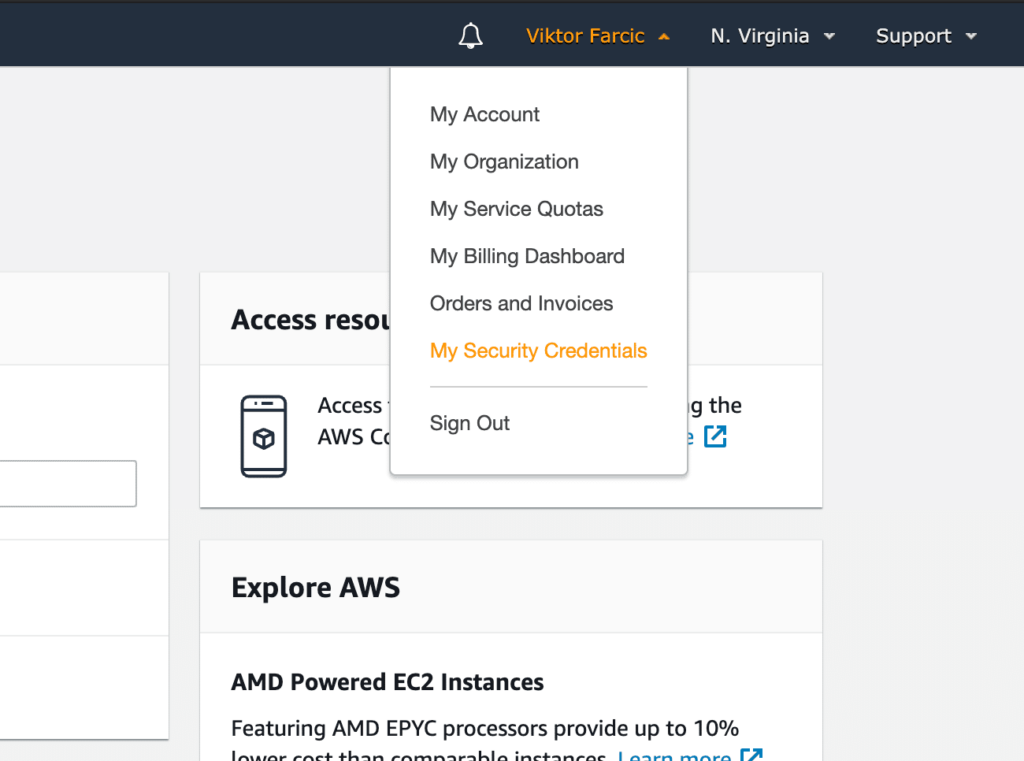
Select My Security Credentials, and you will be presented with different options to create credentials.
Please expand the Access keys (access key ID and secret access key) tab, and click the Create New Access Key button.
You should see the message that your access key has been created successfully. Do NOT dismiss that popup by clicking the *Close button. We’ll need the access key, and this is the only time it is available to us.

Please expand the Show Access Key section, and you’ll see the access key ID and the secret access key. We are about to store them in environment variables. But, before we do that, I strongly recommend downloading the file and storing it somewhere secure since this is the first and the last time you saw those keys from the AWS console.
Now we are ready to create the environment variables.
Please replace the first occurrence of [...] with the access key ID, and the second with the secret access key. Those are the values you should see in the AWS console.
export AWS_ACCESS_KEY_ID=[...]

export AWS_SECRET_ACCESS_KEY=[...]

export AWS_DEFAULT_REGION=us-east-1
Now we can move to the part that is specific to Terraform.
Preparing Terraform Definitions
Given that both we can now authenticate, we can turn our attention towards Terraform.
Please note that I will not go into detail on how Terraform works since this is focused on converting Terraform definitions into CD pipelines. So, we’ll focus only on the relevant parts within the context of Continuous Delivery. If you’re interested in more details about Terraform, please consult The DevOps Toolkit: Catalog, Patterns, And Blueprints.
The most critical and often overlooked part of Terraform is state storage. When used by a single person, and executed manually from a laptop, state storage is not that important. Or, to be more precise, it is not critical to store it somewhere other than on the local file system with, potentially, backing it up somewhere else. But, when working in a team, and, especially, when automating Terraform through pipelines, the location of storage becomes much more important.
I just realized that I “jumped the gun”, so let me backtrack a bit.
Terraform must store state about your managed infrastructure and configuration. That state is used by Terraform to map real-world resources to your configuration, to keep track of metadata, and to improve performance for large infrastructures. By default, the state is stored in a local file named terraform.tfstate.
In other words, without knowing the state of the resources, Terraform cannot do its job. Every time we execute terraform apply, it would think it is the first time we’re doing that. Many people do not even realize that right away. As long as Terraform is executed from the same directory, the state is there, and its purpose might not be obvious. But, what happens if we run it from a pipeline?
When executing Terraform commands from a pipeline, we cannot make the assumption that the state from previous executions will be present in subsequent builds. When running pipelines from VMs, we cannot be sure that it will always be the same machine. It might, or it might not. It’s like a lottery. But, when running pipelines from containers, the state will inevitably be gone forever as soon as the container running a pipeline is shut down. We could fix that by mounting persistent storage to each container running pipelines, but that would create other problems like, for example, “race conditions”. Fortunately, Terraform has a solution baked int, and we’ll explore it soon.
The critical thing to understand is that we will need to have a storage bucket. We’ll see, later on, how to use it. For now, let’s focus on creating the bucket.
AWS S3 buckets must have globally unique names, so we’ll create a new one using a timestamp. That should be “unique enough”.
We’ll need aws CLI for that. If you do not already have it, go to the Installing the AWS CLI section of the documentation and follow the instructions for your operating system. And, while we’re in the “installation mode”, please install aws-iam-authenticator as well. We’ll need it later.
export BUCKET_NAME=doc-$(date +%Y%m%d%H%M%S)

aws s3api create-bucket
--bucket $BUCKET_NAME
--region $AWS_DEFAULT_REGION
--acl private
Now that we have the bucket, let’s take a look at the Terraform definitions I prepared.
We’ll start with the variables.
cat variables.tf
The output is as follows.
variable "region" {
type = string
default = "us-east-1"
}

variable "cluster_name" {
type = string
default = "devops-catalog"
}

variable "k8s_version" {
type = string
default = "CHANGE_VERSION"
}

variable "release_version" {
type = string
default = "CHANGE_RELEASE"
}

variable "min_node_count" {
type = number
default = 3
}

variable "max_node_count" {
type = number
default = 9
}

variable "machine_type" {
type = string
default = "t2.small"
}

variable "destroy" {
type = bool
default = false
}
You can probably guess what each of those variables means from their names. What matters, for now, is that the default value of k8s_version is set to CHANGE_VERSION. I could not define the EKS version in advance since they are changing all the time, and whatever is the valid one at the time of this writing might not be correct when you’re working on the exercises. I could have skipped defining the explicit version altogether, but that would be against one of the most essential principles. We always need to be explicit with the versions we’re using. So, the only alternative left was to force us to change that value to the valid EKS version.
Similarly, the default value of release_version is set to CHANGE_RELEASE. Releases of AMIs for worker nodes are changing even more frequently, so that one is a placeholder that we’ll update soon.
Now, let’s find out which EKS version we will use. We can do that easily through the Platform versions page.
open https://docs.aws.amazon.com/eks/latest/userguide/platform-versions.html
Over there, you’ll see at least two minor Kubernetes versions (e.g., 1.16), with the table that lists all the patch versions (e.g., 1.16.8).
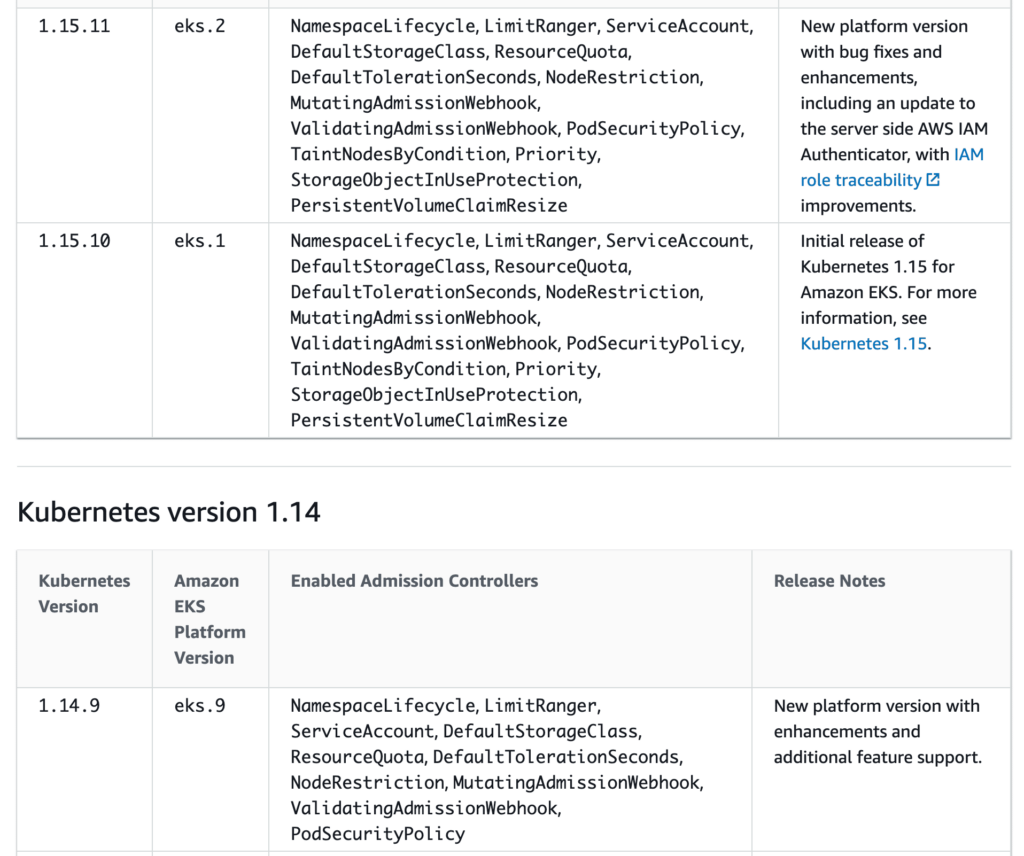
EKS is a bit “special” in a way it handles Kubernetes versions. We can only specify major and minor versions (e.g., 1.17). If we’d like to use a specific patch, we’d have to define the release_version field as well, and we can do that only for node pools. But, for now, we are interested only in major and minor versions. Pick any of the valid major and minor versions.
Since we will likely have to provide a valid Kubernetes version to all the commands we’ll execute from now on, we’ll store it in an environment variable.
Please replace [...] with the selected version in the command that follows.
export VERSION=[...] # e.g., 1.17
We’ll also define a variable for the release version. We will not need it until we get to the part that creates worker node pools. Nevertheless, since we’re in the mood of defining variables, we can just as well deal with that one right away.
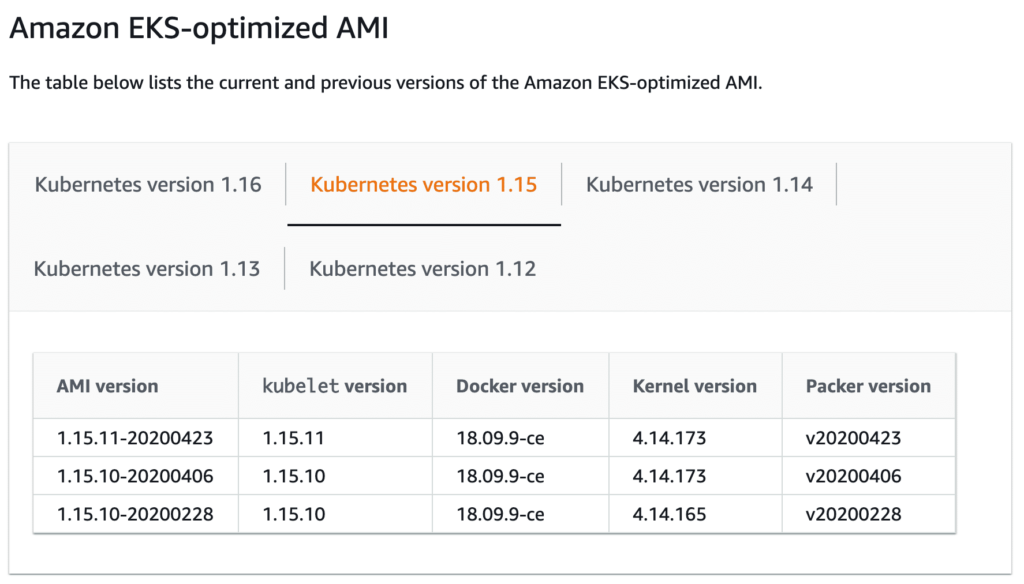
Let’s open the Amazon EKS-optimized Linux AMI versions page and see what we can choose.
open https://docs.aws.amazon.com/eks/latest/userguide/eks-linux-ami-versions.html
Please select the tab that coincides with the Kubernetes version you selected previously and copy one of the values from the AMI version column. If in doubt, the latest AMI that matches the Kubernetes version is probably the best choice.
export RELEASE_VERSION=[...] # e.g., 1.17.9-20200904
Next, we’ll use sed magic to replace the beforementioned placeholders with the values stored in environment variables.
cat variables.tf
| sed -e "s@CHANGE_VERSION@$VERSION@g"
| sed -e "s@CHANGE_RELEASE@$RELEASE_VERSION@g"
| tee variables.tf
Now we can move into main.tf that contains the definitions of the resources we’ll create.
cat main.tf
The output is too long to be presented here. You should see it on your screen anyway.
If you are familiar with Terraform, that definition should be straightforward. If you’re not, this is not the place where we’ll go into details, so I’ll just mention what each means.
Through provider "aws", we are telling Terraform which region to use.
We also have the backend set to s3. That is the signal to Terraform to keep the state in the AWS S3 bucket, instead of storing it locally. As a result, we will be able to manage the resources from any location that has access to that storage and without being constrained to a single machine or some kind of mounted network drives.
The vital thing to note about the backend storage definitions is that the bucket must be hard-coded. It cannot be a variable. Since it must be unique, I set the value to CHANGE_BUCKET. We’ll replace that soon with the name of the bucket you created earlier.
Further on, aws_eks_cluster defines the control plane, and aws_eks_node_group represents the node pool the cluster will use.
The rest of the resources are those that are common to almost anything running in AWS. Don’t blame me if there are too many of them. AWS is excellent at many things, but simplifying complexity is not one of them.
One important thing to note about all the resources is that each has count set to var.destroy == true ? 0 : 1. The reason behind that is simple. If we apply GitOps principles, everything needs to be defined in Git, and, preferably, in a declarative format. We cannot rely on ad-hoc commands. That is not an issue when creating or updating resources. But, if we’d like to destroy what we created, we cannot simply remove all the files. Terraform would not allow us to execute terraform apply against an empty directory. Even if it would, it might be a good idea to keep the definitions, even if we want to destroy everything. That allows us to be able to change our minds easily without restoring previous commits. Also, there could be quite a few cases when we’d like to destroy a cluster temporarily and recreate it later. For example, we might have a development cluster that should exist only while we are working.
In any case, I believe that it is easier and more transparent to destroy resources by changing the value of the destroy variable, then deleting all the files. So, if we go back count = var.destroy == true ? 0 : 1, we can translate it to “create that resource if destroy is set to false, or destroy it if it’s set to true.” We’ll see that variable in action later. For now, let’s focus on changing the bucket name placeholder to whatever is the “real” name of the storage we created earlier.
cat main.tf
| sed -e "s@CHANGE_BUCKET@$BUCKET_NAME@g"
| tee main.tf
Finally, the last Terraform file we have is output.tf.
cat output.tf
The output is as follows.
output "cluster_name" {
value = var.cluster_name
}

output "region" {
value = var.region
}
Those are the outputs that we’ll see every time we apply the definitions. Those two might come in handy if anyone wants to know the name of the cluster and the region. You’ll see their usefulness later when we get to the part of validating the cluster.
We are almost finished with Terraform. The only thing left is to push the changes to Git.
git add .

git commit -m "Initial commit"

git push
Now comes the “real deal”. We finally reached the main subject. Everything we did so far was the preparation for the “big moment”.
Defining A Continuous Delivery Pipeline
We want to have a pipeline that will run every time we push a change to that repository. So, we need to pick a CD tool. It could be any, but not today. Right now, we are going to use codefresh.io. I won’t take deep dive into it but focus on the parts that matter when managing infrastructure with Terraform.
Codefresh comes in handy for the task we are about to perform because it is a Software as a Service (SaaS) solution. It could be a self-managed solution, but not inside the same cluster since that would pose a “chicken and egg” type of problem. If we need a cluster to manage a cluster, then it cannot be the same one. We’d need a cluster with a CD platform to manage a different cluster. On top of that, we could not run a pipeline inside the cluster if that pipeline might need to upgrade or even destroy that same cluster. Using a SaaS solution is very handy, especially when dealing with infrastructure.
So, what is the bare minimum for a pipeline that will manage infrastructure using Terraform?
Before answering such a question, I will need to make at least two assumptions.
I will assume that you are creating pull requests (PRs) with proposed changes. Those PRs can be reviewed and, potentially, tested. That means that, as a minimum, we need to be able to see the proposed changes. We need to know how will that PR affect the current state. That means that we probably want to execute terraform plan that outputs what will be removed, what will be added, and what will be modified if we apply the changes. PRs should NOT apply the changes, at least not inside the same project. In other words, we need to know what the proposed changes are, but not to apply them.
The second assumption is that you want to apply changes only after merging to the master branch. Any other branch should be ignored.
You might have a different way of working. If that’s the case, pretend that it is not, and go with the flow. Later on, you should be able to modify the examples to fit whichever process you prefer to use.
With all that in mind, let’s try to define which steps we might need to have. If we are successful at that, you should have no problems extending them to whatever else you might need.
We can split the needs into two stages; prepare and apply. Those are arbitrary, and you are free to have steps organized differently, but not today.
In the prepare stage, we have to clone the specific revision from the repository.
In the apply phase, we have to init the project so that the Terraform plugins used in our definitions are downloaded, and the state is retrieved from the bucket. Further on, we already discussed that we need to output the plan. We could do that only when working with PRs, but there is no harm in outputting it always. Finally, we need to apply the definitions so that the actual state is converged into the desired state. But, as we already discussed, we should apply only when making changes to the master branch, and not when working with other branches or with PRs.
Now that we know, more or less, what we want to do, let’s take a look at one possible implementation of those goals.
Codefresh pipelines are defined as YAML and, by default, are expected to be in codefresh.yaml file. I already prepared one, so let’s take a look.
cat codefresh.yml
The output is as follows.
version: "1.0"
stages:
- prepare
- apply
steps:
main_clone:
title: Cloning repository
type: git-clone
repo: "${{CF_REPO_OWNER}}/${{CF_REPO_NAME}}"
revision: "${{CF_BRANCH}}"
stage: prepare
init:
image: hashicorp/terraform:0.13.0
title: Initializing Terraform
stage: apply
commands:
- terraform init
plan:
image: hashicorp/terraform:0.13.0
title: Outputting Terraform plan
stage: apply
commands:
- terraform plan
apply:
image: hashicorp/terraform:0.13.0
title: Applying Terraform
stage: apply
commands:
- terraform apply -auto-approve
when:
branch:
only:
- master
That’s a very simple pipeline. It is split into two stages (prepare and apply).
Inside the prepare stage, we are cloning the revision that initiated the build (main_clone). There’s not much more to it, so let’s move to the steps in the apply stage. That’s where the “real” action is happening.
The steps in the second stage (apply) should be self-explanatory if you are familiar with Terraform. We are initializing the project through terraform init so that the required plugins are downloaded and, more importantly, the state stored in the S3 bucket is retrieved. Further on, we are outputting the plan (plan) and applying the definitions (apply). Since, by default, terraform apply asks for an input confirmation, we are circumventing that through the -auto-approve argument.
However, we are not going to execute all those steps always. The flow of events differs depending on whether we are working with a pull request or the master branch. To be more precise, when pushing to a pull request, we want to get the information about the changes that will be applied, without changing the actual state. We want the information that we can review and make the decision whether to apply it or not. That’s why we have the when conditional in the apply step. It will be executed only if the branch is master.
This process is, in a way, equivalent to executing terraform apply manually without -auto-approve. If we did that, Terraform would show us all the changes and ask us to type yes if we are satisfied with the outcome. However, running terraform apply manually prevents us from involving the rest of the team, not to mention that it does not adhere to GitOps principles. By having a pipeline that outputs the plan when working with a pull request and apply after merging to the master, we can involve the whole team to participate in the review of the changes. We can suggest modifications through comments, approve the changes, and perform all the other steps we usually associate with pull requests. We are, effectively, adopting the same practices as those we might be using when working on an application.
Now, before we continue, there is one crucial thing to note.
Each of those steps is executed in a separate container based on potentially different images. For now, all we need is Terraform, so all the steps, besides main_clone are using hashicorp/terraform.
The pipeline should be, more or less, self-explanatory, so let’s skip further explanations and make it work inside Codefresh.
Creating And Configuring Codefresh Pipeline
Let’s start by opening Codefresh UI in a browser.
open https://codefresh.io/
Please log in if you are already a Codefresh user, or register if you’re not. Everything we need can be accomplished through the free plan, so your wallet will not be affected in any form or way, at least not by Codefresh.
Once you log in, you will be presented with the Projects screen.
Please create a new project by clicking the CREATE PROJECT button if you are a first-time user, or + NEW PROJECT if you already have others.
Type devops-catalog as the PROJECT NAME, use any PROJECT TAGS you like, and select any ICON.
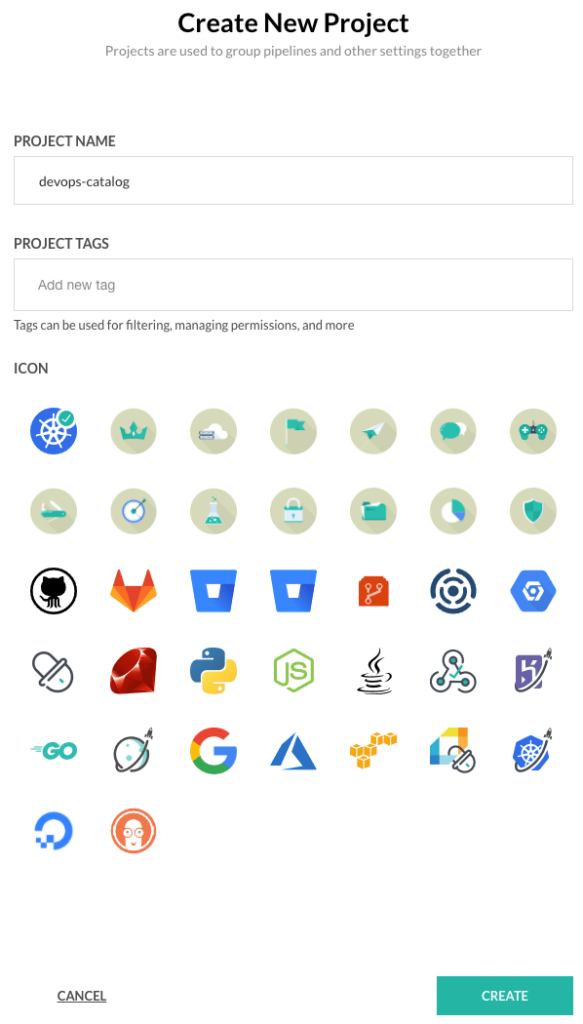
Click the CREATE button.
Next, we’ll need to create a new pipeline. As you can surely guess, we can do that by clicking the CREATE PIPELINE button.
Type cf-terraform-eks as the pipeline name, and select cf-terraform-eks as the repository. You can use the search field to narrow the list of the repos if you have too many.
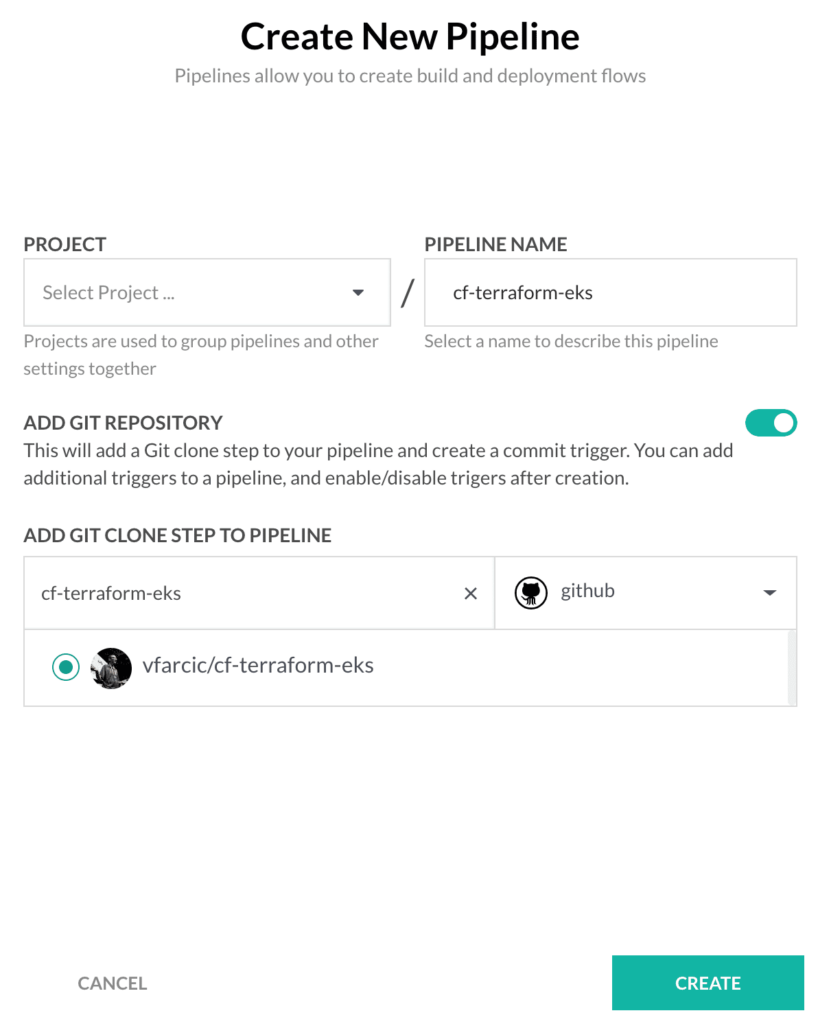
Click the CREATE button.
Codefresh allows you to specify pipeline definition inside the UI, but, in the majority of cases, it should be stored in a Git repo, just as any other code or config related to the project. We already have codefresh.yaml, so there is no good reason not to use it.
Please change Inline YAML to Use YAML from Repository.
Click the DONE button.
As we already discussed, Terraform definitions assume that there are environment variables AWS_ACCESS_KEY_ID, AWS_SECRET_ACCESS_KEY, and AWS_DEFAULT_REGION. We created them locally, in a terminal session. But Codefresh does not know about them. We need to define them there as well.
Please go back to the terminal to output the contents of those variables.
echo $AWS_ACCESS_KEY_ID

echo $AWS_SECRET_ACCESS_KEY

echo $AWS_DEFAULT_REGION
Copy the output of the first (AWS_ACCESS_KEY_ID) and return to Codefresh in your browser.
Select the VARIABLES tab, and click the ADD VARIABLE button.
Type AWS_ACCESS_KEY_ID as the Key and paste the content you copied earlier into the Value field.
Finally, we’ll encrypt the value of that variable by clicking the Encrypt button, followed with OK to confirm the desire to ENCRYPT VALUE.
Now, repeat those same steps two more times to add variables AWS_SECRET_ACCESS_KEY and AWS_DEFAULT_REGION.
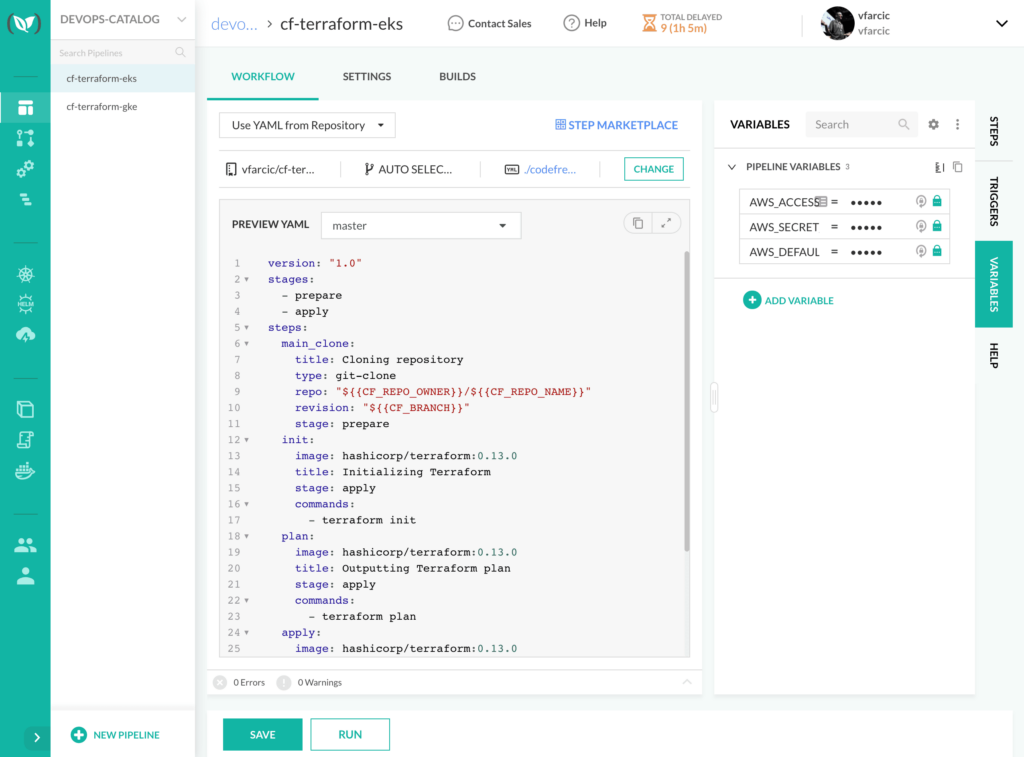
Click the SAVE button to persist the newly created variables.
We’re done. We have the pipeline, and the only thing left is to give it a spin.
Applying Infrastructure Definitions
Everything is set up, except for our infrastructure. We defined everything we need as a combination of Terraform definitions and a pipeline YAML. From now on, we will not be clicking any buttons to make the “magic” happen. Whichever changes we push to the master branch will be applied directly to our infrastructure. Git will make sure to notify Codefresh about the changes of the desired state, and the pipeline will make sure that the actual state is converged to the desired one. Later on, we’ll see that might not be enough, but, for now, we’ll focus on the master alone.
However, since we already have the definition stored in Git, we will break the rule and click the RUN button ourselves. Hopefully, this will be the first and the last time we’ll initiate a pipeline from the UI. Think of the action we are about to perform as me showing you what NOT to do.
Please click the RUN button, twice.
You will be redirected to the build screen from where you can observe the progress. Feel free to click any of the steps that were already executed or to follow the one that is currently running. You’ll see the output of the logs.
When the build reaches the apply stage steps, it will init Terraform by downloading the plugins and restoring the state from the bucket. Further on, it will show the plan of the changes that will be performed, and continue to apply them.

A few minutes later, the cluster should have been created, and we can confirm that from a laptop by, let’s say, executing kubectl get nodes. But, to do that, we need to create KubeConfig locally. We can do that through the aws eks update-kubeconfig, but, for it to work, we need to find out the name of the cluster and the region where it is running. We can get that information in two ways.
One option would be to copy and paste the information we need from the output of the apply step. Go ahead. Open the logs of that step (the last one), and you’ll see the information we need. However, there is a better way which, at the same time, demonstrates the benefits of storing Terraform state in a storage bucket.
Instead of going through the Codefresh UI and digging through build logs, we can restore the Terraform state locally and retrieve all the information we need or, to be more precise, the information defined as output values. To do that, we need to init the project first.
terraform init
That command downloaded the plugins we would need to apply the changes. But we are not going to apply anything. From now on, applying changes is done through GitOps. We should push changes to Git and let the system converge the actual into the desired state. Besides, that was not the reason why we initialized the project. That command also configured our local project to use the S3 bucket that contains the state. That was the “real” reason behind terraform init.
Next, we need to synchronize the local state with the one stored in the bucket. We can do that through refresh.
terraform refresh
The output, limited to the outputs, is as follows.
...
Outputs:

cluster_name = devops-catalog
region = us-east-1
We can see the information we need. Now we could copy it and paste it as arguments to the get-credentials command. But we will not do that. The only place worth copying and pasting is Stack Overflow. For everything else, it is much better to have self-executable commands that we can easily convert into scripts if needed.
Fortunately, we can use terraform output commands to retrieve the information we need. So, without further ado, the commands that will generate the KubeConfig file, which will allow us to interact with the newly created cluster, are as follows.
export KUBECONFIG=$PWD/kubeconfig

aws eks update-kubeconfig
--name
$(terraform output cluster_name)
--region
$(terraform output region)
--alias devops-catalog
We defined the environment variable KUBECONFIG with the path where we want to store the configuration. That wasn’t necessary. Without it, the config would be stored in the default location, together with other clusters we might be using. However, that tends to get messy when working with many clusters, so I prefer to have a separate file for each and store it in the same directory where the project with the cluster definitions is.
Do not worry about the danger of accidentally pushing kubeconfig to the Git repo. It is listed in the .gitignore file.
Further on, we executed the aws eks update-kubeconfig command. Instead of copying and pasting the name of the cluster and the region, we used terraform output commands to retrieve that info.
All that’s left, before we move on, is to confirm that the cluster is indeed operational.
kubectl get nodes
You should see the output of the nodes that constitute the cluster. Hurray!
Nevertheless, we are not yet finished. We still need to figure out how to make the infrastructure changes safe or, at least, less likely to cause damage.
Incorporating Pull Requests Into Infrastructure Management
Applying changes to infrastructure directly, without doing any type of review or testing is irresponsible. That might prove to be catastrophic. We could make a mistake that would be poorly reflected on our users (external or internal). Yet, that’s precisely what we did. So, let me correct the previous statement. Updating existing infra without any review or validation is terrible. Creating infra for the first time is usually OK since no one is yet using it, and we are not updating or destroying existing resources. That’s why our previous actions were acceptable. We created a new cluster that isn’t affecting anyone since no one could have been using something that does not exist.
Now, let’s imagine that we deployed some applications in that cluster and that they are being used by others. How can we make changes to that cluster safely? The answer to that question is in pull requests. That’s the widely accepted way to propose changes that can be reviewed and tested.
Testing changes proposed through a pull request usually means deployment of an application and some of its dependencies. But, right now, we are not dealing with applications, but with infrastructure. Still, the logic is, more or less, the same. We need to deploy at least some applications so that we can test whether they behave correctly in changed infrastructure.
When compared with PRs related to applications, the additional complication is that we need to create that infrastructure in parallel with the one that we are planning to change, then apply the changes, followed with testing. But, all that is too big of a subject and deserves a separate article. So, we’ll focus on PRs themselves and reviews and leave the creation of temporary infrastructure that can be used for testing purposes for some other time.
A review of any pull request usually consists of observing the differences in code, communication between team members, and a clear understanding of what would happen if applied to production. We’ll focus only on the latter, assuming that you already know how to review code changes and communicate with your team through comments or other means.
The good news is that we already set up almost everything we need. The plan step inside the apply stage is executing terraform plan that shows which changes will be performed if we execute terraform apply. We can use that output to evaluate whether we should proceed with the proposed changes.
On the other hand, we do NOT want to execute terraform apply as a result of creating a pull request. That would defy the purpose of proposing changes.
If you take another look at the apply step in codefresh.yml, you’ll see the following declaration.
...
apply:
...
when:
branch:
only:
- master
That is a conditional statement, and you can probably guess that it means that the step should be executed only if the branch is master.
In other words, if we make a change to the master branch, all the steps will be executed, including the one that applies the changes. But, in all other cases (including PRs), the apply step will be skipped.
So, we are all set, except for one tiny detail. We need to modify Codefresh triggers so that pipelines are executed only if a change is made to the master branch, or when creating or making changes to PRs. That means that we need to do two things. We need to restrict Codefresh to trigger pipelines only when changes are made to the master branch and ignore others. On top of that, we need to add an additional trigger that will run builds whenever we create a new pull request or make changes to an existing one.
Please go back to the Codefresh UI in your browser.
You should see the breadcrumbs near the top of the screen. Click the cf-terraform-eks link.
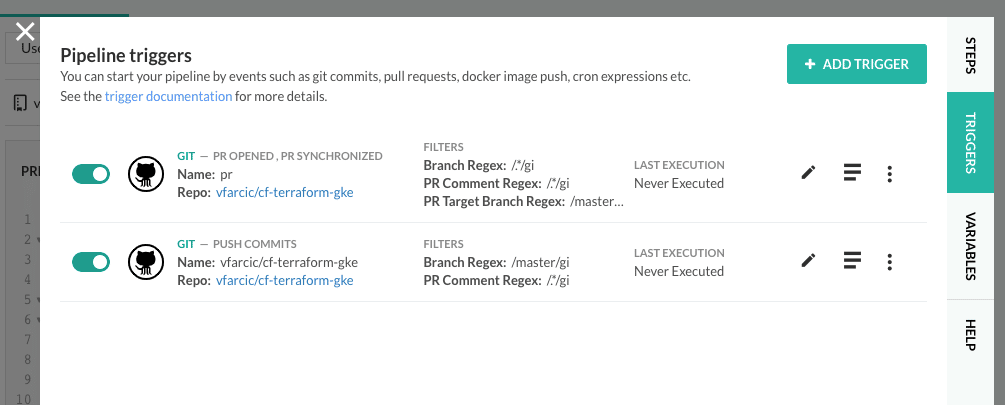
Next, we want to change the triggers, so click the TRIGGERS tab. You’ll see a single trigger created by default when we created the pipeline. Click the edit button next to it.
For now, we’ll focus on making sure that only the master branch triggers pipeline builds.
Please change the BRANCH (REGEX EXPRESSION) to /master/gi. That will ensure that only the changes to the master branch will trigger pipelines.
Click the UPDATE button.
Next, we need to add an additional trigger that will handle creation and changes to pull requests.
Click ADD TRIGGER, followed with the + ADD TRIGGER button. Select GIT as the type. Click the NEXT button.
Change the TRIGGER NAME to pr, or whatever you would like to call it. Select the cf-terraform-eks repository.
For this trigger, we are not interested in the push commits coming from branches since we already have that set up in the other trigger. So, unselect the TRIGGER BY option Push commits.
Select the TRIGGER BY options Pull request opened and Pull request synchronized. The names should be self-explanatory.
Now, if we leave it as-is, the trigger would run pipelines on any pull request. But we might not want that. We might want to limit them only to PRs created against the master branch.
I don’t think I ever created a PR that is not against the master branch, but one can never know how far the creativity of others goes.
So, we’ll change the PULL REQUEST TARGET BRANCH (REGEX EXPRESSION) to /master/gi
Click NEXT, followed by the DONE button.
Close the dialog by pressing the X icon in the top-left corner of the Pipeline triggers dialog.
Now we’re ready to give pull requests a spin.
Using Pull Requests To Preview Changes To Infrastructure
Let’s create some changes to our infrastructure and see how we can benefit from pull requests and triggers to Codefresh pipelines.
The first few steps are typical for creating any pull request. It starts with the creation of a new branch.
git checkout -b destroy
We could make some changes to the definition of the infrastructure. We could, for example, upgrade the Kubernetes version. Or, we could add another node pool. But, since we are getting close to the end of the story, we might just as well destroy the whole cluster. I don’t want you to blame me for the high cost of using my examples, so I always end tutorials with the destruction of everything. This will not be an exception, except that we’ll proceed with the destruction before reaching the end.
The typical way to destroy the resources created through Terraform is to execute terraform destroy. But that command is not very “friendly” to CD processes. It makes much more sense to keep using terraform apply, no matter whether we want to create, update, or destroy resources.
However, there is no intuitive way to do something like that in Terraform. If, for example, we delete all the files, terraform apply would think that there is something fishy about it and prevent us from proceeding. On top of that, deleting all the files from Git might complicate tracking and reviews. Similarly, sometimes we might want to delete resources but still keep the option to recreate them later. That is especially true when dealing with those that are temporary like, for example, a cluster used as a development environment. One might create it at the beginning of the workday and shut it down when finished working.
We can use the count property available in all Terraform resources. It can be set to 1 by default and changed to 0 if we want to destroy that resource. To make it a bit more user friendly, we can have a boolean variable to control that behavior.
That’s why the current definition has the variable destroy of type bool set, by default, to false. Further on, we have count = var.destroy == true ? 0 : 1 set to all the relevant resources. We saw those when we explored variables.tf and main.tf. Feel free to take another look at those files if your memory does not serve you, or if you did not pay attention.
Now that the logic behind destructive tendencies is a bit clearer, let’s create a PR that will propose the destruction of the whole cluster.
Please open variables.tf in your favorite editor and change the value of the destroy variable to true. Make sure to save the changes.
Now that we modified the Terraform definition, we can push the changes to the newly created branch.
git add .

git commit -m "Destroying everything"

git push
--set-upstream origin destroy
Feel free to go back to Codefresh. If you do, you’ll see that a pipeline build was not triggered by that push. That was expected since we modified the triggers to work only with the master branch and pull requests.
Next, we’ll pretend that we are finished working with that branch and that we are ready to propose that those changes be applied to production. So, as you already know, it is time to create a pull request.
open https://github.com/$GH_ORG/cf-terraform-eks
Please create a pull request. I’m sure you already know how to do that, so I will not give you step-by-step instructions. If you don’t know how to do it, the first step is to feel ashamed for a few minutes and then Google it.
Now, go back to Codefresh UI opened in your browser, and observe that a new pipeline build was triggered. The last two steps are what matters in the context of pull requests.
The logs from the second to last step (the one named Outputting Terraform plan) should show what will happen if we apply the changes. In this case, you will see that some of the resources will be deleted.
The second important observation is that the Applying Terraform step was skipped. We did not apply the changes, but only executed terraform plan that shows us what would happen if we do.

Further on, we would probably review the code of the proposed code changes, discuss it with our peers, ask for someone to approve, and do all the other things we usually do with PRs. We’ll imagine that we did all that,
All that is left is to confirm that we indeed want to apply the changes that will destroy the cluster. Since we are enforcing the GitOps principles, the way to proceed is to merge the PR and let the machines do the rest. So, please go back to the pull request and hit the Merge pull request button.
We’re finished with that branch, so let’s go back to master.
git checkout master
Go back to Codefresh. You’ll see that a new pipeline build was triggered. It will complete soon. When it’s done, your cluster will be gone. If you do not believe me, open the AWS Console and confirm that it is no more.
From now on, you can create or destroy the cluster by changing the value of the variable destroy. Of course, that does not mean those are the only operations you can do. You can add new resources, change the properties of the existing ones, or do (almost) anything else related to your infrastructure.
What matters is that your job is to write or modify Terraform definitions and push them to Git. The machines will do the rest.
What Are We Missing?
We could have done many other things, but due to constraints of time and space, we didn’t. We could create a temporary parallel infrastructure for testing purposes. We could add tests that would validate changes. We could send the output of terraform plan to the PR to have all the information there. We could also employ ChatOps to further streamline the whole process.
Time and space are limited, and this article is already much longer than I initially thought it will be. So, we’ll end here, for now.