Unit and integration testing is one of the pillars of software quality. Shipping software fast is certainly an important target for any organization, but shipping correct software is an equally important goal.
There are several types of testing in regards to what area of the application we examine (functional or non-functional requirements), but in the broader sense we can split tests that happen in a CI/CD pipeline into two categories:
- Unit tests that depend only on the source code of the application and nothing else.
- Integration/component/end-to-end tests that depend on external services (such as a database or a queue) and if you have adopted a microservice architecture you might also need a selection of neighboring services to be up as well.
The first category (plain unit tests) is easy to implement in a Codefresh pipeline since the only thing needed is the source code. Just pick a Docker image that contains your tools (e.g. maven/junit) and run the same command that you would run locally in your workstation. For more details see the Codefresh unit testing guide.
Integration tests are much more challenging to set up. You need to make your pipeline aware that integration tests are taking place and automatically launch the extra services needed.
Launch service containers in a pipeline
Codefresh supported integration testing since its inception by using composition steps. Composition steps allow you to describe extra services in your pipeline in a similar manner to Docker compose. However, as more and more companies started using Codefresh for CI/CD we discussed several improvements on how to make integration testing even easier in order to cover more customer scenarios. To this purpose, Codefresh now supports Service Containers.
Service Containers are the recommended way to run integration tests from now on. Plain composition steps are still supported, so don’t fear that you need to migrate your existing steps to service containers.
Some of the major advantages that service containers have (and will be described in more detail below) are:
- Ability to control service startup order in a fine-grained manner
- Explicit mode for preloading test data to databases or doing other initialization tasks
- Automatic mounting of the shared Codefresh volume in order to access your source code in integration tests
- Launching services for the duration of the whole pipeline instead of just individual pipeline steps.
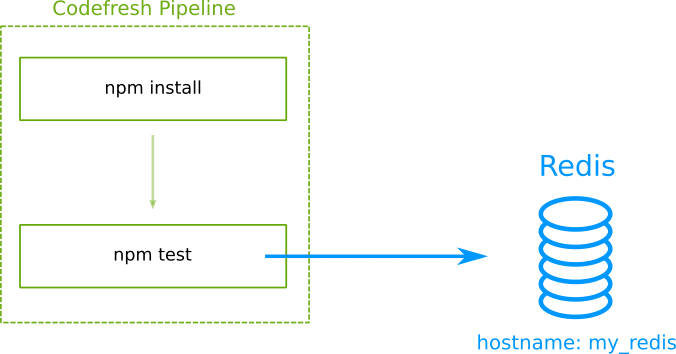
As a very simple example let’s say you want to use a Redis datastore in your pipeline because your Node.JS application depends on it.

Your integration tests expect the Redis hostname to be my_redis (with the standard Redis port). Here is the Codefresh YAML that does this:
 my_tests:
    image: 'node:11'
    title: "Integration tests"
    commands:
      - 'npm test'
    services:
      composition:
        my_redis:
          image: 'redis:latest'
          ports:
            - 6379
The syntax for services is similar to Docker compose (in fact you can even reference an existing docker-compose file in your pipeline if you already have one). And as with Docker compose, you can create any complex microservice architecture that you need for integration tests.
Controlling the startup order of services
One of the killer features of service containers is the ability to control the exact order of services launched. This way when your integration tests run, you know that all services are actually up and running. This is a well-known problem that is not solved even by Docker compose itself.

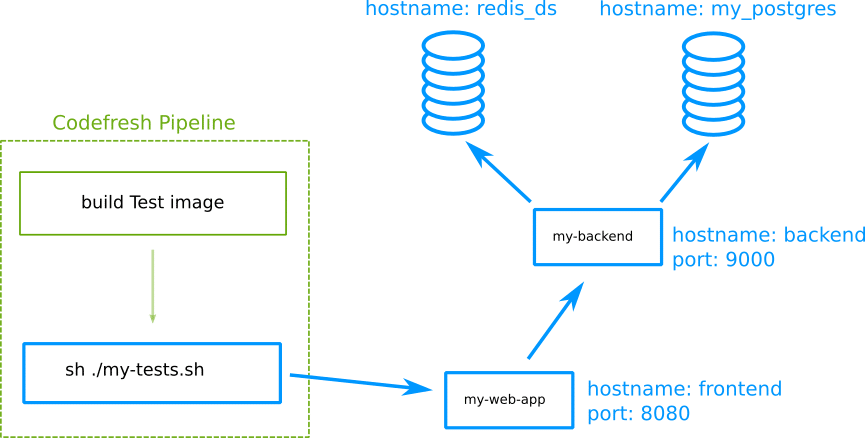
Let’s say that you have a pipeline like the picture shown above. You need to make sure that both datastores are up before launching the backend, and also that the backend is itself up before launching the front-end.
This particular issue is usually solved with special wait-for-it scripts that loop over a port until it is actually ready to receive connection. These scripts do work, but in a very clumsy manner, because you have to remember to include them in every Dockerfile that needs them.
Codefresh instead offers you this functionality in a built-in manner placing it where it belongs (i.e. in the pipeline). For each service container, you can define one or more commands that will check a condition in a setup block. The condition is automatically looped by Codefresh until it becomes true. Here is a very simple example for PostgreSQL:
 run_integration_tests:
    image: '${{build_image}}'
    commands:
      # PostgreSQL is certainly up at this point
      - rails db:migrate
      - rails test
    services:
      composition:
        my_postgresql_db:
          image: postgres:latest
          ports:
            - 5432
      readiness:
        timeoutSeconds: 30
        periodSeconds: 15
        image: 'postgres:latest'
        commands:
          - "pg_isready -h my_postgresql_db"
In the example above our Rails tests only run when the PostgreSQL DB is actually ready to receive connections. Notice the complete lack of a looping script. Codefresh will automatically loop on its own running pg_isready all the time. Of course you can specify timeouts and the loop period as well as other parameters.
The commands and Docker image that you use in the readiness block are arbitrary. Another common pattern is to just use curl for checking the status of a web application:
 run_integration_tests:
    title: "Running integration tests"
    stage: test
    image: '${{build_test_image}}'
    commands:
      # Tomcat is certainly up at this point
      - mvn verify -Dserver.host=app
    services:
      composition:
        app:
          image: '${{build_app_image}}'
          ports:
            - 8080
      readiness:
        timeoutSeconds: 30
        periodSeconds: 15
        image: byrnedo/alpine-curl
        commands:
          - "curl http://app:8080/health"
In this pipeline we make sure that the /health endpoint of our application under test is up and running and then we start the integration tests.
This is a very powerful technique because it means that no matter the services you need in integration tests, they will always start in the correct order that you have defined. The definition of being “ready” for each service is up to you. Simple HTTP and TCP checks are very common, but given the power of Docker images, you could create your own complex health check in exactly the way that your service is working.
Preloading a database with Test data
Another common scenario with database testing is when you need test data in the DB. Some tests are smart enough to create and delete their own data from a dB, but even in this case you still need some minimum data such as read-only values, configuration properties, and other information that is “always there”.
Service containers also support a “setup” block that you can use to run any initialization code that you need. What you put in this block is entirely up to you.
run_integration_tests:
    image: '${{build_image}}'
    commands:
      # PostgreSQL is certainly up at this point and has the correct data
      - rails test
    services:
      composition:
        my_postgresql_db:
          image: postgres:latest
          ports:
            - 5432
      readiness:
        timeoutSeconds: 30
        periodSeconds: 15
        image: 'postgres:latest'
        commands:
          - "pg_isready -h my_postgresql_db"
      setup:
        image: 'postgres:latest'
        commands:
          - "wget my-staging-server.exaple.com/testdata/preload.sql"
          - "psql -h my_postgresql_db < testdata/preload.sql"
In the example above, we download a SQL script inside the Postgres container and then automatically load it in the database. Codefresh is smart enough and will run all blocks in the way that you expect them. First, the readiness block will ensure that the database is up, and then the setup block will prepare the test data.
When the integration tests start, Codefresh guarantees that both the Database and its test data will be ready for the tests. PosgreSQL is just an example. You can follow the same technique with other databases, a queue, or any custom service.
Duration of test infrastructure
One important thing to remember regarding test infrastructure is that it shares the same resources with your pipeline. The more memory/cpu your tests need, the less it remains for the actual pipeline.
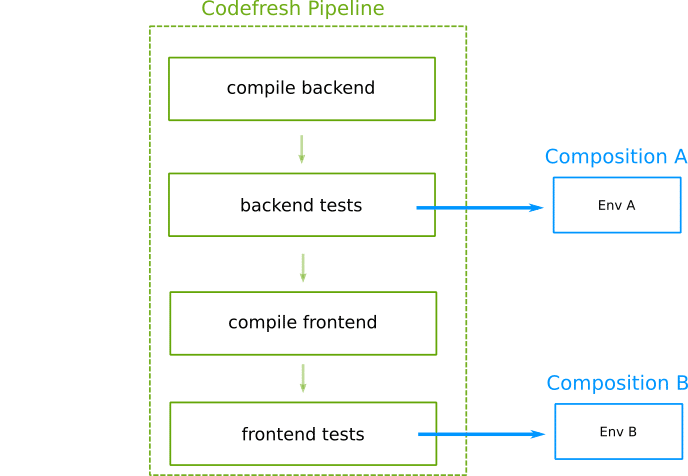
It is therefore wise to launch extra services only when you actually need them. And the most natural way to do this is to only launch service containers in the steps that require them:

This is the recommended way to run service containers as it is very resource-efficient. Each set of services is launched before the step that needs it, the step then executes, and then all test infrastructure is torn down.
All the examples mentioned so far in this blog post use this technique.
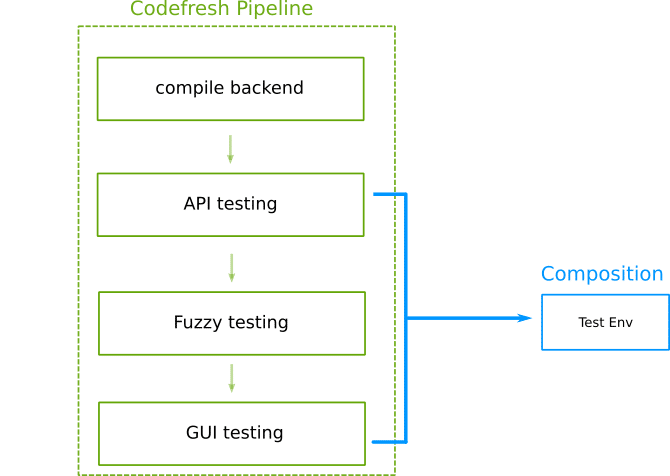
We also have listened to customer feedback which involves cases where the test infrastructure is needed for the whole pipeline. The test infrastructure is launched once, the pipeline starts and finishes, and then everything is discarded.

In order to accomplish this behavior you can simple move the service container YAML to the root of the pipeline:
Here is an example where a Redis instance is accessible to all pipeline steps:
version: "1.0"
services:
  name: my_database
  composition:
    my-redis-db-host:
      image: redis:latest
      ports:
        - 6379
steps:
  my_first_step:
    image: alpine:latest
    title: Storing Redis data
    commands:
      - apk --update add redis
      - redis-cli -u redis://my-redis-db-host:6379 -n 0 LPUSH mylist "hello world"
      - echo finished
    services:
      - my_database
  my_second_step:
    image: alpine:latest
    commands:
      - echo "Another step in the middle of the pipeline"
  my_third_step:
    image: alpine:latest
    title: Reading Redis data
    commands:
      - apk --update add redis
      - redis-cli -u redis://my-redis-db-host:6379 -n 0 LPOP mylist
    services:
      - my_database
Notice that the services block is at the root of the yaml instead of being a child in a specific step. Please use this technique with caution as it can be very heavy on your pipeline resources.
Service containers are currently available to all Codefresh accounts of all tiers (even free ones), so you can use them in your own pipelines right now.
Ready to try Codefresh and start creating your own CI/CD pipelines for microservices? Create Your Free Account Today!
