This is the first of many posts highlighting GitOps topics that we’ll be exploring. Within this post, we will explore Helm, a tool used for Kubernetes package management, that also provides templating. Helm provides utilities that assist Kubernetes application deployment.
In order to better understand how Helm charts are mapped to Kubernetes manifests, we’ll explain more details below and how to use Helm with and without GitOps.
What is Kubernetes?
Kubernetes is an orchestrator for containers that allows you to automate scheduling, deployments, networking, scaling, and health monitoring for the containers.
Kubernetes was needed because we increased the usage of the following:
- Microservices
- Containers
This was difficult to manage with scripts and self-made tools and caused the need for orchestration technology like Kubernetes. It provides features like scalability, disaster recovery, and less downtime.
What is Helm?
Helm is a package manager for Kubernetes, and ideal for Gitops Kubernetes. It’s a convenient way for packaging collections of YAML files with a Helm chart for the Kubernetes application and allowing distribution with a Helm repository.
Maintaining Kubernetes manifests is time-consuming and tedious and this is why Helm is helpful!
Helm Charts
Helm Charts are deployable units for Kubernetes applications. These charts are a collection of files inside a directory. This directory is the name of the Helm chart and consists of a self-descriptor file, YAML file, and one or more Kubernetes manifests. Helm charts are typically written in the Go template language. Charts are created as such files, describing a related set of Kubernetes resources. Here’s an example of a Helm chart directory and it’s layout:
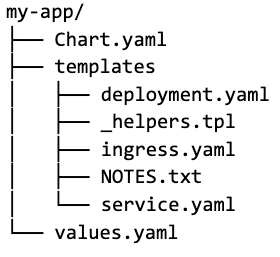
This particular directory contains a Chart.yaml file and this is where the global variables, versions, and descriptions are stored. Then, the templates directory is what contains the YAML files for Kubernetes, otherwise known as the Kubernetes manifests.
Files such as the deployment, service, and ingress files contain variables from the values.yaml file when the chart is deployed. The _helpers.tpl incorporates helpful functions for variable calculations.
You can then share the Helm chart to increase easy reusability for others to use. Sharing is done by storing the chart to a Helm repository. This repository can then be shared with others to deploy the application with the chart.
Helm Repositories
Helm supports a chart repository service that can be used to store the Helm charts. You can use any web server host or source code host for the Helm repository.
The repository has an index.yaml file that contains metadata about the package, including the Chart.yaml file. The index will contain information about each Helm chart in the chart repository. Then the server can serve your index and charts or the packages can be stored in the repository for shareable access.
Helm Release
Each install or upgrade will create a Helm release. A Helm release is a running instance of your Helm chart running within a Kubernetes cluster or a namespace. It’s essentially an instance of a versioned, templated chart. It’s also possible to have multiple releases of the same chart in a single cluster or namespace since the chart is self-contained. You can also roll back a Helm release to a previous version in case there are any failures.
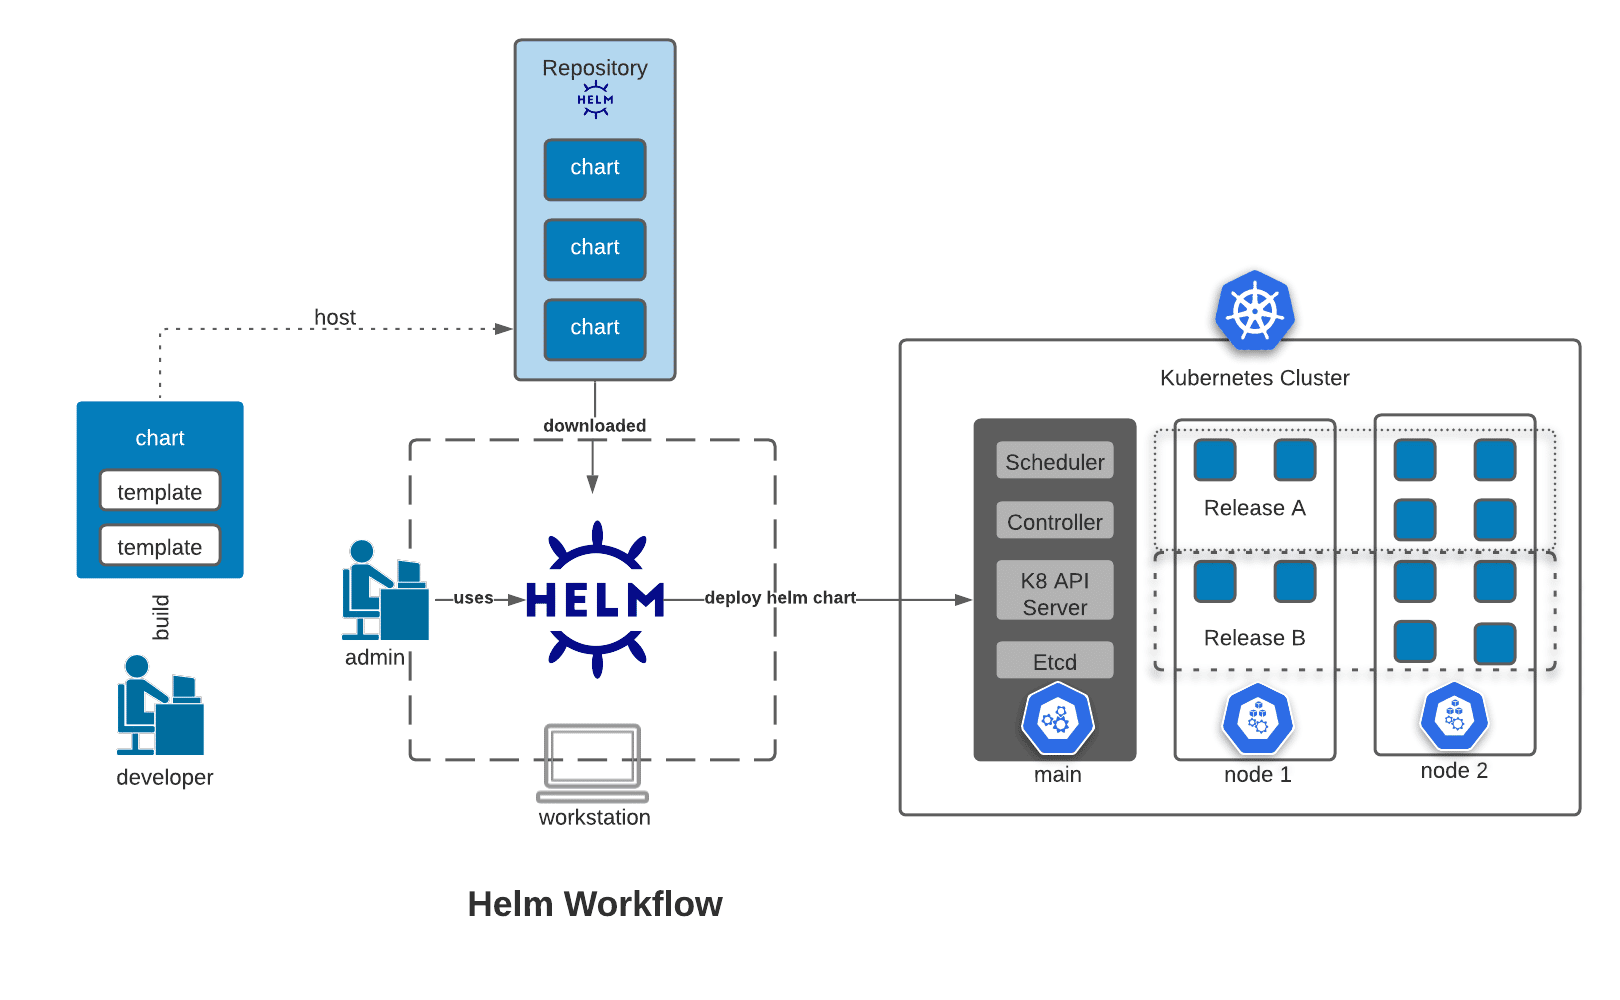
Assuming you’re a developer with an existing cluster, perhaps you’d like to share your Helm application with an external vendor. Let’s recap the Helm workflow and release process:
- To share an application with others, you need to create a Helm chart. The chart is a package that contains templates for a set of resources necessary for the application. The template uses variables applied to the Values.yaml file when the manifest is created and describes how to configure the resources.
- The Helm charts are then hosted within a repository that can then be downloaded or accessed from a server. This chart will contain all the necessary resource definitions needed for the developer to run an application.
- Now that you have access to the cluster, you can add new features or bug fixes to the application and update the Helm chart. Helm offers useful tools to manage your releases. You can upgrade the chart and create a new deployment. In Helm a deployed instance of your application is referred to as the release.
- You can now deploy your packaged application to the cluster.
Within this workflow we identified how Helm packages files and deploys them to a cluster. So, how do you apply GitOps to the workflow above? Let’s explore this below…
What is GitOps?
GitOps is a paradigm that incorporates best practices applied to the application development workflow all the way to the operating infrastructure of a system.
Some GitOps benefits are:
- Deploying faster and more often
- Easier and quicker error handling and recovery
- Self documenting deployments
- Increased developer productivity and an enhanced experience for teams
- Greater visibility on the lifecycle of developed features
These benefits make it easier to handle the applications and allow teams to deliver quality software faster.
GitOps relies on Git as the single source of truth for declarative configuration and active reconciliation. By adopting the GitOps methodology it provides transparency between the application configuration deployed in a cluster and the one residing in Git.
A GitOps tool that follows this approach of a Git-based workflow is Argo CD. It’s a continuous delivery tool for Kubernetes that is essentially a GitOps controller that does two-way synchronization. Argo continuously monitors running applications and compares the live state against the desired state in Git and applies it to the cluster. In addition, it also monitors the container registry for new images and updates the workload definitions based on the deployment policies.
We will mention Argo CD again in this post and can assume that it’s already been installed and implemented within our workflow!
GitOps works with all of your existing tools
Now that you have a good understanding of what Helm is and it’s capabilities, perhaps you’ve considered applying GitOps to your existing or future applications.
Let’s explore the various approaches of how to use GitOps with or without Helm:
- Using only Helm (without GitOps)
- Using GitOps (without Helm)
- Using Helm with GitOps
If you’d like to explore these different approaches from a code-base perspective, here is an example project that you should check out on GitHub that digs deeper into how you can:
- Install an application with Helm and deploy locally
- Install an application with Argo CD and deploy locally both within the UI and command line
If not, then we’ll be sure to highlight these approaches below!
Approach #1: Using only Helm without GitOps
If you want to use Helm but your organization isn’t quite ready to implement the GitOps workflow, that’s perfectly fine. Helm was created before the GitOps methodology came to fruition, but can still work with GitOps (as we will see in the latter point).
The workflow allows you to search through Helm repositories for charts and install them to clusters, creating releases. This process enables execution of application deployments on a cluster. The maintenance of YAML manifests for Kubernetes objects is still the same as before. Helm releases are what keeps track of the version history of each chart installation and change and still allows rolling back to the previous cluster version. When installing a chart it creates a release of the new package and it’s the Helm release that deploys the Helm application.
When using Helm there are some powerful commands you will find useful, please see below.
To install a new package:
helm install
To view currently deployed releases:
helm list
or
helm ls
To view revision numbers for a particular release:
helm history
To learn more details about these commands and how to use them, reference the example project in GitHub.
Approach #2: Using GitOps without Helm
If you’re sold on the idea of GitOps, there are alternative tools that can be used if you’re unable to use Helm or choose not to.
You can use ArgoCD on its own. It is pretty flexible and can work with other templating solutions or even plain manifests. Another templating tool that can be used instead of Helm is Kustomize. This tool is built into kubectl and is native to Kubernetes. It allows you to customize Kubernetes configurations using only the Kubernetes API resource files.
Now, let’s explore our third approach about how to implement GitOps using Helm and Argo CD…
Approach #3: Using Helm with GitOps
Now that you’ve seen how GitOps can be applied without Helm, let’s explore how you can use it with Helm.
First, the Helm chart and any application changes must be committed in Git prior to being applied to the cluster. Meaning all of your workload definitions in a YAML format, the Helm charts, and any other Kubernetes custom resources that define the cluster’s desired state must be committed to the repo. This way rollbacks and logs are accessible and the state of production can be restored easily.
Within Argo CD you can connect the Git repository using HTTPS and add the URL directly. This then allows you to enable auto-synchronization to automatically synchronize the cluster to the desired state in the Git repository. Once synced successfully, the application status is recognized as Healthy. Otherwise, if the application is OutOfSync, you can rollback or view the release history to resolve the issue.
Here’s an example of a Healthy application in the Argo CD UI.
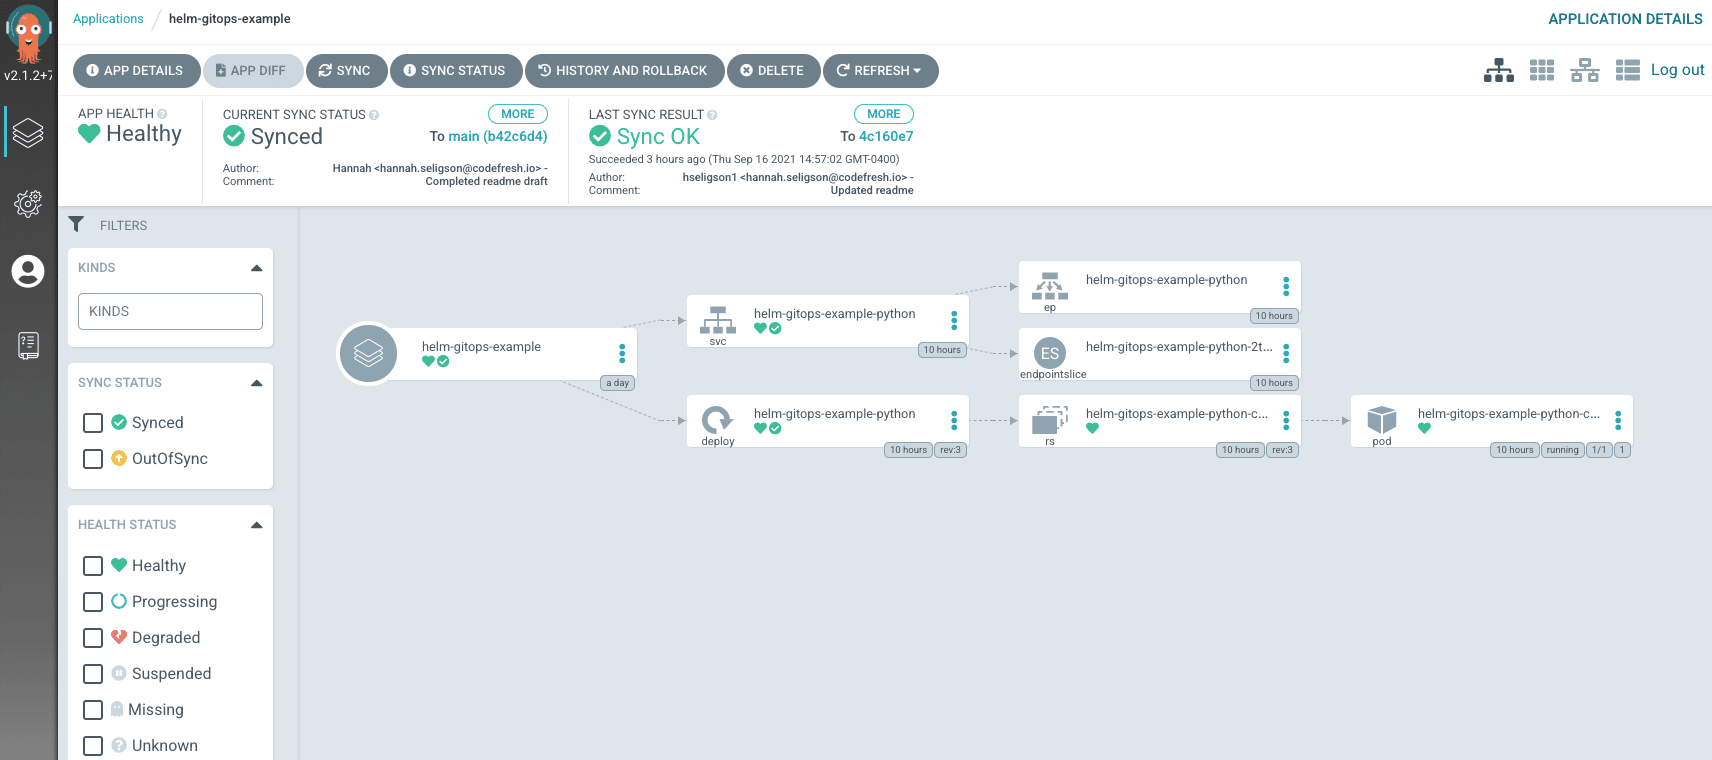
When the application is running you can view its resource components, logs, events, and the health status.
For good measure, here’s a visual of the Argo CD UI exemplifying an OutOfSync application when the live state deviates from the target state.
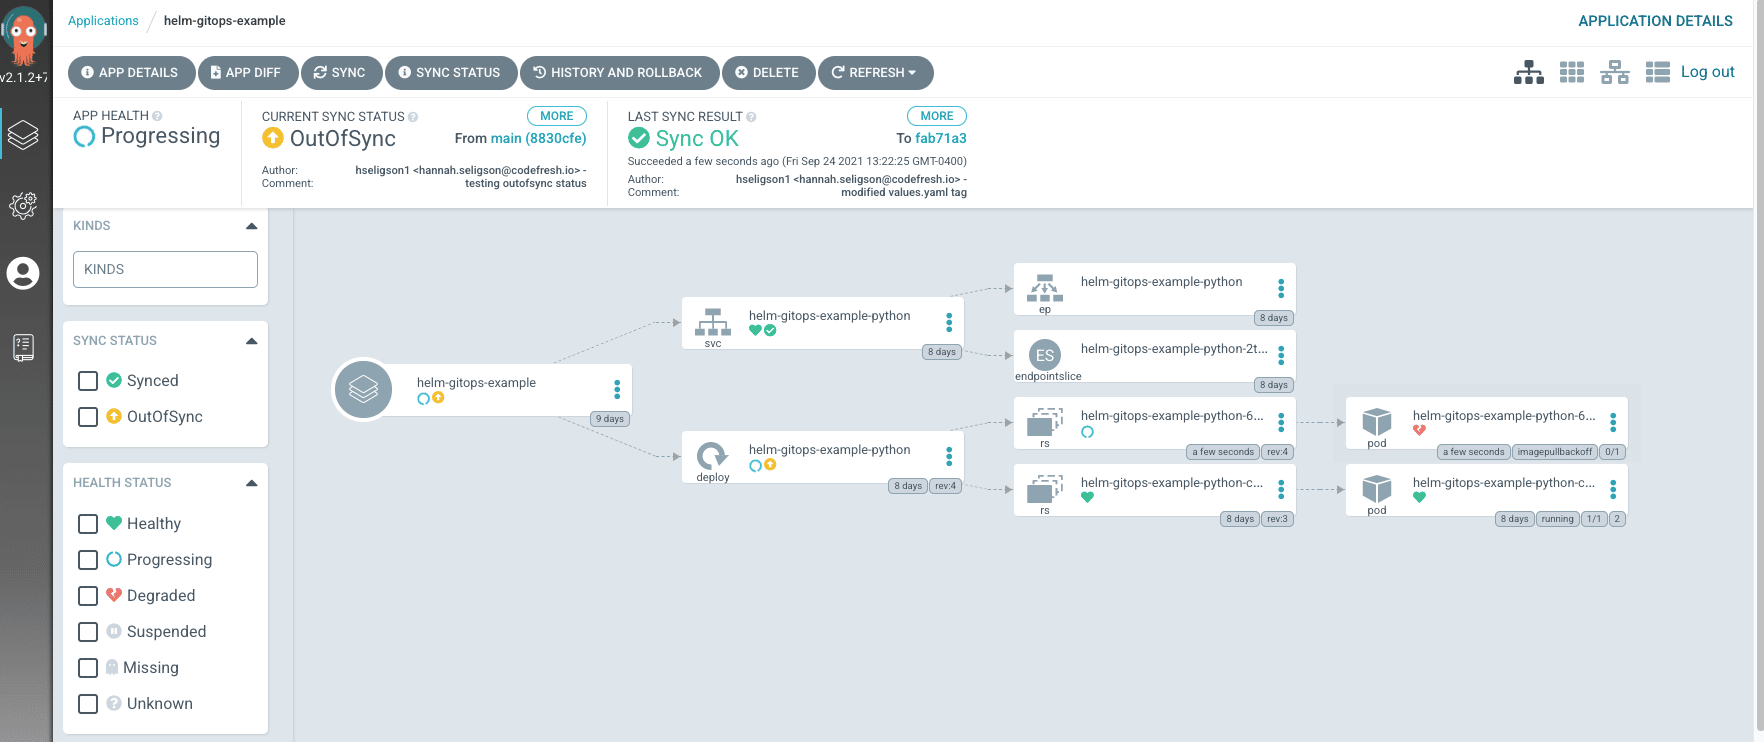
If your application had an error or was OutOfSync like the example above, you could execute the argo history command that allows you to view the application deployment history:
argocd app history
Then, if you need to rollback the deployment you can do so by executing this command:
argocd app rollback
Essentially, these commands leverage a faster and more secure deployment, by enabling the tracking from the Git repository. It also allows you to track the active Kubernetes resources and events.
Therefore, using source control like this is what classifies this application deployment as GitOps!
Something important to note is that Argo CD provides native support for Helm, meaning you can directly connect a packaged Helm chart and Argo CD will monitor it for new versions. When this takes place the Helm chart will no longer function as a Helm chart and instead, is rendered with the Helm template when Argo is installed, using the Argo CD application manifest.
Argo CD then deploys and monitors the application components until both states are identical. The application is no longer a Helm application and is now recognized as an Argo app and can only operate by Argo CD. Hence if you execute the helm list command, you should no longer be able to view your helm release because the Helm metadata no longer exists.
Here’s an example of the command output. As you can see, the Argo CD application is NOT detected as a Helm application.
![]()
Summary
Helm is a powerful tool that is used often with Kubernetes deployments and provides tracking for each release. This helps ensure reliable and quick deployments for development teams.
So, if you’re completely new to Helm, I suggest referring to our documentation to learn more about it, here:
We’ll discuss additional tools in our next post that can help you and your team continue implementing a GitOps process to your development and infrastructure systems.