In case you missed our Testing Strategies Docker Driven Development Webinar with Cloud66, we recorded it for you to view on demand. During the session, you’ll learn strategies and best practices for testing Docker containers and running them in production.
The Webinar Includes:
- Daniël van Gils’ (Developer Advocate at Cloud 66) talk on “Docker Inside/Out: the ‘real’ real-world of stacking containers in production.” This includes 12 stages of the hero journey to run containers in production and examples on how developers use microservices today.
-
Alexei Ledenev’s (Cheif Researcher at Codefresh) talk on “Testing Strategies for Docker Containers.” During the presentation, Alexei shows step-by-step demos of 4 testing strategies and explains the benefits and drawbacks associated with each approach.
You can view and download their slides below:
Highlights:
Talk #1: Docker Inside/Out: the ‘real’ real-world of stacking containers in production
Daniel walks us through the 12 stages of the hero journey to run containers in production.
You can’t run containers in production from day one, you need to take the journey. During the first couple stages you work on your projects with the methods you already know but then one day you hear about “containers” online or from a friend/ colleague, or event.
At stage three you start to think –How can I implement containers in my current workflow? But you might decide not take action right away or don’t know how.
At stage four you come across a mentor or experienced user that is happy to help you on the containers journey, for example, Daniël.
Apply the artichoke model – When you want to embrace change in your company you need a medium. The container/microservice is an elegant message.
Stage five: Now you are crossing the threshold. You and your team need to understand the containerization machine or the process to get your service from idea to production. Think global, act local. Once you create a Dockerfile don’t deploy it right away. Make sure you understand how the Dockerfile works and getting it up in running on your local machine before deploying it.
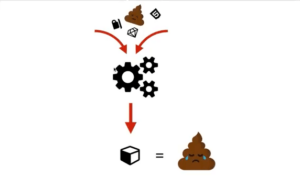
Stage six: You are using the containers and run into some problems because you are doing it wrong. This is the stage where most developers realize they are putting too much in their containers. Try removing unneeded components and cleaning up your image.
“If you put in sh#t in you will get sh#t out, you can’t polish a turd.”
At stage seven you are ready to start running containers in production. Reminder to “keep it simple stupid.”
K.I.S.S.S.S.S. – Keep It Slim, Secure, Speedy, Stable, Set
- Slim – remove all the layers and stuff you don’t need
- Secure – make sure you have the latest security updates and remember to remove all secrets
- Speedy – follow best practices how to deploy your code in production and run performance tests
- Stable – lock downstream base image, lock runtime dependencies, has to be the same in all environments
- Set – make it immutable, don’t mess around with stuff like volumes and databases inside containers (yet)
Stage eight: It’s time for production! But first, a reality check. Based on Daniël’s research this is how people are using containers in production:
- 60% of developers use a monolith containerization approach (part of the learning curve)
- 30% of developers use an API-first approach
- 7% of developers split their architecture with containers (including workers, APIs, and background processes, etc)
- 3% of developers are truly using microservices
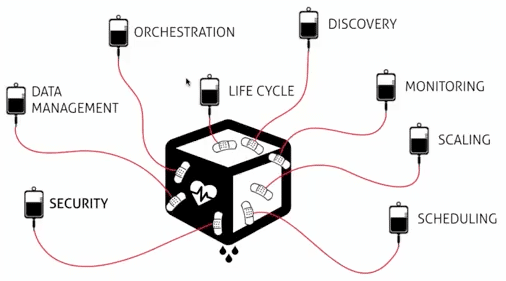
Stage nine: You understand the container ecosystem and what is needed in production.
This is your container nursery:
Stage ten: You go back to your team with a proof of concept of how to implement containers.
Stage eleven: You show off to your team everything you learned during the journey.
Stage twelve: You are a container hero and can go explore new things/ start a new journey.
Talk #2: Testing Strategies for Docker Containers
Alexei started the talk by first explaining the benefits of using Docker, including portability, speed, configuration flexibility, Docker Hub ( app store of tools and resources packaged in containers you can utilize), etc. He also explained the Docker architecture at a high level.
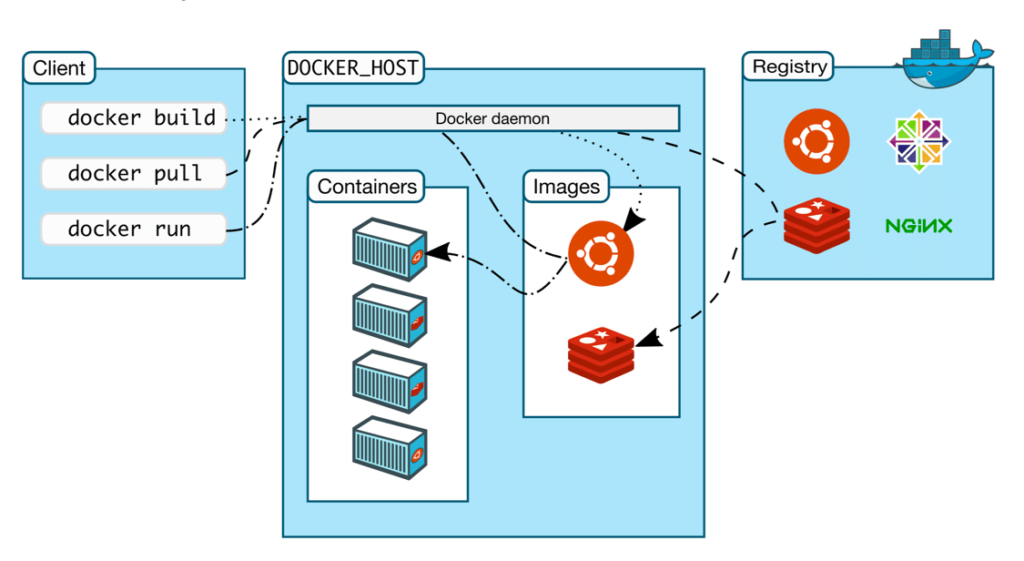
After explaining how Docker images are built, Alexei walks us through the different ways we can test them.
The “Naive” Approach
See the 1st scenario demo – 29 minutes 30 seconds of the webinar
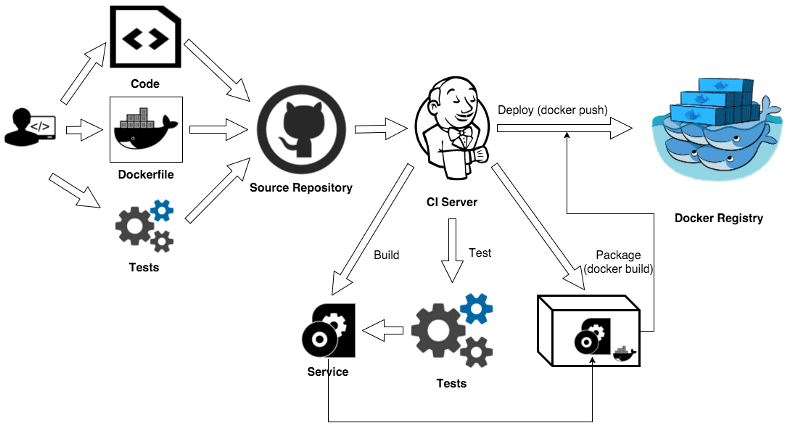
The “Naive” approach is what most people do when they start their container journey and relies on a CI server. In this approach, the developer uses Docker as a package manager (a better option than the jar/rpm/deb approach) to modify their flow slightly with a Dockerfile. The CI server compiles the application code and executes the tests (unit, service, functional, etc). The build artifacts are reused in the Docker build to produce a new image which becomes a core deployment artifact. The produced image contains not only application “binaries” but also the required runtime, dependencies, and application configurations.
Benefits and drawbacks of this approach:
We get to use our familiar CI flow and achieve application portability and a small Docker image. But won’t have a portable Dev or Test environment, meaning we’re not able to reproduce exactly the same dev and test environments outside of our CI server. To create a new test environment we would need to set up test tools (correct versions and plugins), configure runtime and OS settings, and get the same versions of test scripts and any test data. And we would need to repeat this procedure for each developer machine, CI machine, new build agent machine, etc. which can be quite tedious.
How can we improve this scenario? Place all CI flow (compile & test) inside the app container.
App & Test Container Approach
(See the 2nd scenario demo – 33 minutes 38 seconds of the webinar)
In this approach, we use Docker to create one image with everything in our CI flow (test tools, required packages, test scripts, test data, etc.) and app.
Here’s a simplified Dockerfile that illustrates this approach.
FROM "<bases image>":"<version>"

WORKDIR "<path>"

# install packages required to run app and tests
RUN apt-get update && apt-get install -y
    "<app runtime> and <dependencies>"   # add app runtime and required packages
    "<test tools> and <dependencies>"      # add testing tools and required packages
    && rm -rf /var/lib/apt/lists/*

# copy app files
COPY app app
COPY run.sh run.sh

# copy test scripts
COPY tests tests

# copy "main" test command
COPY test.sh test.sh

# ... EXPOSE, RUN, ADD ... for app and test environment

# main app command
CMD [run.sh, "<app arguments>"]

# it's not possible to have multiple CMD commands, but this is the "main" test command
# CMD [/test.sh, "<test arguments>"]
view rawDockerfile hosted with ❤ by GitHub
Benefits and drawbacks of this approach:
This strategy gives us a simple CI flow, application portability, and portable Dev and Test environments.
Downsides to this method are it increases the size of our Docker image because it contains all test tools, required packages, test scripts, and test data. We also need to rebuild the image each time we code or test and decide what to do with the test results and logs (how and where to export them). It also pollutes the image with test specific configurations and some unneeded dependency packages.
How can we improve? Split the image into two images.
Test Aware Container Approach
(See the 3rd scenario demo – 38 minutes 31 seconds of the webinar)
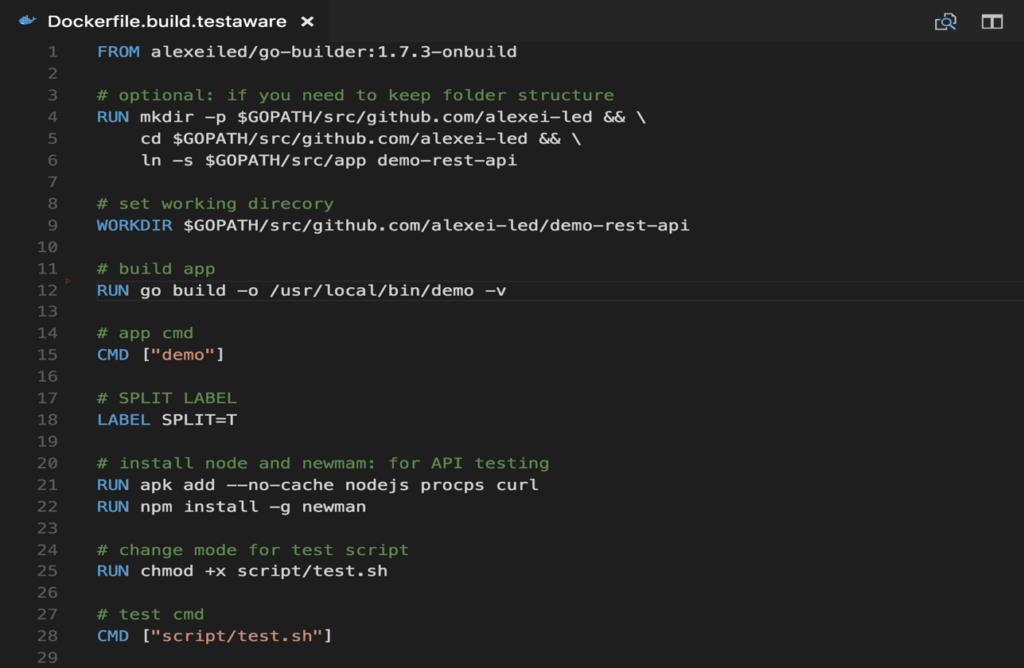
In this approach, we take the same (App & Test container) approach but extract layers so we have one image that only contains the application and another larger image that contains both app & test. We take the same Docker file but add these commands on line 15 and 28. We also a special label called “SPLIT” to cache the image layer or split where the image is created.
Benefits and drawbacks of this approach:
Using this method, we end up with two separate images and one Dockerfile. It allows us to achieve a portable Dev and Test environment and capture test our scripts at a specific point in time so we can reproduce them in any environment. We also don’t have to setup and configure our testing tools since their part of our image.
But the drawback is we still need to rebuild the entire Docker image with every code or test change. We’ll also need some shell “magic” to create a clean app image (without test tools and tests).
After trying many different testing strategies, Alexei recommends the following:
Docker Automation Flow
(See the 4th scenario demo – 42 minutes 56 seconds of the webinar)
In this approach, we create a Docker Automation Flow and containerize every step. For example, we create a builder container (with all compilers, linters, package managers, and dev tools), a test container (with testing tools, test scripts, runtimes, etc. ), and an app container (with only the application binaries, runtimes, and required packages).
Alexei found this to be the best method because we achieve portability with everything (our application, automation flow, dev and test environment) so we can build and test anywhere. This also allows enables us to have a smaller app image and faster builds.
However, you still need to find a tool to automate and orchestrate this build flow. It can be difficult to do on your own using Bash or Shell scripts so Alexei recommends using tools like Habitus.io or Docker CI/CD services like codefresh.io that allow you to easily define multiple steps as a Docker Container.
Have questions?
Sign up for a free account at Codefresh.io and request a one-on-one onboarding session so we can help you set up your Docker automation flow. Or email Alexei directly at [email protected]
Sign up for a Cloud 66 account at Cloud66.com or request a one-to-one demo of Cloud 66. Or email Daniël directly at [email protected]