Update 4/13/2022: This post shows some early work on canary releases in Kubernetes. We recommend following our always up-to-date learning center for the best approaches to canary deployments.
Introduction:
Canary releases (or deployments) are a modern software delivery technique allowing stress-free rollouts of new application versions into production environments.
The idea is to deploy the new release alongside the current functional version and send a small percent of production traffic to the new instances (the canary) . If the canary stays healthy and provides satisfactory service – we can then incrementally update all of our production environment to use the new version.
The concept is pretty simple, but the implementation details can differ based on your overall system topology, data structure and observability level.
Today we are going to look at a simple example of canary release pattern implemented with the help of Codefresh-Kubernetes integration.
The Flow
Kubernetes provides us with advanced deployment tooling out of the box, so the main challenge with implementing canary releases does not lie in the deployment. It’s about defining the criteria of canary health and implementing it.
The flow here can be as complex or as simple as required by your specific environment.
The number and type of required verification points, manual or automated approval processes, etc.
For the sake of our example we’ve defined the following, fully automated flow:
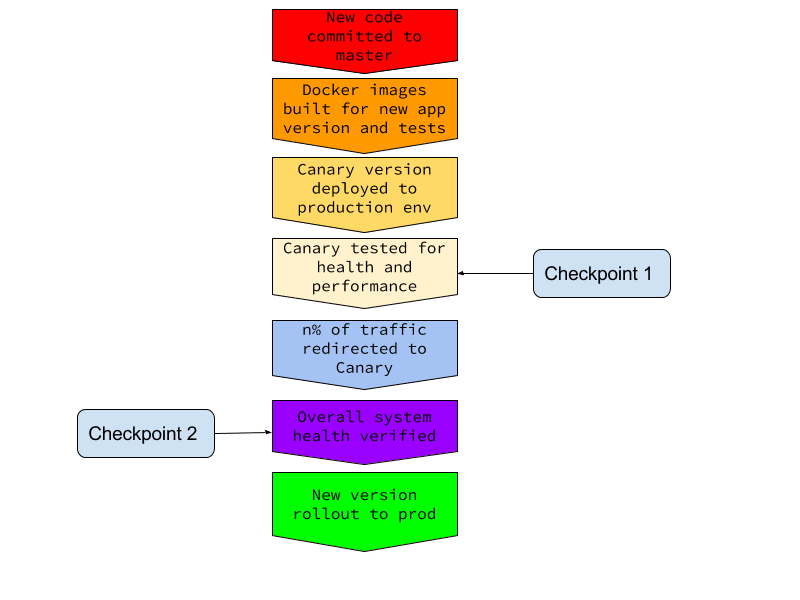
As you can see – this flow involves 2 checkpoints on the way from canary to production. We first test canary in isolation and then check the overall system health with some of the traffic redirected to canary instances.
Now let’s see how Codefresh makes this possible.
The example
Canary is a small cute bird so we decided to dedicate our demo deployment to birds in general. We will be deploying an ornithology data management service written in Python with a mongodb backend.
The application name is just that: ornithology.
(If you look this up on Wikipedia – it’s the scientific study of birds.)
Example Repositories
- The code and all the configuration files – https://github.com/otomato-gh/ornithology
- Configuration files and Codefresh pipeline examples head to: https://github.com/Codefresh-Examples/Examples/tree/master/canary-release
Application code is all in the file named api.py with data structures defined in settings.py .
There are 2 dockerfiles in our repo: one named Dockerfile that is used to package and execute the application code and the other one named Dockerfile.test used to package and execute the tests. This is needed because we will run all of our tests inside the K8s cluster and we will use Docker to send them there.
Codefresh Pipelines
Our goal in this example is to implement the trunk-based development and delivery pattern. We will do this by associating 2 Codefresh pipelines with the same github repository. Both watching the master branch.
The Canary Pipeline
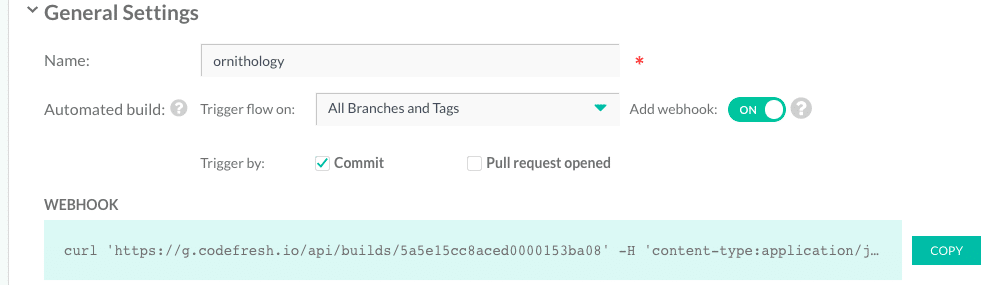
First pipeline is called ornithology-canary. It is triggered by a Github webhook for each new master commit and is configured to use codefresh-canary.yml as its flow definition.

Let’s see what this looks like:
As you can see – there’s quite a lot going on here. So let’s walk through this step by step.
We first build and push the images for the application and for test execution. Steps appropriately named buildAppImage, pushAppImage, buildTestImage and pushTestImage take care of that:
version: '1.0'
steps:
  buildAppImage:
    type: build
    description: Builds my service
    image_name: otomato/ornithology
    tag: ${{CF_SHORT_REVISION}}
  pushAppImage:
    type: push
    candidate: ${{buildAppImage}}
    tag: ${{CF_SHORT_REVISION}}
  buildTestImage:
    type: build
    description: Builds image with tests
    dockerfile: Dockerfile.test
    image_name: otomato/ornitest
    tag: ${{CF_SHORT_REVISION}}
  pushTestImage:
    type: push
    candidate: ${{buildTestImage}}
    tag: ${{CF_SHORT_REVISION}}
The step deployToK8s then uses the K8s deployment definition residing in orni-dep-canary.yml to deploy our new version to the production cluster. ( We’ll take a look at the deployment file in a minute.)
deployToK8s:
    title: deploy-to-k8s
    image: codefresh/k8s-kubectl
    commands:
      - sed -i -- "s/BUILD_NUMBER/${{CF_SHORT_REVISION}}/g" orni-dep-canary.yml
      - kubectl config use-context cf-staging@codefresh-staging
      - kubectl apply -f orni-dep-canary.yml -n otom8
In testCanary we run an end-to-end integration test on the canary in order to verify its health.
testCanary:
    title: testCanary
    image: codefresh/k8s-kubectl
    commands:
      - kubectl config use-context cf-staging@codefresh-staging
      - kubectl run e2e --image=otomato/ornitest:${{CF_SHORT_REVISION}} --attach=true --restart=Never --rm=true -n=otom8 --  "/tests/it/canarytest.sh"
      - cf_export CANARY_EXIT_FLAG=$?
    fail-fast: false
If the test fails – we rollback the canary release:
rollbackCanary:
    title: rollbackCanary
    image: codefresh/k8s-kubectl
    commands:
      - echo "Canary didn't pass isolation gate. Rolling back"
      - kubectl delete -f orni-dep-canary.yml -n otom8
    when:
      condition:
        all:
          canaryTestFailed: "'${{CANARY_EXIT_FLAG}}' != '0'"
If all goes well – we proceed to verifyCanaryInProd where we open 10% of production traffic to the canary instance and verify that some of the traffic indeed gets served by it.
verifyCanaryInProd:
  title: verifyCanaryInProd
  image: codefresh/k8s-kubectl
  commands:
    - kubectl config use-context cf-staging@codefresh-staging
    - export PODNAME=`kubectl get pods -n otom8 | grep canary | cut -d ' '  -f 1`
    - kubectl label pod $PODNAME run=ornithology -n otom8
    - kubectl run verify --image=otomato/ornitest:${{CF_SHORT_REVISION}} --attach=true --restart=Never --rm=true -n=otom8 --  "/tests/it/version_verify.sh"
Once that is completed – we call triggerProdDeployment which executes Codefresh CLI to run our second pipeline.
triggerProdDeployment:
  image: codefresh/cli:latest
  commands:
    - codefresh run 5a5e15cc8aced0000153ba08 -b master -detach
The Production Pipeline
This pipeline is called simply ‘ornithology’ . It gets triggered by the canary pipeline. It only has one step that updates a K8s deployment file with the docker image version created in the canary pipeline and then triggers a rolling update of all production pods with the new image version.
Here’s what it looks like:
version: '1.0'
steps:
  deployToK8s:
  title: deploy-to-k8s
    image: codefresh/k8s-kubectl
    commands:
      - sed -i -- "s/BUILD_NUMBER/${{CF_SHORT_REVISION}}/g" orni-dep.yml
      - kubectl config use-context cf-staging@codefresh-staging
      - kubectl apply -f orni-dep.yml -n otom8
Nuts and Bolts
Now that we’ve scanned the overall pipelines structure, let’s look under the hood to get a better understanding af all those cryptic kubectl commands and shell scripting wizardry.
The Deployment Files
We are using two K8s declarative definition YAML files: one for the production instances and another one for the canary.
The production one is called orni-dep.yaml and declares 2 K8s resources:
- An externally visible LoadBalancer type service named ‘ornithology’
- That exposes pods based on app=ornithology and production=ready labels
- A deployment, also named ‘ornithology’
- That creates 9 replicas of our application pod with the matching app=ornithology and production=ready labels
Note the container spec of the deployment object:
spec:
  containers:
    - name: ornithology
      image: otomato/ornithology:BUILD_NUMBER
      ports:
        - containerPort: 5000
The image tag BUILD_NUMBER is not an actual tag but a placeholder which gets replaced inside our Codefresh pipeline with the actual tag of the newly built image:
- sed -i -- "s/BUILD_NUMBER/${{CF_SHORT_REVISION}}/g" orni-dep.yml
(This could be of course better implemented using a Helm chart, but I’ve decided to keep this example simpler and not add Helm into the mix.)
You will also notice that the deployment strategy for production pods is set to RollingUpdate, which means that once we are satisfied with the canary and ready to upgrade them – they are replaced in a zero-downtime, ramped manner.
The canary deployment declaration resides in orni-dep.yaml. It also defines 2 resources:
- A cluster-visible ClusterIp type service named ‘ornithology-canary’
- That exposes pods based on type=canary label
- A deployment, also named ‘ornithology-canary’
- That creates 1 replica of our application pod with the matching type=canary label.
This allows us to roll out the canary to the same cluster and namespace as the production but initially invisible to clients talking to the production version.
Canary Gates

As we already said – the real challenge with canary is building the quality gate that defines when and if the new version satisfies all the requirements and can incrementally be exposed to more production users.
This gate could of course be purely manual. I.e – deploy the canary version, let it run for a while, analyze its logs and metrics to see if everything is working fine and then release to production.
But manual techniques are slow, unreliable and scale really-really bad. So for a real canary islands paradise you need some automated solution that will approve your application health and send it to production when everything looks sunny.
In a real-world environment you’ll want such a solution to integrate with your observability platform. In fact – our example application is already instrumented to output metrics that can be scraped by Prometheus.
But here again – for the sake of simplicity I decided not to look into reading and programmatically analyzing Prometheus metrics.
Instead we will be running some shell scripts to verify that application provides responses with acceptable latency and to test basic functionality.
Gate 1: Test in Isolation
As we already discussed – the canary is first exposed only to the K8S cluster via the ornithology-canary NodePort type service. This is done by matching pod label type=canary to the corresponding service selector.
Once the service is up – we can test application health by sending requests only to the canary pod(s).
As the service is not available outside of the cluster – we’ll need to run the tests inside our cluster and namespace. Here is the step that does exactly that in codefresh.yml:
testCanary:
    title: testCanary
    image: codefresh/k8s-kubectl
    commands:
      - kubectl config use-context cf-staging@codefresh-staging
      - kubectl run e2e --image=otomato/ornitest:${{CF_SHORT_REVISION}} --attach=true --restart=Never --rm=true -n=otom8 --  "/tests/it/canarytest.sh"
      - cf_export CANARY_EXIT_FLAG=$?
    fail-fast: false
We are using the test image we built earlier and running it in the cluster as a one-shot job using –attach=true to get the job exit code back into Codefresh.
If the test script fails, it will exit with non-zero exit code, which will also fail the pod and therefore this pipeline step will be marked as failed.
Note the use offail-fast: false and cf_export – this is how we record test results in order to rollback the canary if they failed. The rollback criteria is then evaluated in the next step:
rollbackCanary:
    title: rollbackCanary
    image: codefresh/k8s-kubectl
    commands:
      - echo "Canary didn't pass isolation gate. Rolling back"
      - kubectl delete -f orni-dep-canary.yml -n otom8
    when:
      condition:
        all:
          canaryTestFailed: "'${{CANARY_EXIT_FLAG}}' != '0'"
We will use the same mechanism of result evaluation and rollback for the next quality gate.
The verification itself is done by the test script that is found in tests/it/canarytest.sh
It first waits for the application to return a response within a satisfactory timeout. If the response is not returned – verification is failed. This is similar to how we’re defining the readinessProbe for the canary pod. Both the probe and the verificator script try to hit the same /ping application endpoint.
This endpoint is set to have an initial latency of 10 seconds which decreases with each incoming request. The difference here is that the service doesn’t even start sending traffic to the pod until the readinessProbe is satisfied.
Once the service becomes available – the verificator does its own checks. If the response arrives – the script proceeds to running the integration test. This involves reading and writing some actual ornithology data to and from the database.
If all goes well – we conclude that the canary is alive and healthy and proceed to the next gate.
Gate 2: Test in Production
Now that our canary grew stronger we can try and expose it to the poisonous winds of production workloads. We do this by attaching app=ornithology and production=ready labels to it. This tells the ‘ornithology’ service to route part of the incoming traffic to the canary pod.
In our case this will be approximately 10% – as we’re running 9 replicas of the production version and 1 instance for the canary.
We then verify that the whole system continues to function as expected, while the canary is in fact getting the designated traffic:
verifyCanaryInProd:
    title: verifyCanaryInProd
    image: codefresh/k8s-kubectl
    commands:
     - kubectl config use-context cf-staging@codefresh-staging
     - export PODNAME=`kubectl get pods -n otom8 | grep canary | cut -d ' '  -f 1`
     - kubectl label pod $PODNAME app=ornithology production=ready -n otom8
     - kubectl run verify --image=otomato/ornitest:${{CF_SHORT_REVISION}} --attach=true --restart=Never --rm=true -n=otom8 --  "/tests/it/version_verify.sh"
     - cf_export CANARY_EXIT_FLAG=$?
If this step also goes well – we can either open some more traffic to canary (by deploying more replicas of the new version or replacing some of the production pods) or just roll out straight to production if we’re satisfied with the results.
Letting the Canary Out
If we passed both the gates, we are ready to promote the canary to production use. If any of the previous gates had failed, the pipeline would have stopped and we wouldn’t have reached this step of promoting the canary.
For this example, let’s assume that the 10% traffic check is a strong enough criteria for release approval.
Therefore in the next step we just trigger the Codefresh production pipeline as shown below:
triggerProdDeployment:
    image: codefresh/cli:latest
    commands:
      - codefresh run 5a5e15cc8aced0000153ba08 -b master -detach
This is done using the brand new Codefresh cli which you can read more about here: http://cli.codefresh.io/
The production pipeline doesn’t need to rebuild the application image (remember the CI/CD mantra : build artifacts only once) – it just does the tag replacement trick in the K8s deployment file and triggers a rolling update of production replicas to the new image version.
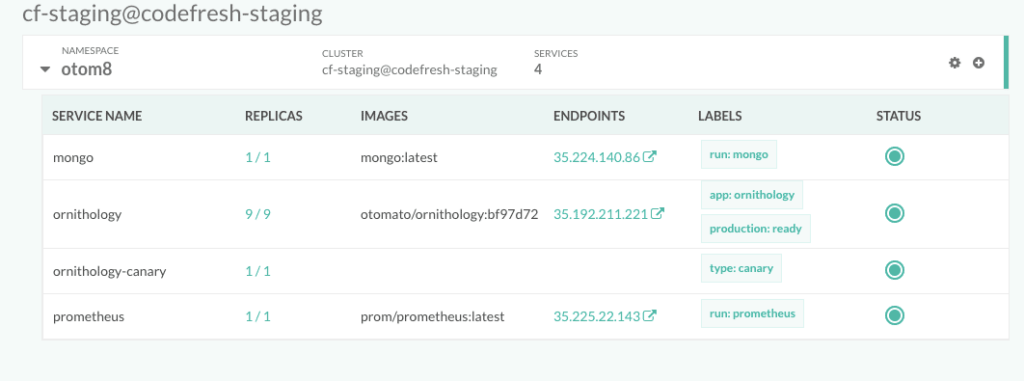
Here are all our services and pods shown in Codefresh K8S dashboard:
Stepping Up Your Canary Game
Canary deployments provide tremendous value, but they aren’t that easy to pull off. With all the simplicity there is quite a lot of detail in our tiny example. We haven’t even discussed rolling back the canary if something goes wrong! And then there are the questions of data compatibility, API versioning and inter-service dependencies. You can not cover it all in one blog post. We will do our best to touch upon each of these topics separately in future publications.
Another point to remember is that, using Kubernetes standard LoadBalancer type service only allows simple round-robin traffic distribution between canary and production instances. That’s why we had to deploy at least 9 replicas of the production version in order to be able to route 10% percent of traffic to the canary.
For more advanced traffic splitting, one could use a smarter Ingress resource based on Nginx, for example.
In further posts we’ll provide an example of how this is done.
It’s also worth noting that our example is fully synchronous and blocking – i.e all the canary verifications are executed inside of the pipeline. In a real-life scenario such a pipeline could take quite a while to complete. A better strategy would be introducing a cluster-side listener that would orchestrate canary availability and trigger further Codefresh pipelines when canary quality gates are passed. We’ve started looking into developing such a component to complete this flow.
We do hope that today’s example provides a glimpse of how one can achieve canary bliss by combining Codefresh and Kubernetes. Feel free to send us your feedback, ask questions and raise doubts. Codefresh engineers are here to help!
New to Codefresh? Get started with Codefresh by signing up for an account today!