
Introduction
Docker has quickly become the ultimate enabler for continuous delivery practices. But all-in containerization is a disruptive change. It requires us to re-think each step along our delivery stream.
Many brownfield projects have learned to rely on Jenkins for the orchestration of their build, test and packaging tasks. Now they are starting to ship their first application containers and looking at how to integrate Docker with their existing procedures.
There’s an abundance of powerful Docker-related plugins in Jenkins ecosystem. But they all share the same downside: at the end of the day one has to manage Docker infastructure on their own. While a great, super-flexible scheduler and orchestrator – Jenkins wasn’t built with Docker in mind. It can’t (and probably shouldn’t) provide the native, out-of-the-box Docker experience that Codefresh has to offer.
That’s why we’ve created the Jenkins Codefresh plugin: to allow easy, seamless integration of Docker-native pipelines with your existing, well-trusted jenkins processes.
The New Release
We’ve just released the new version of the plugin. Version number is 1.5 and it brings the following features:
- Separate build steps for Codefresh pipeline builds and composition launches.
- Codefresh process logs in Jenkins console output.
- Passing environment variables to both pipeline builds and launched environments.
- Support for Blue Ocean pipeline editor.
A walkthrough
Step 1: Install the plugin
The plugin is hosted on the official Jenkins plugin repository, so the installation is the standard Jenkins procedure:
In your Jenkins instance UI go to: Manage Jenkins -> Manage Plugins. Click on the ‘Available’ tab and type ‘codefresh’ in the ‘Filter’ textbox at the top on the right. Choose ‘Codefresh Integration Plugin’ and click on ‘Install without restart’ button at the bottom of the page.
Result:

Once Jenkins tells you the plugin got installed – you can proceed to configuration.
Step 2: Configure the integration
Define the connection to Codefresh in Jenkins system config (Manage Jenkins->Configure system-> scroll down to find ‘Define Codefesh Integration‘).
This requires filling out your username and Codefresh auth token. You can verify the authentication by using the ‘Test Connection‘ button.
To find your auth token:
- Login to Codefresh (use your Github, Gitlab or Bitbucket account) and then open https://g.codefresh.io/api/ in another tab of the same browser.
- Copy your token from the right-hand text field on the Swagger header.
Screenshot:

Step 3: Trigger a Docker Pipeline
This step has many faces. You can trigger Codefresh pipelines either from traditional freestyle Jenkins jobs or from Jenkins Groovy-DSL pipeline scripts. Either with or without environment variables.
In this post we’ll provide an example of using Codefresh with freestyle jobs and then describe the pogrammatic usage pattern with Jenkins pipelines in part 2.
The Demo Project
For the purpose of this demostration we will be building a small RESTful api webservice written in Golang. The service will store and retrieve software build results using MongoDB as the storage backend. The name of the service is ‘bringon‘ (that’s for Build Recorder In GOlaNg). The source code with all the Docker-, Codefresh- and Jenkins-related files can be found here: https://github.com/otomato-gh/bringon
The Dockerfile:
Our service is built with the help of the following multi-stage Dockerfile:
FROM golang:1.7.3 AS builder
WORKDIR /go/src/github.com/antweiss/bringon
ADD . .
RUN go get -u github.com/golang/dep/cmd/dep && dep ensure
RUN CGO_ENABLED=0 GOOS=linux go build -o bringon

FROM alpine:latest
RUN apk --no-cache add ca-certificates
WORKDIR /root/
EXPOSE 8091
COPY --from=builder /go/src/github.com/antweiss/bringon/bringon .
CMD ["./bringon"]
As you can see – we’re using the official golang:1.7.3 build for the compilation and the brand-new Go dependency manager dep to fetch the dependency packages.
We then package the resulting binary in a lightweight alpine-based image for execution.
The Codefresh Pipeline
The first step here is, of course, adding the repository to my Codefresh account.
Once that is done – we can start defining the pipeline.
In the Codefresh pipeline we will be using the brand new Google cloud integration to deploy our service to a Kubernetes cluster running on GKE.
I am using a codefresh.yml pipeline defintion but you can configure a similar pipeline from the simple to use GUI.
Here’s my Codefresh flow:
version: '1.0'
steps:
  BuildingDockerImage:
    title: Building Docker Image
    type: build
    image_name: otomato/bringon
    working_directory: ./
    dockerfile: Dockerfile
    tag: '${{CF_BRANCH_TAG_NORMALIZED}}'
  PushingToDockerRegistry:
    title: Pushing to Docker Registry
    type: push
    candidate: '${{BuildingDockerImage}}'
    tag: '${{CF_BRANCH_TAG_NORMALIZED}}'
    registry: dockerhub
  RunningDeployScript:
    title: Running Deploy Script
    type: deploy
    kind: kubernetes
    cluster: cftest@otomato-auth
    namespace: default
    service: bringon
    when:
      branch:
        only:
          - master
    candidate:
      image: '${{BuildingDockerImage}}'
      registry: dockerhub
Let’s go through it step by step.
- So first – we’re building the docker image ‘otomato/bringon’ and tagging it with the branch name.
- Then – we’re pushing the image to Dockerhub. Again – with the same branch-named tag.
- And then – we’re deployng the newly built image to a service that’s running in our Codefresh-integrated GKE cluster.
Pretty easy and straightforward, isn’t it?
Don’t forget the DB
It’s worth mentioning that our demo service requires a database (MongoDB) connection in order to do any work. This means we’ll need to deploy a db instance inside the same GKE cluster. The service expects to find the database by static name ‘mongo’ – so this is the name we will give our MongoDB service.
The Jenkins Job
Now that our repository has all it needs to build the Docker image and run a Codefresh pipeline – it’s time to define the Jenkins job.
We create a new job by clicking ‘New Item’ and choosing ‘Freestyle project’.
In the job creation window we click on the ‘Build’ tab and then – on the ‘add build step’ button.
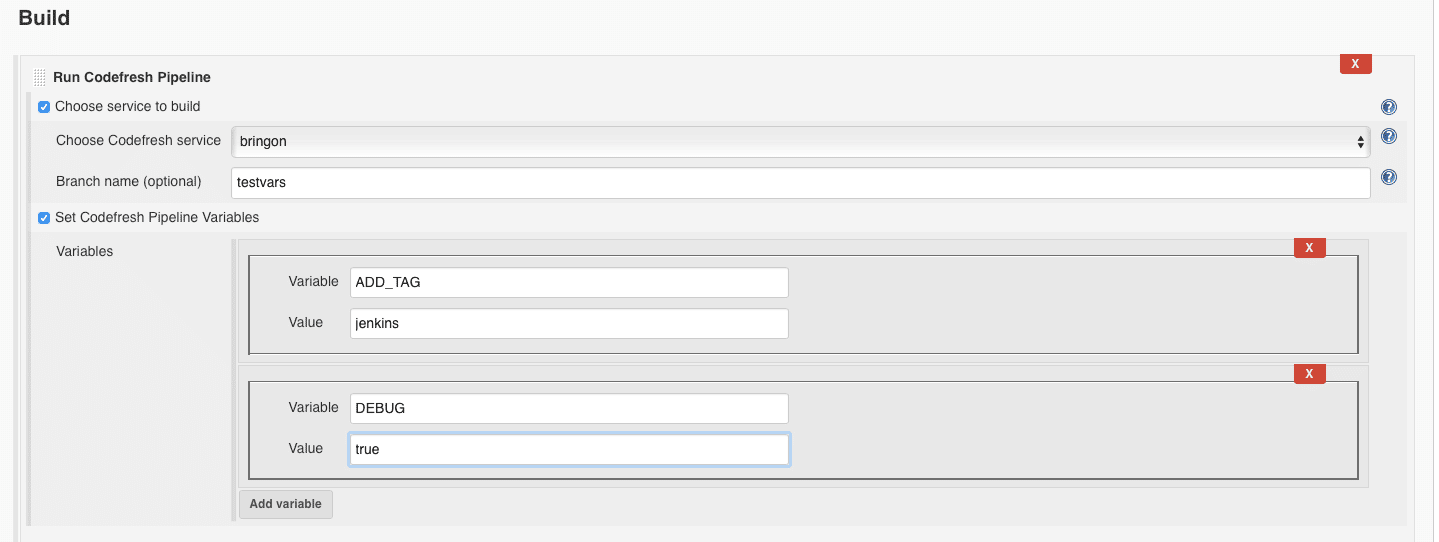
Choose ‘Run Codefresh Pipeline’ from the available steps list.
If your Jenkins job has a git SCM definiton – the step will try to find a relevant Codefresh pipeline. But we haven’t defined any SCM configuration, so we’ll check the ‘Choose service to build’ checkbox. This will show a drop-down list of all Codefresh pipelines in the connected account.
We will choose the default ‘bringon’ pipeline.
If we need to pass environment variables to the pipeline execution, we will check the ‘Set Codefresh Pipeline Variables’ option and add the needed parameters. For example we may want to set DEBUG=true for our CI pipeline configuration.
Screenshot:

Now we can save the job and click on ‘Build Now’.
This will trigger the Codefresh pipeline and add a badge with a link to the Codefresh build output on the Jenkins build page.
Step 4: Launch a Docker composition from Jenkins
As we’ve seen – Codefresh integration makes deploying services to Kubernetes a breeze. But for lightweight ephemeral testing environments many of us still prefer the simple syntax of docker-compose.
It’s easy to define, deploy and share Docker compositions on Codefresh. And now it’s even more powerful with Jenkins integration.
The composition we will be using looks as follows:
version: "3"

services:
  bringon:
    image: otomato/bringon:master
    ports:
      - 8091
  mongo:
    image: mongo
    ports:
      - 27017
We will save it on Codefresh UI with the name bringon-mongo.
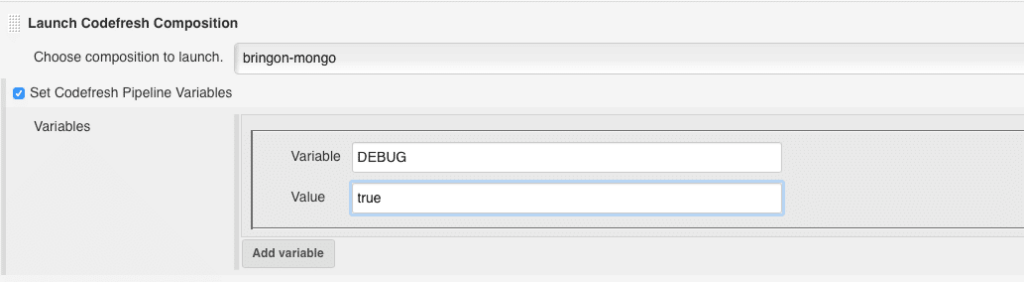
Now on our Jenkins job we will add another build step: “Launch Codefresh Composition” and choose ‘bringon-mongo’ form the drop-down list of composition names.
We can also define environment variables for our composition launch – exactly as in the case of pipeline execution.
Screenshot:
Now a composition environment will get launched every time we run the Jenkins job.
Terminating the Environment
Running compositions is often used for creating ephemeral temporary environments for component-level testing. Many times when the tests are green – we don’t need the environment anymore.
You can terminate the composition environment you’ve launched in the build step using the post-build action called “Terminate Codefresh Environment”
By default the environment will only get terminated if the job succeeded. This way – if there are failed tests – it’s stll available for debugging. Optionally you can choose to temirnate it even when the job fails.
Screenshot:

And that’s it for today.
Stay tuned for part 2 of this post where we will show how to trigger Codefresh from Jenkins groovy pipelines.