
Microsoft has begun working with the Docker team and community so Docker can be used for the following:
- Build
- Host
- Scale .NET applications with ease
What will you learn in this tutorial?
If you would like to run an ASP.NET Core web app in a Docker container and learn how to create images, we will explain all the steps on how to do the following:
- Build a custom image with Dockerfile
- Use a prebuilt image hosted by Microsoft
- Use a prebuilt image with HTTPS
A Docker container image is a standalone, lightweight package that can be executed and contains all the requirements you need to run an application, such as: code, runtime, libraries, and settings. The image can then be pushed to a container registry and pulled to your server to run as a container.
For this demo you can clone or download the ASP.NET Core sample app and run it in Docker containers. The sample app builds in a .NET SDK container that copies the result of the build into a new image based on the .NET Docker Runtime image. This demo also works with both Linux and Windows containers too!
Prerequisites:
- Latest version of ASP.Net Core
- Setup Docker:
- Windows
- macOS
- Linux distributions:
- CentOS
- Debian
- Fedora
- GitHub
Build a custom Docker image with Dockerfile
Let’s start this tutorial by creating a Docker image from scratch using a Dockerfile for your app. Later on in this tutorial, we’ll explain how to use prebuilt Docker images with your ASP.NET Core web app.
Prerequisites:
- An ASP.NET Core web app:
- Create your own app
- DockerDemo app with Dockerfile
- Note:The Dockerfile within the demo app uses a Docker multi-stage build feature that can be used to build and run in different containers. We’ll share more about this in a future blog post.
Create a Dockerfile in your project folder
The Dockerfile is essentially a recipe for creating your Docker image and is added to the project’s root. It includes the necessary commands for a user to build an image when executing docker build. For additional details to better understand the commands within the file, please refer to the Dockerfile reference.
Dockerfile
 FROM mcr.microsoft.com/dotnet/core/aspnet:3.1-buster-slim AS base
 WORKDIR /app
 EXPOSE 80
 FROM mcr.microsoft.com/dotnet/core/sdk:3.1-buster AS build
 WORKDIR /src
 COPY ["DockerDemo.csproj", ""]
 RUN dotnet restore "./DockerDemo.csproj"
 COPY . .
 WORKDIR "/src/."
 RUN dotnet build "DockerDemo.csproj" -c Release -o /app/build
 FROM build AS publish
 RUN dotnet publish "DockerDemo.csproj" -c Release -o /app/publish
 FROM base AS final
 WORKDIR /app
 COPY --from=publish /app/publish .
 ENTRYPOINT ["dotnet", "DockerDemo.dll"]
Create a .dockerignore file
Similar to a .gitignore file a .dockerignore file allows you to mention a list of files or directories that you want to ignore while building the Docker image. This is essential because it helps reduce the size of an image and speeds up the docker building process.
Note: We also have an excellent article reviewing the .dockerignore file that you might enjoy
.dockerignore
 class=""> **/.classpath
 **/.dockerignore
 **/.env
 **/.git
 **/.gitignore
 **/.project
 **/.settings
 **/.toolstarget
 **/.vs
 **/.vscode
 **/*.*proj.user
 **/*.dbmdl
 **/*.jfm
 **/azds.yaml
 **/bin
 **/charts
 **/docker-compose*
 **/Dockerfile*
 **/node_modules
 **/npm-debug.log
 **/obj
 **/secrets.dev.yaml
 **/values.dev.yaml
 LICENSE
 README.md
Build Docker image and start container
The docker build builds a Docker image from the Dockerfile and a “context”. The context is a set of files located in a specified PATH or URL.
Open the terminal or command prompt and navigate to your project folder. Use the following command to build your Docker image:
docker build -t dockerdemo .
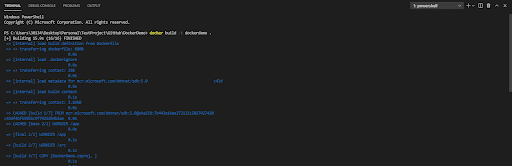
This returns the status of your build.
Create and run container
The docker run command creates a new container and runs the Docker image.
Open the terminal or command prompt and use the following command to run your Docker image:
docker run -d -p 8080:80 --name myapp dockerdemo
![]()
Check that the container was created and is running with the command:
docker ps
![]()
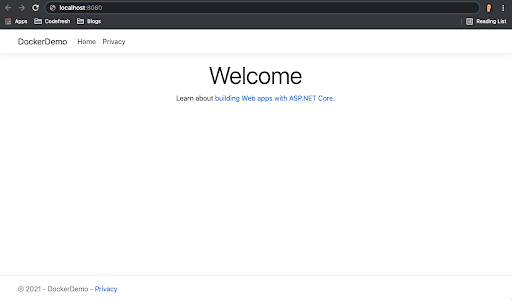
Lastly, go to http://localhost:8080/ to access your app in a web browser.
Note:
The Dockerfile and the .dockerignore files are generated for an ASP.NET Core Web app in Visual Studio 2019 when you select Create a new project and Docker is enabled. For more information, you can reference the Quickstart guide for Docker in Visual Studio.
You can also generate a Dockerfile and .dockerignore file in Visual Studio Code by opening the Command Palette and utilizing the Docker:Add Docker Files to Workspace command. For more information you can reference the Working with containers guide.
Fetch, Build, and Run a prebuilt Docker image
Now that you’re familiar with how to create a Docker image with a Dockerfile, let’s dive into using a prebuilt image for your ASP.NET Core app.
Prerequisites:
Download/Clone sample app https://github.com/dotnet/dotnet-docker
Assuming you cloned the sample app, you can now access existing prebuilt Docker images. You can reference existing Docker images at the public register, Docker Hub. Search for .NET Core and you will find several repos hosted by Microsoft.
Run the sample app and execute the following command in your terminal:
docker run -p 8000:80 --name my_sample
mcr.microsoft.com/dotnet/core/samples:aspnetapp
This command is fetching and running your container which is stored within:
mcr.microsoft.com/dotnet/core/samples
If you receive an error, it’s likely a port conflict, and you’ll need to select a port you’re not using.
However, your output should look like the following:
View all the images that you are currently running by simply running the command:
docker ps
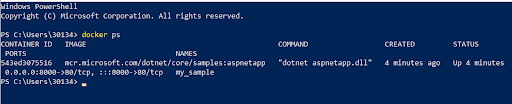
This returns a lot of helpful information, including your container ID, the registry location, and even the command used to run it.
Launch your browser and navigate to: http://localhost:8000
Note: If you’ve changed your port, make sure you also change this url.
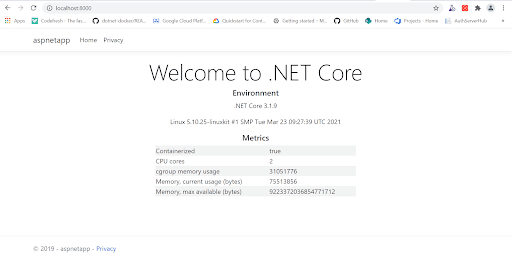
Wasn’t that easy? This demonstrates the simplicity and value of containerization and not having to worry about infrastructure complexities.
Next, run the command:
docker image list
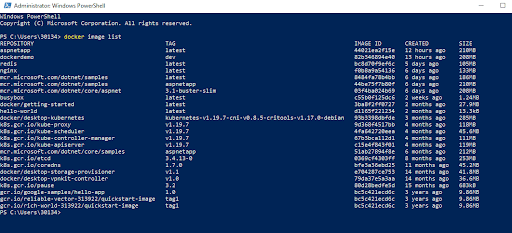
The screenshot above is a list of all the installed images, with the latest at the top.
This demonstrates how to serve an image over HTTP locally; however, with containerization you should run your containers over HTTPS. HTTPS provides a secure channel within an insecure network by relying on certificates and encryption.
Build prebuilt Docker images with HTTPS
You’re on a roll! Let’s review how to build prebuilt container images with HTTPS. ASP.NET Core uses HTTPS by default for security purposes because it encrypts the traffic between the client and server, so others can’t see and prevents any modifications from malicious attackers.
Prerequisites:
.NET Core 3.1 or .NET
Certificates
For both Windows and macOS or Linux operating systems you will need a self-signed development certificate to host the image locally for non-production purposes. Using this certificate helps enable HTTPS on the server and protect your data using a Secure Socket Layer (SSL). This can be done multiple ways, and some of those ways are by utilizing dotnet dev-certs, Powershell, and OpenSSL. This way you can access your application from either port for demo purposes. There’s no right or wrong way to go about this. However, these instructions are similar to using a production certificate you can request within your team.
Windows using Windows containers
From your Windows terminal, use the following command to generate the cert and configure your local machine (make sure to replace “my password” with something unique):
dotnet dev-certs https -ep %USERPROFILE%.aspnethttpsaspnetapp.pfx -p mypassword
dotnet dev-certs https --trust
Afterwards, execute the docker pull/run commands to run the container image with ASP.NET Core configured for HTTPS (make sure your password matches the one you assigned for the certificate):
docker pull mcr.microsoft.com/dotnet/samples:aspnetapp

docker run --rm -it -p 8000:80 -p 8001:443 -e
ASPNETCORE_URLS="https://+;http://+" -e ASPNETCORE_HTTPS_PORT=8001 -e
ASPNETCORE_Kestrel__Certificates__Default__Password="mypassword" -e
ASPNETCORE_Kestrel__Certificates__Default__Path=httpsaspnetapp.pfx -v
%USERPROFILE%.aspnethttps:C:https
mcr.microsoft.com/dotnet/samples:aspnetapp
If you want to learn more about configuring Windows using a Linux container, you can reference the Microsoft documentation for details.
MacOs/Linux
From your Mac/Linux terminal, you can execute this command to generate a certificate and configure your local machine (make sure to replace “my password” with something unique):
dotnet dev-certs https -ep ${HOME}/.aspnet/https/aspnetapp.pfx -p
mypassword dotnet dev-certs https –trust
We should note that depending on which Linux distribution you’re utilizing, the command: dotnet dev-certs https -trust may not work, and you may need to find an alternative way by researching the specific distribution’s documentation.
Then, execute the following command to run the container image with ASP.NET Core and configure with HTTPS (make sure your password matches the one you assigned for the certificate):
docker pull mcr.microsoft.com/dotnet/samples:aspnetapp

docker run --rm -it -p 8000:80 -p 8001:443 -e
ASPNETCORE_URLS="https://+;http://+" -e
ASPNETCORE_HTTPS_PORT=8001 -e ASPNETCORE_Kestrel__Certificates__Default__Password="mypassword" -e
ASPNETCORE_Kestrel__Certificates__Default__Path=/https/aspnetapp.pfx -v
${HOME}/.aspnet/https:/https/ mcr.microsoft.com/dotnet/samples:aspnetapp
Summary
Within this demonstration, you were able to get familiar with Docker and fetch, build, and run a prebuilt ASP.NET Core container image and serve the container over to HTTPS. You also were able to touch on some of the core concepts such as the images and using a DockerFile and .dockerignore file. Nice work!
In a future blog post, we’ll review 3 different ways to create a Docker image for .NET, so stay tuned!
Cover photo by Pexels.