
The default Kubernetes scheduler works great when your cluster is destined for long running applications. At Codefresh we use our Kubernetes clusters for running Continuous Integration pipelines which means our workloads are ephemeral (they are discarded when a pipeline has finished).
This allowed us to look at the Kubernetes scheduler from a different perspective and forced us to think about how Kubernetes can work for short-running workloads. After trying to fine-tune the default scheduler for running CI pipelines, we decided that it was best to write our own scheduler designed specifically for our needs.
In this post, we will describe why the default scheduler is not a good choice for ephemeral workloads and how we replaced it with a custom scheduler that meets our needs.
Codefresh pipelines – build your code on Kubernetes
Codefresh pipelines are powerful tools with a simple yet powerful syntax and many capabilities that can optimize your container or application builds. Beyond pipeline syntax, there are less discussed operational aspects of running Codefresh pipelines in hybrid or on-prem scenarios.
Every day we run lots of builds both for ourselves and SAAS customers. Build start time is one of the most immediately noticeable aspects of user experience. Nothing spoils the first impression about our platform quite like builds that are stuck in the initialization stage for a prolonged period of time. There is a psychological threshold when “it’s normal” turns into “it’s kinda slow” and then into “is it broken?”. Since we want to provide a pleasant experience to our customers we want to avoid slowness as much as possible.
There are naive ways to brute force this issue, but we want to stay cost-efficient in our solutions, so we had to be a little bit more inventive than throwing resources at the problem. A big part of our solution is realizing that the default behavior of the Kubernetes scheduler is sensible for regular web applications, but is completely suboptimal for CI/СD workloads.
At Codefresh, we implement measures to address both latency and cost considerations. Some of those are useful if you run builds on your infrastructure. In this article, we will cover those topics by explaining the problem, designing the solution, and implementing it all.
We focused on two main areas
- The time it takes to start a build
- Reducing the cost of the infrastructure that runs our builds
Let’s see these in order.
Build start latency
As a starting point we want to minimize the time it takes to start a pipeline run in order to offer a better user experience.
Behind the scenes Codefresh builds are mapped to Kubernetes Pods, so naturally the question of scheduling comes up. Both in terms of “how to start builds as fast as possible?” and “how to minimize the costs associated with running builds?”.
The build cannot start until the pipeline Pod(s) are up and running. Typically, there is spare capacity on the Nodes dedicated to running the build, but it’s not always the case: if we keep creating new builds faster than they are completed, we are bound to reach cluster capacity limits.
Sooner or later builds would be delayed by build Pods being stuck in the Pending status. It might take several minutes for the autoscaler to react and provision new Node(s) for a surge of new builds. Then new Nodes must pull Codefresh images and start all required containers inside the Pod. During all that time the user sees their build in the “Init” phase, probably getting increasingly frustrated.
The solution – avoid waiting for empty nodes completely
To combat this bad user experience, we’ve implemented a concept of ballast: Pods that mimic build Pods in terms of scheduling preferences but with greatly reduced priority. Pod priority affects the K8s scheduler’s behavior. Usually, if there is not enough capacity in a cluster to run a Pod, it will enter a Pending state, and then it’s up to autoscaler or human operators to provision additional capacity for it.
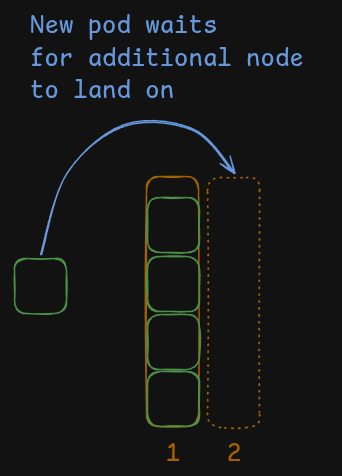
In this illustration a Pod waits for a second node to be created to finally land on it.
But that is not a complete picture. In fact, before transitioning a Pod into the Pending state, the scheduler compares the new Pod’s priority to existing ones and if there are any with lower priority then the scheduler will evict those to make space for new Pod.
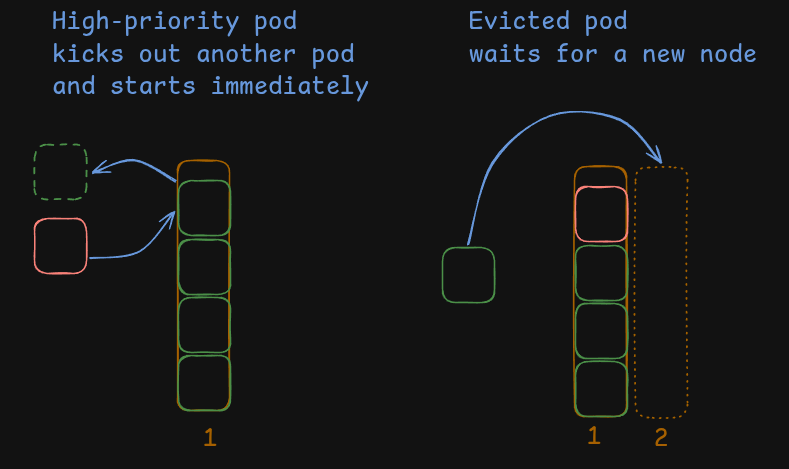
Typically this mechanism is used to ensure critical components like various DaemonSets (marked red in the illustration above) are always up and running. There are 2 built-in PriorityClasses: system-cluster-critical and system-node-critical to facilitate that. They have a very large positive priority value that should be enough to kick out any regular pod.
It turns out that we can employ this basic scheduling mechanism to our advantage.
We can use the same mechanism in reverse by creating a PriorityClass with a very large negative value to ensure that Pods with this class will be “total pushovers” and concede their spot to any other Pod if needed.
We call those Pods a “ballast”. These are placeholder pods with the sole purpose of getting discarded by the scheduler when a real pod appears.
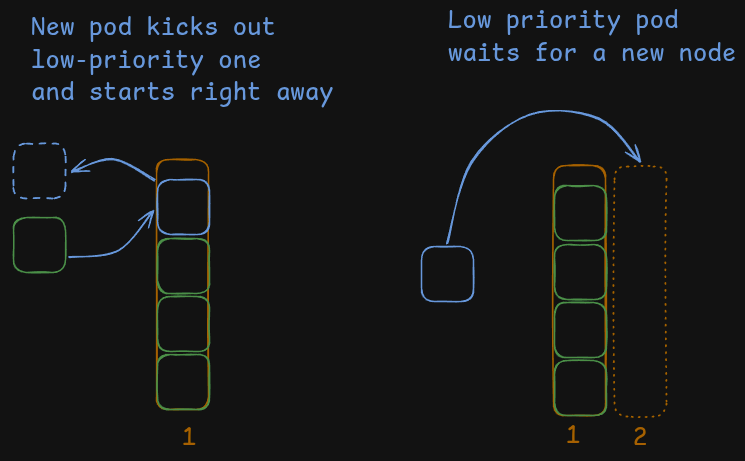
We can create ballast Pods (marked blue in the illustration above) in a Node pool dedicated to running builds. When the node eventually fills up, the next build Pod will evict a ballast Pod and land in its place. The evicted ballast Pod will become Pending and trigger new Node creation.
From the cluster’s view the picture is the same: A Pod is created, the Pod enters the Pending state, and a new Node is provisioned.
But from the end user perspective there is a key difference. The “real” build pod starts working immediately and the placeholder/ballast pod is the one that has to wait and enters the Pending state.
Users see their pipeline start right away!
Implementation
In the release 7.6.0 of our cf-runtime Helm chart we’ve added a ballast section that allows users to enable ballast for both dind and engine Pods. Under the hood those are Deployments that copy nodeSelector, affinity, tolerations and schedulerName of respective build Pods to perfectly mimic their scheduling behavior.
All you need to do is enable them, and set the amount of replicas and the resources of an individual replica:
ballast:
 dind:
   enabled: true
   replicaCount: 3
   resources:
     requests:
       cpu: 3500m
       memory: 7800Mi
     limits:
       cpu: 3500m
       memory: 7800Mi
 engine:
   enabled: true
   replicaCount: 3
   resources:
     requests:
       cpu: 100m
       memory: 128Mi
     limits:
       cpu: 100m
       memory: 128Mi
In this example we create a “ballast” setting that can handle a build spike of up to 3 builds. Ballast resources are set to the same values as runtime.dind.resources (targeting xlarge EC2 instance size) and runtime.engine.resources respectively.
There are some considerations and rules of thumb for picking those values:
- Pick ballast Pod size equal to the default build Pod size
- Pick replica count not greater than the typical build spike size
If the ballast Pod is equal to the default build Pod size, then most of the time there will be one eviction per one new build, which makes it easier to reason about the number of replicas.
At the same time the ballast count should not be higher than the expected spikes we want to accommodate: if we create at most 10 builds at a time, but have 30 ballast pods then those 20 remaining replicas will never be of use to us and just idly burn through our infra/cloud budget.
The maximum value from this setup would be achieved by setting the replica count to the most common spike size: all spikes up to the common size will be fully accommodated while bigger spikes will still benefit from the setup.
Another factor to consider is cluster autoscaler reactivity. If it can provision a node in 10 minutes, then in general you want to have a bit bigger ballast compared to a more reactive autoscaler that provisions a new node in under a minute.
Ultimately your ballast setup is a tradeoff between convenience and cost: we host idle Pods for our builds to start faster. If ballast causes cost concerns, one might want to scale the ballast setup dynamically. It’s possible to set the number of replicas to zero in chart values and add an external HPA, for example use KEDA with Cron scaler to effectively remove ballast outside of office hours, where we don’t care about build start times (since they are most likely created by some form of automation and not humans).
Cost-efficient scheduling
After we optimized the start time of our builds, we wanted to look at cost efficiency.
Running pipelines requires considerable computing resources, so being as efficient as possible when scheduling build Pods is a major concern for operators.
There is a significant difference between running something like a web application expressed in Kubernetes terms as Deployment and a CI/CD pipeline, which is more like a Job object.
Deployments are scalable and can afford disruption, which actually happens during every release that updates image tags in a rolling fashion. That allows operators to run those workloads on Spot instances or aggressively scale down underutilized nodes, pushing replicas to other nodes.
On the other hand, CI/CD pipelines do not work in this manner. They are not stateless and disrupting them while they are running is a scenario we want to avoid.
With Job-like workloads that implement pipelines we need to patiently wait for their completion, and only then can we scale down the node that hosted this Job.
This trait creates a harmful dynamic that we’ve observed in our clusters that run customer builds. Below you can see a snapshot of a node pool from one of our clusters (made with eks-node-viewer):
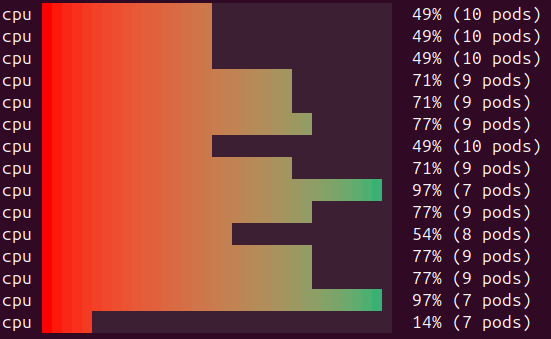
Those clusters tend to run half-empty, costing us extra money.
This problem is especially exaggerated right after a spike in the amount of submitted builds. During a build spike, the cluster autoscaler will create new nodes to accommodate workloads.
In the illustration below, you can see a cluster right after the build spike, where the majority of those builds have finished and the cluster is half-empty. After those builds finish, there will always be a small stream of builds that trickle in and are evenly spread across the nodes.
As you can see in the illustration below, overall resource utilization is very small, but no single node can be scaled down.

Solution – fine tune the scheduler for job-like workloads
The Root cause of this problem is two-fold:
- Job-like workloads are non-disruptible
- The default Kubernetes scheduler strives for even load spread
We cannot do anything about the first aspect, but the second one is entirely in our control.
The default scheduler’s behavior is reasonable for most applications but suboptimal for CI/CD pipelines. To prevent builds from taking nodes hostage, we want to pack them tightly, filling nodes one by one instead of spreading builds evenly across the nodes. Any solution that fills small nodes first gets bonus points.
We want our scheduling algorithm to look like this:
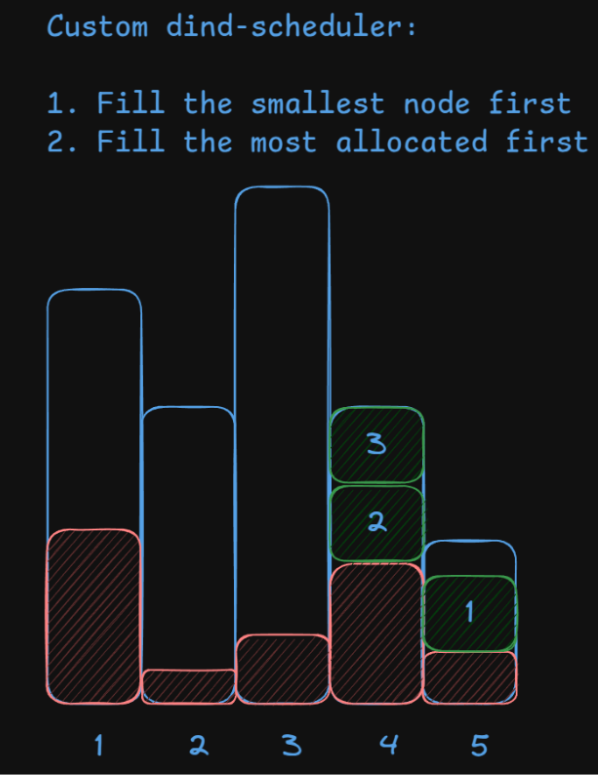
This way, we give big and mostly empty nodes a chance to complete a few remaining jobs and retire from the cluster. In this particular example, nodes 2 and 3 will most likely be scaled down very soon.
Implementation
To change the scheduler’s behavior we need to implement a custom scheduler. Kubernetes allows for multiple schedulers to exist in a cluster and Pods can specify the desired scheduler via the “schedulerName” field which defaults to boringly named “default-scheduler”.
WARNING: It’s important to make sure that all Pods on a given node pool are managed by a single scheduler to avoid conflicts and evict/schedule loops.
For the purpose of running Codefresh builds the recommendation is to have a dedicated tainted node pool and add matching tolerations to Codefresh pods.
We need to create an umbrella chart over the scheduler-plugins Helm chart, since it doesn’t provide the required level of flexibility. You can find our Helm chart for our scheduler plugin at https://github.com/codefresh-contrib/dind-scheduler/tree/main/dind-scheduler
Here is the important part of values.yaml
schedulerConfig:
   score:
     enabled:
       # pick smallest node fitting pod
     - name: NodeResourcesAllocatable
       weight: 100
       # in case of multiple nodes of the same size,
       # resolve a tie in favor of most allocated one
     - name: NodeResourcesFit
       weight: 1
     disabled:
     - name: "*"


 pluginConfig:
 - name: NodeResourcesAllocatable
   args:
     mode: Least
     resources:
     - name: cpu
       weight: 1
 - name: NodeResourcesFit
   args:
     scoringStrategy:
       type: MostAllocated
If we focus on the core of scheduler logic in plain English it sounds like:
- Pick the smallest eligible node possible
- If there are multiple nodes of the same size, use the fullest node in terms of allocated CPUs
This way we minimize the time big half-empty nodes are held hostage by trickling builds.
The only thing left is to set the scheduler name in runtime values:
runtime:
 dind:
   schedulerName: dind-scheduler
Now you can describe any DinD pod to validate that the correct scheduler is used:
Events:
  Type    Reason                  Age    From
  ----    ------                  ----   ----
  Normal  Scheduled               39s    dind-scheduler
After rolling out this custom scheduler this is how the same node pool looks after we’ve changed the scheduler’s behavior: nodes became as tightly packed as possible.
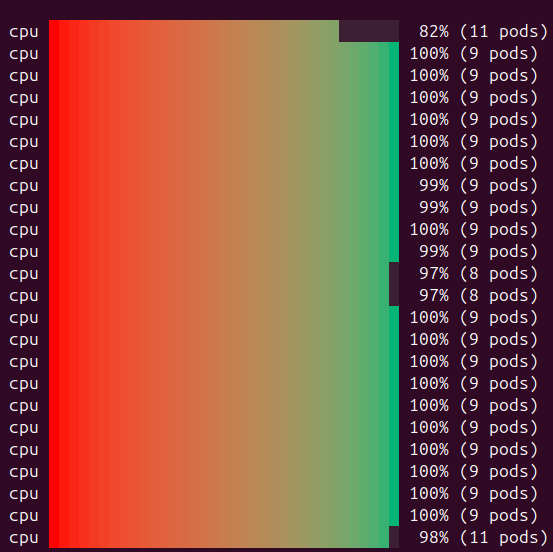
This means that now we pay for nodes we actually use to their fullest capacity keeping our cloud costs down.
Conclusion
In this article we’ve learned how to start Codefresh builds fast and run them cheaply. We have used nothing but built-in Kubernetes concepts revolving around the scheduler:
- We adjusted Pod Priority to improve build start times
- We wrote our own Scheduler Plugin to improve resource utilization
Feel free to use those resources to further tailor this solution to your needs. If you are a Codefresh customer you should also realize why your builds are much faster now!