Article Content
What is GitHub Actions Workflows?
GitHub Actions is a continuous integration and continuous delivery (CI/CD) platform that automates build, test, and deployment pipelines. It lets you create workflows that build and test all pull requests to a repository, or you can deploy merged pull requests to your production environment.
A workflow is a configurable, automated process that executes one or more actions. Workflows are defined by YAML files checked into the repository. They can triggered by events within the repository, events occurring outside the repository, a predefined schedule, or manually.
Workflows are defined in the repository’s .github/workflow directory. You can define multiple workflows, each performing a different set of actions. For example, one workflow can specify how to create and test a pull request, while another workflow can automatically deploy an application when a new release is created.
GitHub Actions Workflow Concepts
Workflow Triggers
A workflow trigger is an event that causes a workflow to run. There are four types of triggers:
- Events happening in the workflow’s GitHub repository.
- Events occurring outside of GitHub, which trigger a repository_dispatch event in GitHub.
- A predefined schedule.
- Manual trigger.
After a workflow is triggered, the workflow engine runs one or more jobs. Each job contains a predefined list of steps – a step can run a defined script or perform a specific action (of a library of actions available in GitHub Actions). This is illustrated in the diagram below.
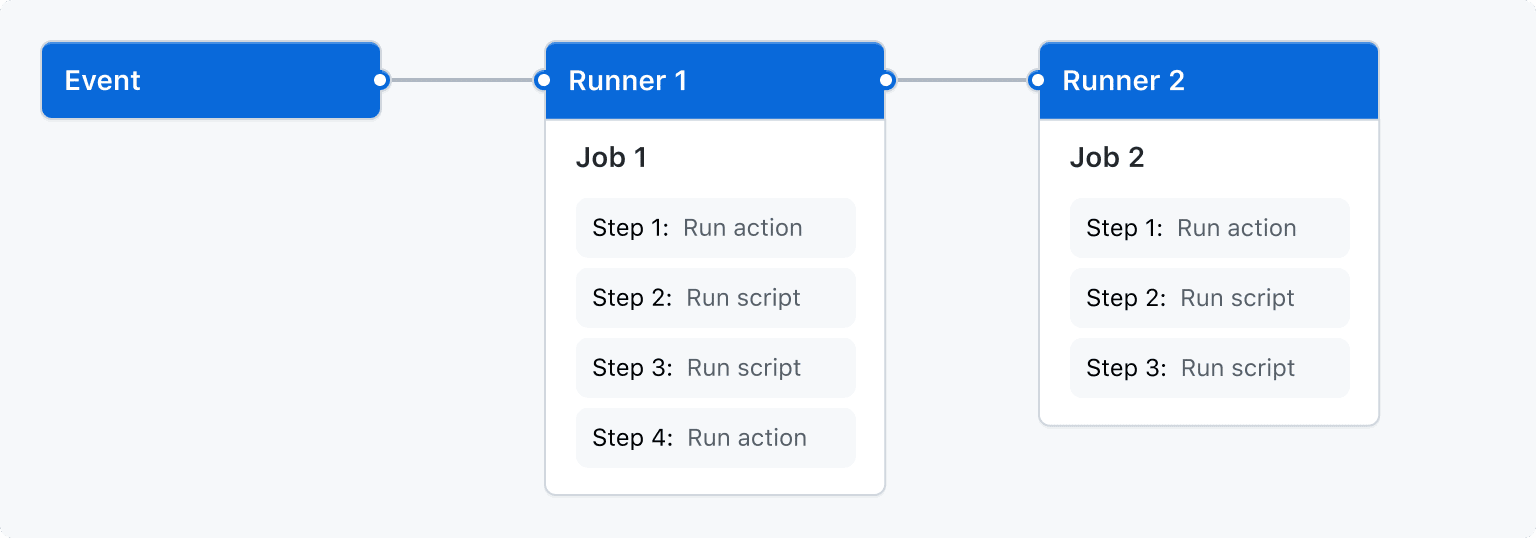
Image Source: GitHub Actions
Here is the process that occurs behind the scenes when an event is triggered:
- An event occurs in the repository. Each event has a commit SHA and Git ref (a human-readable alias for the commit hash).
- GitHub searches the repository’s
.github/workflowdirectory for workflow files related to the commit SHA or Git reference associated with the event. - For workflows with values that match the trigger event, the workflow execution is triggered. Some events require the workflow file to be in the default branch of the repository to run.
- Each workflow uses the version of the workflow in the commit SHA or Git reference associated with the event. When the workflow runs, GitHub sets the GITHUB_SHA and GITHUB_REF environment variables in the launcher environment.
Workflow Jobs and Concurrency
A workflow execution consists of one or more jobs that run in parallel. This is the default behavior, but you can define dependencies on other jobs to make jobs run tasks sequentially. This is done using the jobs.<job-id>.needskeyword.
You can run an unlimited number of tasks within your workflow usage limits. To prevent too many jobs from running concurrency, you can use jobs.<job-id>.concurrency to ensure that only one job or workflow in the same concurrency group runs at the same time. The name of a concurrency group can use any string or exception, except secrets.
If a concurrent job or workflow is in the queue, and another job or workflow is in progress, the queued task or workflow is put on hold, and any previously suspended tasks or workflows in the concurrency group are canceled.
GitHub Actions Workflow Examples: Syntax and Commands
Workflow Syntax
Workflows in GitHub Actions are written in YAML syntax. Hence, workflow files have either a .yml or .yaml extension. The workflow files must be stored in a dedicated directory in the repository named .github/workflows.
name
Used to set the name of the workflow. GitHub Actions displays this name on the repository’s actions tab. If name is absent, Actions will display the workflow file’s relative path from the repository root directory.
Command Examples:
- The name of a workflow is set by placing the following line at the beginning of the file:
name: demo-github-actions-workflow
on
Used to specify the event(s) that trigger the workflow automatically. It can take one or multiple events as triggers. Additionally, it can restrict triggers to specific files, branch changes, or tags.
Command Examples:
The following line triggers the workflow every time a push occurs to the repository:
on: push
The following line triggers the workflow when a push occurs, or the repository gets forked with the following line:
on: [fork, push]
If multiple events occur simultaneously, it triggers the workflow multiple times.
The following example shows how to specify the event activity and activity type to trigger a workflow:
on:
  branch_protection_rule:
    types:
      - edited
Here, the workflow runs every time the branch protection rule of the repository gets changed. The trigger can be multiple activity types in the following manner:
on:
  branch_protection_rule:
    types:
      - edited
      - created
This runs the workflows two times when a user creates a new branch protection rule and adds to it.
The following example shows how to use event filters and trigger the workflow only when the event has certain specific aspects:
on:
  pull_request:
    types:
      - assigned
    branches:
      - 'demo-branch/**'
The following example shows how the workflow can run only for certain kinds of files using the paths filter:
on:
  push:
    paths:
      - '**.py'
The workflow will get triggered whenever a Python file gets pushed to the repository.
defaults
Used to specify the default settings for the workflow. If it is specified under a certain job, it only applies to the job. Otherwise, it specifies configurations for all jobs.
Command Examples:
The default shell for the commands in the workflow and the directory containing the scripts it has to run are specified in the following way:
defaults:
  run:
    shell: bash
    working-directory: demo-workflow-scripts
jobs
Used to specify the actions that the workflow performs. It can have multiple jobs under it, and each job can have its scope, set of actions, and dependent jobs.
Command Examples:
Every job under jobs needs a unique identifier which must be a unique string and contain only -, _, and alphanumeric characters:
jobs:

  first_demo_job:

    name: The first demo job

  second_demo_job:

    name: The second demo job
The actions of a job are specified with the stepssyntax. Each step can have a name, own environment variables, and commands to run:
jobs:
  first_demo_job:
    name: The first demo job
    steps:
      - name: Show the demo running
        env:
          VAR1: This is
          VAR2: A Demo of
          VAR3: GitHub Actions
          VAR4: Workflow jobs
        run: |
          echo $VAR1 $VAR2 $VAR3 $VAR4.
Workflow Commands
Setting Output
The set-output command sets the value for an action’s output. Once set, other commands can use the output by referencing the job’s id:
- name: Set output parameter
  run: echo '::set-output name=OUTPUT_PARAM::parameter_set'
  id: output-parameter-setter
- name: Get output
  run: echo "The output parameter is set to ${{ steps.output-parameter-setter.outputs.OUTPUT_PARAM }}"
Writing Errors
The error command writes error messages to the log. It takes the file name, position, and message as inputs:
echo "::error file=demo-file.js,line=1,col=7,endColumn=9::Missing semicolon"
Echoing Outputs
The echo::on and echo::off commands turn printing the commands on and off respectively, for all the following commands:
jobs:
  demo-workflow-job:
    steps:
      - name: set echoing of commands on and off
        run: |
          echo '::set-output name=demo_action_echoing::off'
          echo '::echo::on'
          echo '::set-output name=demo_action_echoing::on’
          echo '::echo::off'
          echo '::set-output name=action_echo::disabled'
This will show the following output on the log:
::set-output name=demo_action_echoing::on
::echo::off
Quick Tutorial: Creating Starter Workflows
Starter Workflows are template workflows that users can customize to their needs and put to use. GitHub provides many starter workflows for categories like continuous deployment, automation, and security to help users get started.
Creating a starter workflow involves creating a metadata file for the workflow. It describes how other users experience the starter workflow while they make a new workflow from it.
To create a new starter workflow:
- Create a new directory and name it
.github, if it doesn’t exist already. - Create a directory inside the new directory and name it
workflow-templates. - Create a workflow file and name it
demo-workflow.yml. Put the following YAML code in the file:Name: Starter Workflow Demo on: push: branches: [ $default-branch ] pull_request: branches: [ $default-branch ] jobs: build: runs-on: ubuntu-latest steps: - uses: actions/checkout@v3 - name: demo workflow job run: echo This is a demo start workflow - Create a metadata file inside
workflow-templatesand name itdemo-workflow.properties.json. The workflow file’s name and the metadata file name has to be the same. Put the following in the metadata file:
{
    "name": "Starter Workflow Demo",
    "description": "Demo starter workflow.",
    "iconName": "demo-icon",
    "categories": [
        "Python"
    ]
}
Here, the metadata specifies the starter workflow’s language category so a user can find this starter workflow more easily.
Go beyond the basics in our full GitHub actions tutorial (coming soon)
Combine GitHub Actions with Codefresh to Support GitOps and Kubernetes Deployments
GitHub actions is a very powerful platform but it is focused mostly on CI and does not support GitOps and native Kubernetes deployments. Codefresh is created specifically for GitOps and Cloud native applications and includes native support for using GitHub Actions for the CI part of the Software lifecycle.
This means that you can get the best of both worlds by keeping all your CI workflows in GitHub Actions, while using Codefresh for advanced features such as:
- Application dashboards
- Git source managements
- Configuration drift management
- Kubernetes environment dashboards
- Topology views
In case you are new to Codefresh – we have made it our mission since 2014 to help teams accelerate their pace of innovation. Codefresh recently released a completely rebuilt GitOps CI/CD toolset. Powered by Argo, Codefresh now combines the best of open source with an enterprise-grade runtime allowing you to fully tap the power of Argo Workflows, Events, CD, and Rollouts. It provides teams with a unified GitOps experience to build, test, deploy, and scale their applications.
The World’s Most Modern CI/CD Platform
A next generation CI/CD platform designed for cloud-native applications, offering dynamic builds, progressive delivery, and much more.
Check It Out