Managing dependencies across multiple repositories and implementing updates to multiple repositories at the same time can be a time consuming and error-prone task. Thus, organizations have taken the approach of managing multiple projects in the same repository, called a Monorepo. The benefits of using a Monorepo become clear with the right tooling. One of those tools is Lerna, which can be used to manage Node-based Monorepos.
This post will cover the following:
- An overview of Monorepos, examples, and benefits;
- What is Lerna and how it can help developers manage their Monorepo;
- A tutorial, in which we show you how you can create and manage your Monorepo with Lerna.
What is a Monorepo?
Independently versioned packages are great for sharing code on small scale. However, depending on the number of dependencies of the project, it becomes more difficult to track versions across packages. To make it easier, companies pack multiple projects into one Git repository. This hybrid approach is called a Monorepo. In short, Monorepos allow us to keep multiple projects in the same repository.
Several companies have set-up their repositories as Monorepos, some of the most well-known cases are Facebook and Google, but also organizations such as Babel, React, Angular, Ember, and many more, use Monorepos.
The benefits and drawbacks of using a Monorepo have been explored extensively. Thus, we will merely provide an overview. Monorepos allow us to:
- Enhance our tooling: Monorepos are often easier to navigate than having to understand and configure the relationship between dependencies. In the case that dependencies have to be changed across the project to accommodate a specific package, those changes can be made at once, together with the changes to the specific package.
- Simplify the organization of code among teams; instead of having to split up repositories depending on the team structure, we can organize our repository based on team-specific projects.
- Simplify dependencies between multiple projects (more on this later).
- Reach higher productivity: It is easier to onboard new developers to the repository since they do not have to be taught the relationship between dependencies.
Some of the downsides may include that a Monorepository looks more intimidating due to its size. Additionally, you cannot necessarily use the same tools and processes that you would be using on monolithic repositories. For example, Google has developed several custom tools to better manage their workflows.
This tutorial will look at an open-source tool that allows users to better manage, and navigate between projects within a Node.js-based Monorepo: Lerna.
Find out more about the differences between Monolithic, Multi-repos, and Monorepos.
What is Lerna?
Lerna is a tool to manage Monorepos with Git and npm, which automatically ties together all package versions used across your repository.
Assume that you have multiple typescript projects in different repositories that have common dependencies. If you want to update one dependency across all projects it will likely require you to run the same commands as many times as you have projects with the same dependencies that have to be updated. Here is where Lerna can become useful.
By using Lerna, you can execute the same command across your projects. Meaning, all projects can share the same build, test, and release process, making your repository easier to manage. Updates, tests, or deployments, can be run on the entire project to verify that all repositories are working together properly.
Additionally, Lerna allows you to link dependencies between projects. Thus, if project A is dependent on project B, you could have shared dependencies and test both projects in combination without affecting other projects that might not have direct dependencies.
Using Lerna, every project within your Monorepo will have its own package.json file to manage its dependencies. Since Lerna does not give you the option to automatically link one project to another, we are going to utilize yarn workspaces. Once we install dependencies, dependencies between projects will be automatically linked, making it easier to import those into respective projects.
Tutorial: Using Lerna in your project
Now that we know what Lerna can be used for theoretically, let’s have a look at how we can use Lerna in our Monorepo. In the end, we will have a working Monorepo that holds both, a Typescript and a React App. Those will have some shared dependencies and some specific to each project. Note that you could also create a Monorepo that does not have shared dependencies between projects. The main advantages of Monorepos are to handle related projects.
As prerequisites please have yarn and npx installed.
You can find our Monorepo in the following repository. However, following the instructions provided in the tutorial should suffice. Once you cloned the repository, you can run
yarn boot
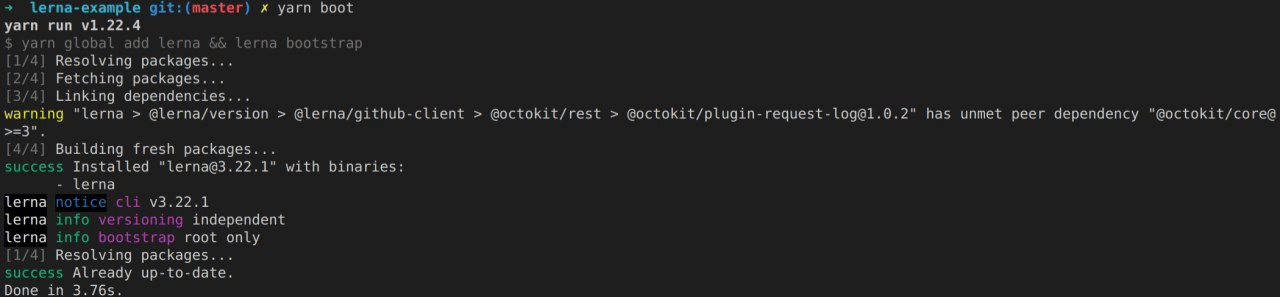
This script will call “yarn global add lerna && lerna bootstrap”. First, we need Lerna to install all of our dependencies with the “lerna bootstrap” command. This tutorial will look at multiple commands that can be used across your Monorepo. So let’s get started!
Setting up our Monorepo
We will start from an empty repository. First, we have to install Lerna:
yarn global add lerna
Note that you might have to run with ‘sudo’. Verify your installation by running:
lerna --version
Now, we create our repository that will become our Monorepo and change into this repository:
mkdir lerna-example

cd lerna-example
To set-up the project folder with Lerna, we are going to use the following command:
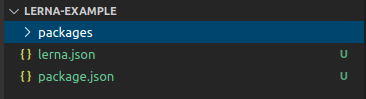
lerna init
This will create a Lerna configuration file and a package folder, as well as the package.json and lerna.json file, used to manage dependencies. Your project tree should look like the following now:
At this point, we want to make some changes to our package.json and our lerna.json file. Within lerna.json, please add the following lines:
 "npmClient": "yarn",
 "useWorkspaces": true,
 "version": "independent"
First, we tell Lerna that we want to use yarn as our npm client, next, we want to use workspaces and then we set the version to be independent. Let’s have a look at what this means. Lerna gives you two options, to use versioning in ’independent’ or ’fixed’ mode.
Independent mode allows you to publish specific versions for each package. Once you publish your Monorepo, Lerna will update the releases that changed to their new version. In comparison, fixed mode operates all packages on the same version. If you update one dependency, it will be updated across your Monorepo. Which mode you are going to choose ultimately depends on the type of projects that you want to manage with your Monorepo. While the independent mode provides you with higher flexibility in managing your dependencies, the fixed mode makes it easier to manage dependencies between similar projects.
Next, we are going to change the package.json file to make sure it knows which folders are used within the workspace. Add the following lines:
"workspaces": [
   "packages/*"
],
Create Typescript Project
Next, we want to add all typescript dependencies needed to run our project. We can treat it as a shared dependency, so go ahead and run:
lerna add typescript
This will install your dependency in the root package.json.
To set-up our typescript project, we are going to use the Lerna create command. Run:
lerna create
In our case, we will name it typescript-project.
Within the project’s root folder, create your tsconfig.json file
{
   "compilerOptions": {
     "module": "commonjs",
     "declaration": true,
     "noImplicitAny": false,
     "removeComments": true,
     "noLib": false,
     "emitDecoratorMetadata": true,
     "experimentalDecorators": true,
     "target": "es6",
     "sourceMap": true,
     "lib": [
       "es6"
     ]
   },
   "exclude": [
     "node_modules",
     "**/*.spec.ts"
   ]
  }
Additionally, the typescript project will need its own tsconfig.json:
{
   "compilerOptions": {
     "module": "commonjs",
     "declaration": true,
     "noImplicitAny": false,
     "removeComments": true,
     "noLib": false,
     "emitDecoratorMetadata": true,
     "experimentalDecorators": true,
     "target": "es6",
     "sourceMap": true,
     "lib": [
       "es6"
     ]
   },
   "exclude": [
     "node_modules",
     "**/*.spec.ts"
   ]
  }
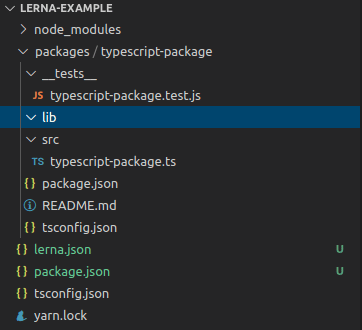
For now, we merely changed the js boilerplate file that came with the Lerna create command into a ts file and moved it inside an src folder. However, feel free to add your own ts code and related tests. Your project structure should now look similar to the one displayed below.
To make sure everything is correctly set-up, we can add a tsc script inside the package.json of our typescript-package:
"scripts": {
   "start" : "tsc",
Run the following command to execute your typescript files:
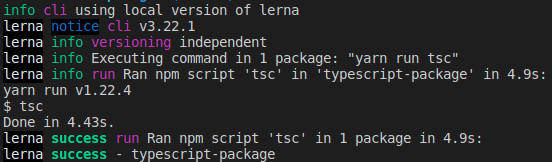
lerna run start
You should see the following success message:
Create React Project
Let’s set-up our React app. For this, we are going to use create-react-app. First, change into the packages folder and then run the following:
cd packages

yarn create react-app  --template typescript
Replace the package name with the name that you want to give to your react project. In our case, we named it react-package.
You should now see the boilerplate react app within the packages folder. Changing into the react package and running the app will open up the app in localhost:
cd react-package

yarn start
Note that this installed typescript again. However, the boilerplate typescript react uses an older version of typescript. While we have the following version in our package.json in our react-package:
"typescript": "~3.7.2"
We have a later version in our root package.json file:
"typescript": "^4.0.3"
This is one of the features of using Monorepos; we can let every package use its own dependencies. Along those lines, we could move the newer typescript version into the package.json of our typescript-package. However, if we want to set-up a new typescript project, we would then have to ensure that it has its own typescript dependency. Thus, we will leave it the way it is for now.
Make one package depend on the other
You might want to access data in your react project from your typescript project. First, edit your typescript-package.ts file inside typescript-package/src.
Once done we have to tell Lerna that our react-package depends on our typescript package. This can be done with the following command:
lerna add typescript-package --scope=react-package
Make sure to replace the package names in accordance with your project.
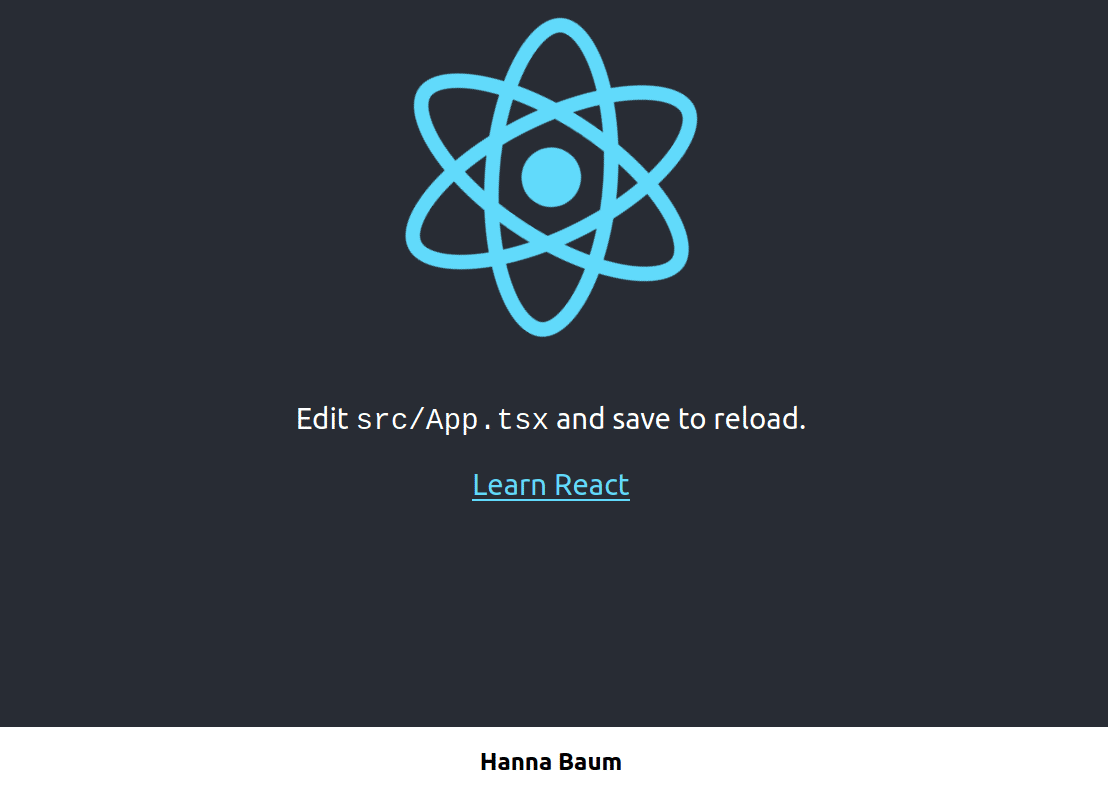
Then add the package in your App.jsx or that part of your React application in which you want to use the typescript-package. In our case, we are going to add the following in our App.tsx file:
const name = require('typescript-package');
Next, we are going to use the function from the typescript-package file in our App.jsx file and display it in our React App.
const variable = name("Hanna", "Baum");
And
{variable}
When you now run the React App, you will see the output in your Browser:
Testing
We currently only have the testing files from the boilerplate React App set-up. However, we will want to test our Typescript app as well. Thus, we are going to add jest to our package.json file our typescript-project. In case you would want to add multiple typescript packages, you might want to add the testing-related dependencies in the root folder.
lerna add jest --scope=typescript-package
This will allow you to run the tests of your typescript project. Add the following script to your typescript-package package.json file:
"test": "jest"
Adding Scripts for installing dependencies, testing, and starting your projects
Now that we can run and test both projects, the typescript-package and the react-package, we want to execute the testing in both packages at the same time. Once we have more projects in our Monorepo, it will become more time consuming to do the testing in sequential order without having to run the same command multiple times across packages. So let’s test packages in parallel. Add the following script to the package.json file inside your root folder:
"test": "lerna run test --parallel",
The run command runs the command in each package that contains the script. Thus, Lerna will run the test script in both, the typescript-package and the react-package. With the –parallel flag we tell Lerna to execute the command in both packages in parallel independent of their respective outputs.
You can now call the script by running the following command in the root of your project repository:
yarn test
We will add several more scripts to execute processes across all our packages.
- The ‘lerna exec’ command will execute the same command in all packages.
"start": "lerna exec yarn start",
- “lerna bootstrap” is used to install all dependencies and any cross-dependencies between packages. This command is needed when the process is first set-up.
"boot": "yarn global add lerna && lerna bootstrap",
- “lerna publish” will either publish an existing package tagged in the current commit, publish a package in the latest commit where the version is not present, update an existing package, or publish an unversioned canary release of the package.
"release": "yarn install && lerna publish && yarn clean",
Read more about Lerna commands and others that you might want to use in your application in the official Lerna documentation.
Commands for installing and upgrading dependencies
As we have seen before, you can add dependencies to specific packages. Here is just a recap:
- Add package A as a dependency to package B:
lerna add package-A --scope=package-B
- Separately, you could also add one external dependency to a specific package:
lerna add external dependency --scope=package-name
- The third option is adding a dependency to all packages by including it into your package.json file in the root folder.
lerna add package-name
Lerna — meet Codefresh
Imagine running all the commands manually every time that you want to make changes to your app. Our goal is to make this easier for you using Codefresh pipelines.
Codefresh includes comprehensive built-in support for building Docker images and pushing them to Docker registries. Combined with dedicated Kubernetes dashboards, Codefresh is a one-stop-shop for microservice development.
This section will show you how to set-up your Codefresh pipeline to make the best out of Lerna. At the end of this section, we will have a working Codefresh pipeline that automatically pushes changes in our Monorepo to the Docker Hub.

In short, this is the process:
Codefresh will need a Dockerfile to build the Docker image of your Monorepo for your application pipeline. Thus, we are going to create the Dockerfile first.
# Pull official base image
FROM node:14.9.0 as build-deps

# A directory within the virtualized Docker environment
# Becomes more relevant when using Docker Compose later
WORKDIR /usr/src/app

# Install lerna globally using npm
RUN npm i lerna -g

# Copy your packages
COPY packages/react-package ./packages/react-package
COPY packages/typescript-package ./packages/typescript-package

# Copies package.json and package-lock.json to Docker environment
COPY package.json yarn.lock lerna.json ./
# Installs all node packages across packages
RUN lerna bootstrap

# Copies everything over to Docker environment
COPY . ./

# Installs all node packages
RUN cd ./packages/react-package && npm run build

# the base image for this is an alpine based nginx image
FROM nginx:1.19-alpine

# copy the build folder from react to the root of nginx (www)
COPY --from=build-deps /usr/src/app/packages/react-package/build /usr/share/nginx/html

# expose port 80 to the outer world
EXPOSE 80

# start nginx
CMD ["nginx", "-g", "daemon off;"]
You can verify that it is working by running:
docker build -t .
And
docker run -d -p 3000:80
Make sure to have a .dockerignore set-up. This will allow you to optimize your Docker build. You can learn more about best practices and the importance of not ignoring dockerignore from this article.
If you do not have a Codefresh account, go ahead and create one to follow along. The free account is sufficient.
Now that we have the account, we have to connect it to a Container Registry. In our case, we are going to use the GitHub Container Registry.
For this, go to the Account Settings — then Integrations — and now select the Docker Registries like shown below:
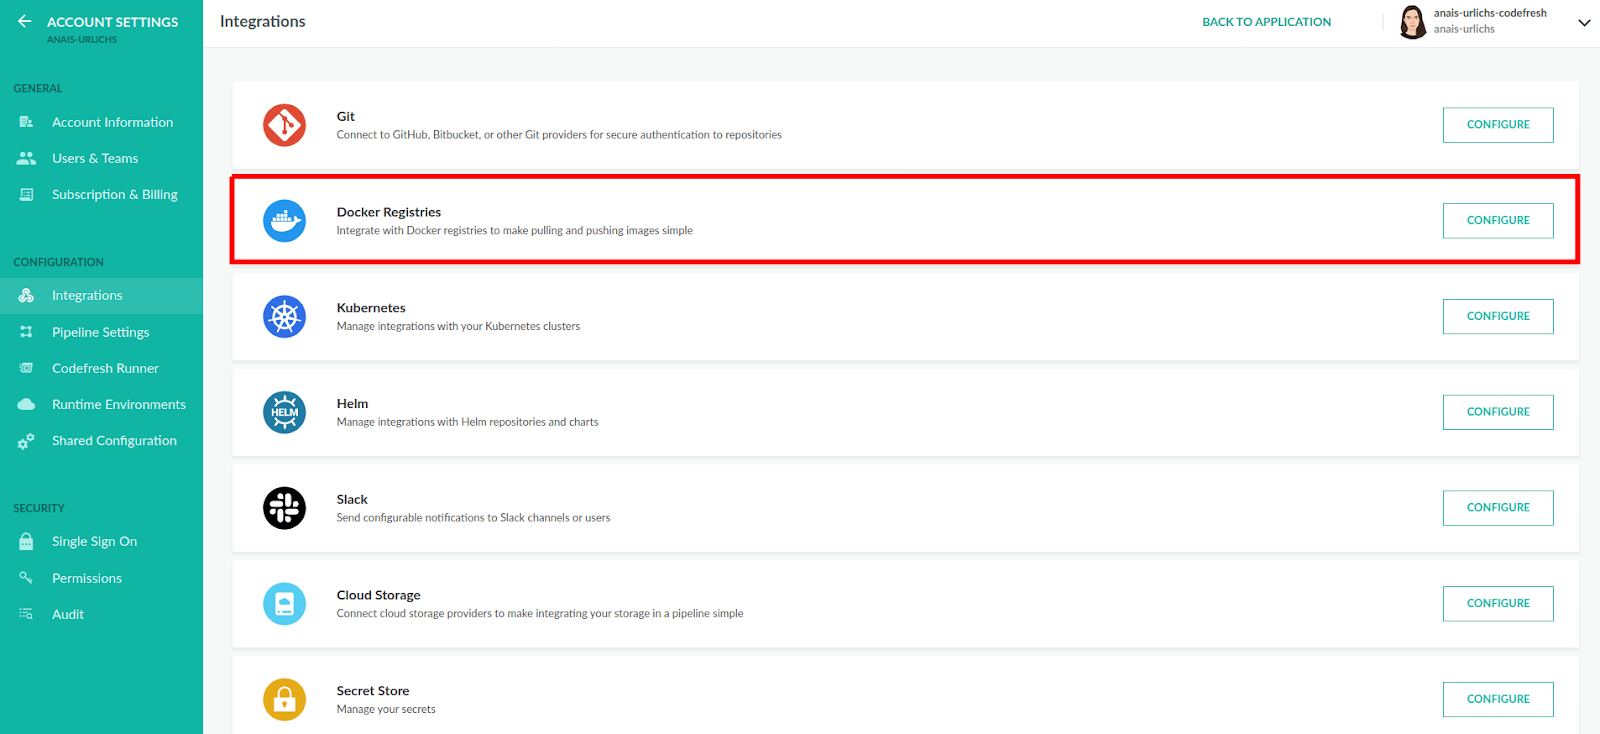
Account Setting Configuration — Docker Registries
Select “Other Registries”:
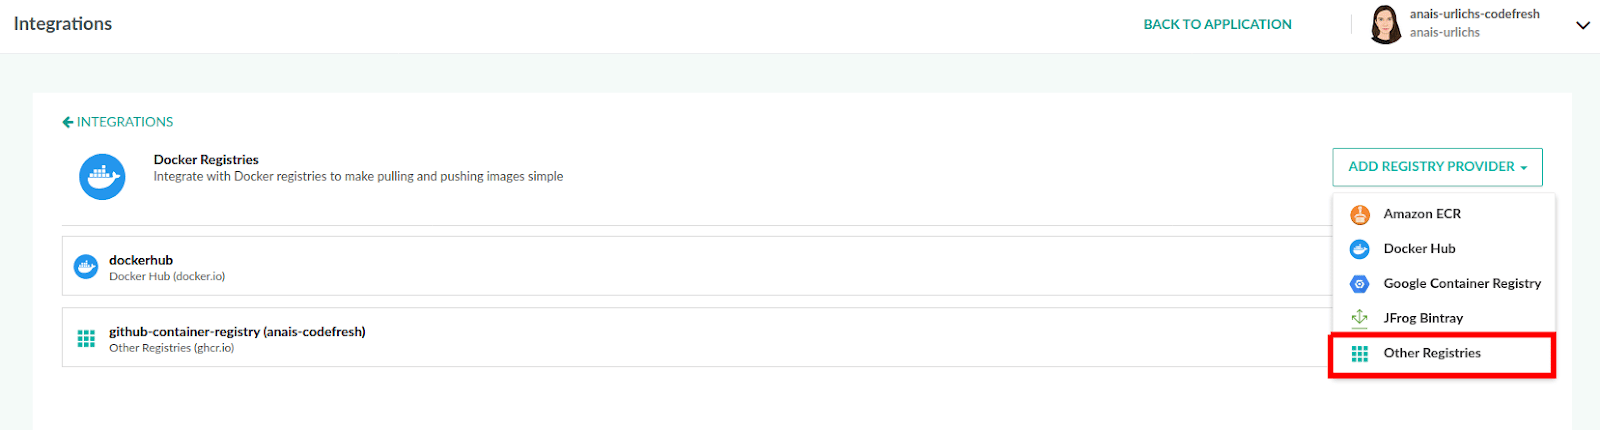
And now configure your Docker Registry to use the Github Container Registry. The inputs are detailed in the screenshot below:
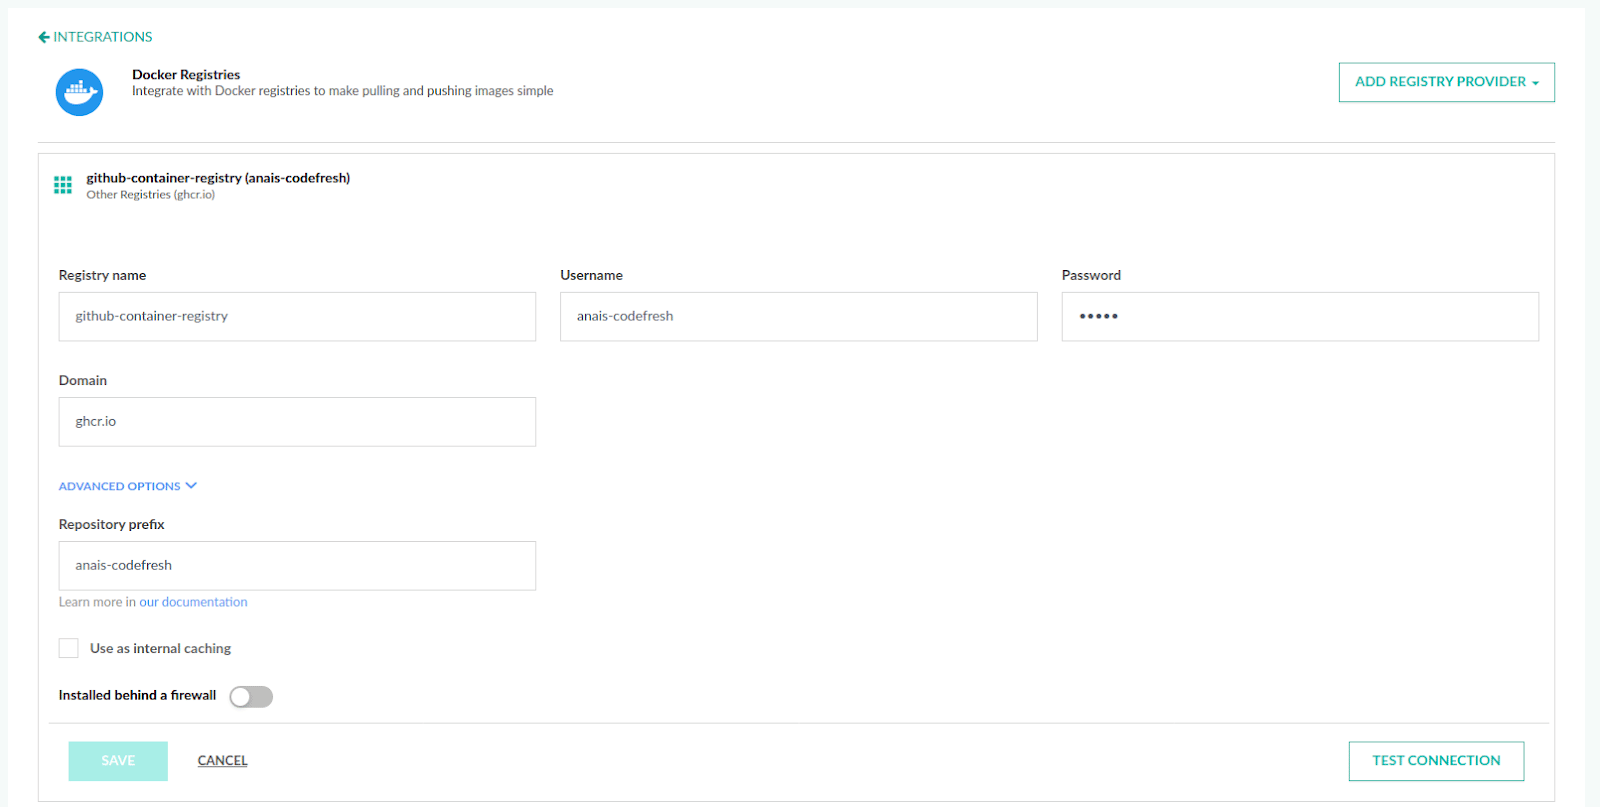
Note that the username is your GitHub username; the Repository Prefix details which repository do you want to reference by default.
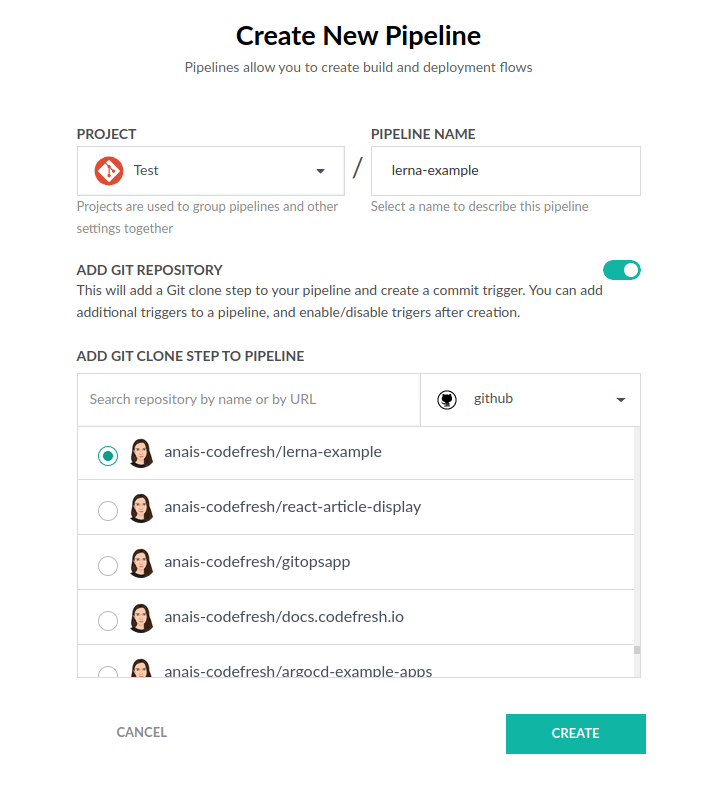
Next, we want to create a new Codefresh Pipeline and tell our Pipeline to use our Monorepo.
To do so, please go to the main page, create a new Project, and then within the Project a new Pipeline. Please follow the instructions provided.
If you are connected to GitHub, you have to select the repository that you want to use to build the pipeline. Select the repository like displayed and hit “create”:
Codefresh will automatically create a codefresh.yml file. This file will be used to build your pipeline.
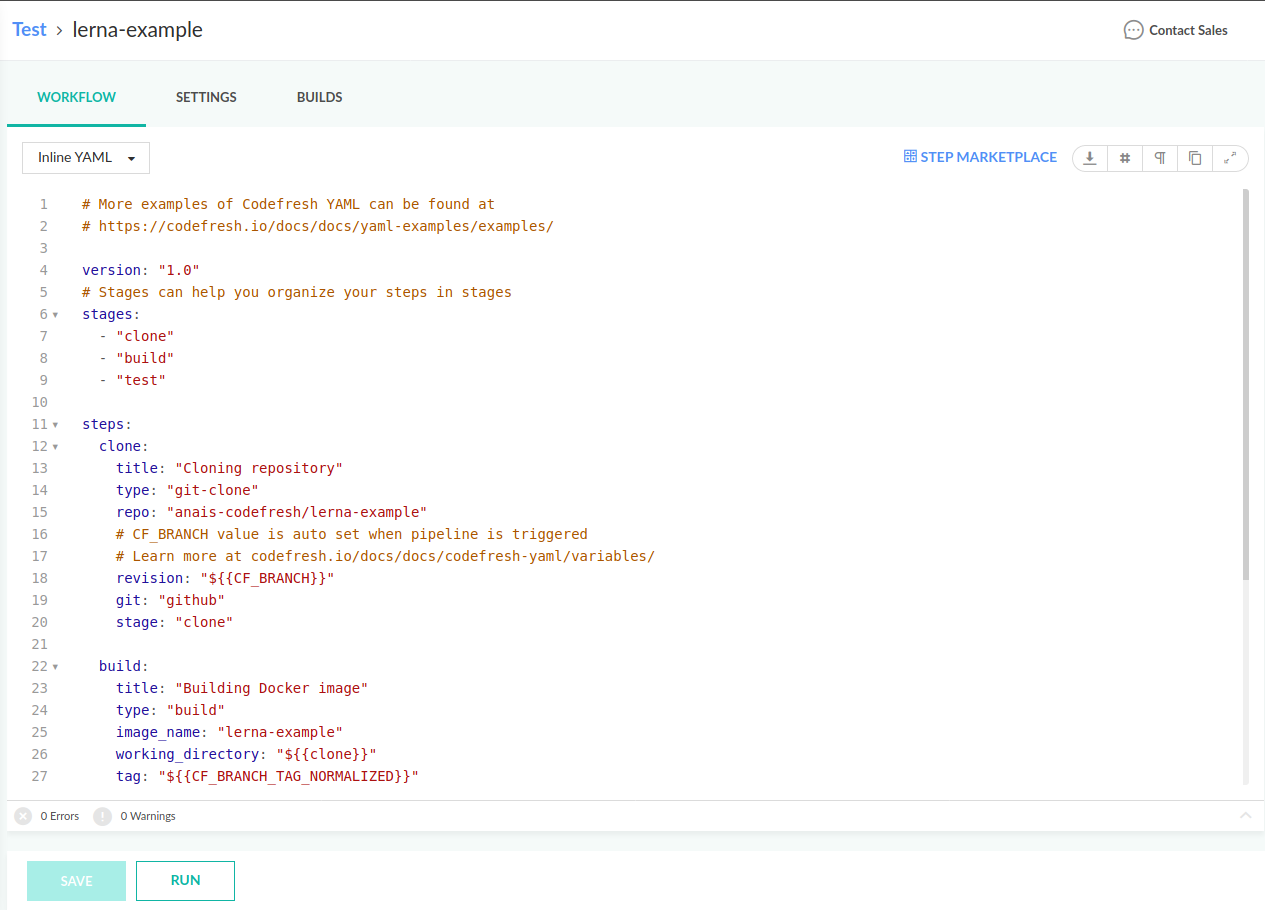
Now hit run and you can watch your pipeline being built. The build step in your codefresh.yml file will automatically push your Docker image to the Docker Registry specified.
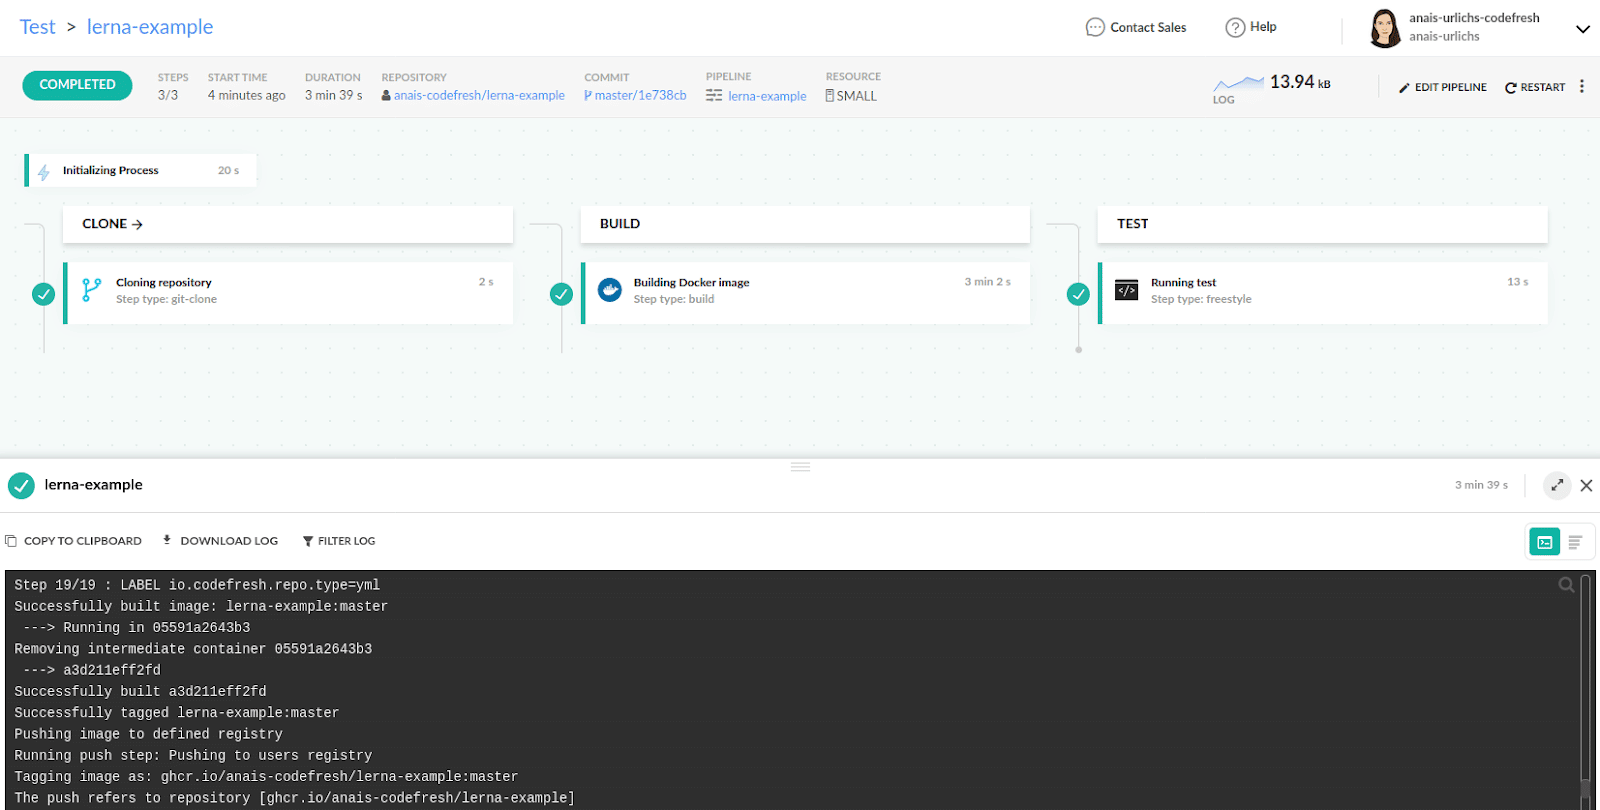
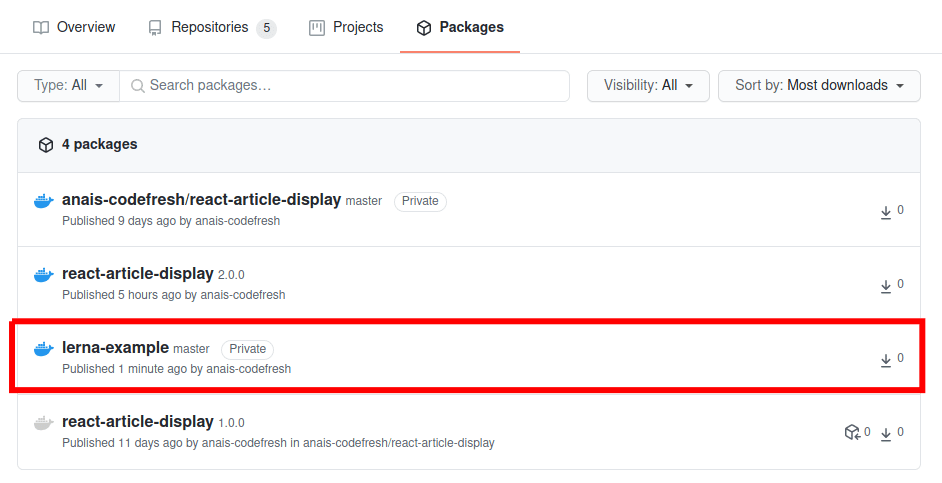
Once the build has been finished, you can view the image of your Monorepo on the GitHub Container Registry within “Packages”:
To learn more about the GitHub Container Registry, please have a look at this tutorial.
Summary
In this tutorial, we first provided:
- An overview of Monorepos and Lerna;
- A Monorepo that includes both a typescript-project and a react-project, which has as its dependency the former;
- Different Lerna commands that you can use to reference both projects and update dependencies.
The second part of the tutorial provided a walk-through of setting up a Dockerfile and Codefresh pipeline for your Monorepo.
We hope this tutorial was useful. If you have any questions, comments, or suggestions please comment below and feel free to reach out.
New to Codefresh? Create Your Free Account today!