We’ve recently released version 1.5 of Codefresh plugin for Jenkins. The new release allows easy, seamless integration of docker-native ci/cd pipelines with Jenkins workflows. In part 1 of this guide we showed how to integrate Codefresh with Jenkins legacy freestyle jobs. In today’s post we’ll see how to call Codefresh from Jenkins groovy-based pipelines.
(Note: Version 1.6 of the plugin is on the way with support for on-prem enterprise-ready Codefresh installations and pipeline API improvements)
Going Groovy
Groovy-dsl pipelines-as-code is the best thing that happened to Jenkins in the last 5 years. They allow one to script a CI/CD workflow of any complexity using loops, conditional expressions and shared libraries. The Codefresh plugin supports for groovy pipelines starting with version 1.2. Now it’s even more intuitive with full separation of build and launch steps and unified syntax for Codefresh environment variable definition.
Let’s see how this is done.
Running Docker-native Pipelines
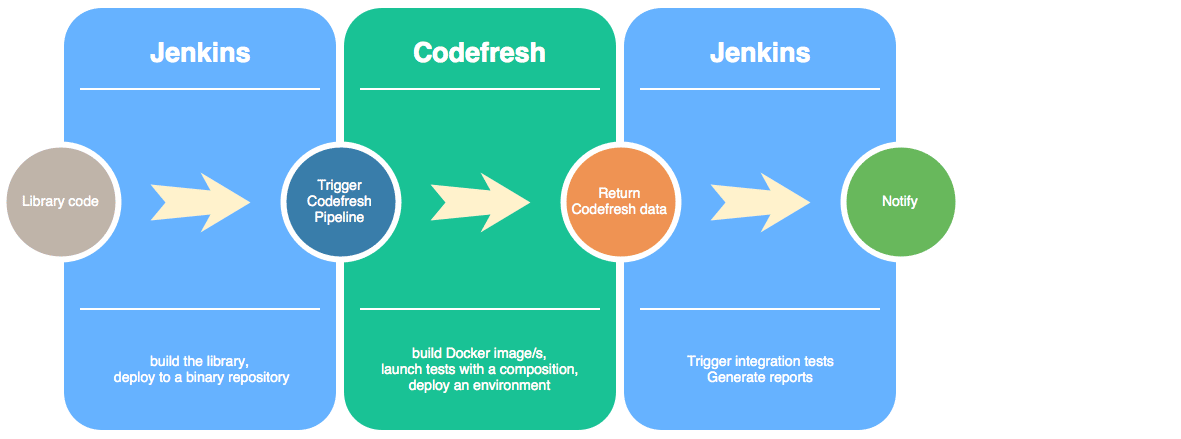
The basic Jenkins -> Codefresh flow that we observe today goes as follows: Jenkins does some non-Docker-related work (let’s say – builds a library), then passes the control to Codefresh for building, deploying and testing the Docker image/s and then comes back to Jenkins for post-processing and reporting. As shown in the following diagram:
The Demo Project
Let’s see how this can be done for our demo project named bringon. This is the same project we’ve been building in part 1 of this blog. It’s an example of a software build registry webservice written in Golang. If you study the source code of model.go you’ll see that it uses a library named buildinfo. The library is responsible for the definition and implementation of the BuildInfo data structure:
import (
    "time"
        //import the buldinfo library
    "github.com/otomato-gh/buildinfo"
)

type Build struct {
    Name      string    `json:"name"`
    Completed bool      `json:"completed"`
    TimeStamp time.Time `json:"due"`
        //use the BuildInfo struct
    info      buildinfo.BuildInfo
}
The code for this library resides in a separate github repositry and is brought in by the dep dependency manager as defined in Gopkg.toml:
[[constraint]]
  version = "0.1"
  name = "github.com/otomato-gh/buildinfo"
Therefore our flow for continuous integration of library changes with service code can be defined as follows:

Building a Library in Golang
In order to better explain the flow – let’s see what the buildinfo library does. (Not much at this stage ;))
buildinfo source tree:
.
├── Jenkinsfile
├── README.md
├── buildinfo.go
├── model.go
└── rate_test.go

0 directories, 5 files
Basically there’s the file named model.go that defines the BuildInfo struct. And the main file buildinfo.go that implements a basic completeness rating routine for build information. Currently this function just goes over all the struct fields. If any of them are empty – the overall rating is lowered by their relative weight. There’s also a testing routine called TestRate located in file rate_test.go that provides a unit test to check the rating accuracy.
All this allows us to build and test our library using ‘go test’.
Here’s what our Jenkins pipeline for the library looks like:
pipeline {
  agent {
    node {
      label 'golang'
    }
  }
  stages {
    stage('Build') {
      steps {
        sh 'go test'
      }
    }
    stage('Push') {
      steps {
        withEnv(["BUILD_NUMBER=${env.BUILD_NUMBER}"]){
            withCredentials([usernamePassword(credentialsId: '18887cf4-97dc-4c1f-90c6-6140f072cc6e', passwordVariable: 'GIT_PASSWORD', usernameVariable: 'GIT_USERNAME')]) {
              sh("git tag -a v0.${BUILD_NUMBER} -m 'Jenkins tested'")
              sh('git push https://${GIT_USERNAME}:${GIT_PASSWORD}@github.com/otomato-gh/buildinfo.git v0.${BUILD_NUMBER}')
            }
        }
      }
    }
    stage('Test with bringon') {
      steps {
        codefreshRun (cfPipeline: 'bringon', cfBranch: 'master', cfVars: [['Value' : "${env.BUILD_NUMBER}", 'Variable' : 'BUILD_NUMBER']] )
      }
    }
  }
}
Jenkins Pipeline Explained
Let’s walk through the code.
At first we tell Jenkins to get a node that has golang installed.
Then we enter a pipeline stage named ‘Build‘ where we invoke the ‘go test‘ command to build and test our library.
If tests are successfull – we continue to the Push stage which creates a new tag (marked with Jenkins build number) in the library github repo.
Once we got our new version published – we go to the stage named ‘Test with bringon’. This is where we trigger a Codefresh pipeline for the bringon repo. Note we’re passing a map of cfVars. This holds Jenkins built-in BUILD_NUMBER variable as a parameter for Codefresh build.
As a result – we can use this environment variable in the Codefresh pipeline. An example fo this is found in codefresh.yml of the bringon repository. Here’s a snippet:
 PushingToDockerRegistry:
    title: Pushing to Docker Registry
    type: push
    candidate: '${{BuildingDockerImage}}'
    tag: 'buildinfo_v0.${{BUILD_NUMBER}}'
    registry: dockerhub
In this way we can tag the resulting docker image with the library version that it uses.
Testing With Codefresh
When integrating with Jenkins – you’re free to choose how to test your Docker images. And – two obvious options are:
- Making the tests part of Codefresh pipeline
- Bringing up a Codefresh environment (composition-based or Kubernetes-based) and then testing it externally – i.e. sending requests from Jenkins.
We will provide more examples on how to test with Codefresh in the near future. For now – let’s see how to launch Codefresh composition-based ephemeral environments for your tests.
Launching a Composition Environment
Sometimes we don’t want to run a full pipeline. Rather – all we want to do is quickly bring up a docker-compose environment that we can then run our tests against.
In Jenkins pipeline this can be done using the codefreshLaunch step as follows:
stage('Launch Codefresh composition'){
  steps {
    codefreshLaunch cfComposition: 'bringon-mongo', cfVars: [[Value: 'true', Variable: 'DEBUG']]
  }
}
This will launch a composition that is defined in the following docker-compose.yml:
version: "3"

services:
  bringon:
    image: otomato/bringon:master
    ports:
      - 8091
  mongo:
    image: mongo
    ports:
      - 27017
Consequently we can use that environment for testing.
As we already said – the upcoming plugin release will provide further Jenkins pipeline support. Expect advanced data retrieval and environment termination functionality.
And it’s coming very soon – watch for updates.