This tutorial will show you how to quickly and easily configure and deploy Kubernetes on AWS using a tool called kops. If you’re looking for a managed solution, we suggest using Stackpoint Cloud to do a one-click deployment of Kubernetes to AWS. We also suggest looking at our Kubernetes Cloud Hosting Comparison. Otherwise, let’s get started!
Step 1: Prepare your Host Environment
The first thing that you need to do is prepare your host environment. You’ll require a few pieces of software that let you create and manage your Kubernetes cluster in AWS.
Install Kubectl
Kubectl is the command line tool that enables you to execute commands against your Kubernetes cluster. Installation is as simple as downloading the binary, marking it as executable, and adding it to your path.
Mac (Homebrew)
brew update && brew install kubectl
Mac (manual)
curl -LO https://storage.googleapis.com/kubernetes-release/release/`curl -s https://storage.googleapis.com/kubernetes-release/release/stable.txt`/bin/darwin/amd64/kubectl
chmod +x ./kubectl
sudo mv ./kubectl /usr/local/bin/kubectl
Linux
curl -LO https://storage.googleapis.com/kubernetes-release/release/$(curl -s https://storage.googleapis.com/kubernetes-release/release/stable.txt)/bin/linux/amd64/kubectl
chmod +x ./kubectl
sudo mv ./kubectl /usr/local/bin/kubectl
Install kops
Kops is an official tool for managing production-grade Kubernetes clusters on AWS. It also supports other cloud providers as alpha features. A simple way to think about it is “kubectl for clusters” — these commands enable you to configure and build your cluster. You can download the binary directly from GitHub, or use homebrew if you are on a Mac.
Mac
brew install kops
Linux
First, download the latest binary from kops release page, then you’ll mark it as executable and put it on your path.
chmod +x kops-linux-amd64 # Add execution permissions
mv kops-linux-amd64 /usr/local/bin/kops # Move the kops to /usr/local/bin
Install AWS CLI tools
The AWS CLI will let you directly interact with Amazon Web Services. The CLI is distributed as a Python package.
Install AWS CLI with Homebrew
brew install awscli
Install AWS CLI with Pip
pip install awscli --upgrade --user
If you’re worried about version conflicts, consider installing the AWS CLI in a virtual environment.
Configure AWS CLI tools
After you’ve installed the AWS CLI, you need to configure it to work with your AWS account. This is easily done with the following command:
aws configure
Step 2: Configure Route 53 Domains
Kops requires that your cluster use DNS. Using DNS names is much easier than remembering a set of IP addresses, and it is easier to scale your cluster as well. If you are going to eventually run multiple clusters, each cluster should have its own subdomain as well. As an example:
cluster1.dev.yourdomain.com
cluster2.dev.yourdomain.com
cluster3.dev.yourdomain.com
In our example, we’ll use Route 53 Hosted Zones to configure our cluster to use dev.yourdomain.com . From there, we’ll be able to assign subdomains to our Kubernetes clusters. You can either use AWS’s Hosted Zones documentation to configure it or simply use the following command:
aws route53 create-hosted-zone --name dev.yourdomain.com --caller-reference 1
Now that you’ve set up your Hosted Zone, you need to configure the NS records for the parent domain to work with your subdomain. In this scenario, yourdomain.com is the parent domain and dev is the subdomain. You’ll need to create an NS record for dev in yourdomain.com . This ensures that dev.yourdomain.com correctly resolves.
If your domain is hosted in Route 53 already, create a new record NS record, and copy and paste the name servers from the subdomain. This will allow requests to reference the hosted zone we just created.
Every hosting provider exposes this functionality, but it can be a bit complicated. To validate that you’ve done it correctly, try running dig NS dev.yourdomain.com If it responds with 4 NS records that point to your Hosted Zone, then everything is working properly.
Step 3: Create S3 buckets for storage
The next step is to configure S3 buckets to store your Kubernetes cluster configuration. Kops will use this backend storage to persist the cluster configuration. Setting up S3 buckets is very easy. You can create it online, or use the CLI. We recommend using the CLI. Since we went with dev.yourdomain.com , let’s name our S3 bucket storage.dev.yourdomain.com .
aws s3 mb s3://storage.dev.yourdomain.com
After you run this, you’ll need to export the environment variable so that kops uses the right storage.
export KOPS_STATE_STORE=s3://storage.dev.yourdomain.com
Optionally, you can export the variable in your bash_profile file so you don’t have to worry about configuring it every time you need to use kops.
Step 4: Build Cluster Configuration
Now that you’ve got S3 storage configured, it’s time to build your Kubernetes cluster configuration. Execute the following command:
kops create cluster --zones=us-east-1c dev.yourdomain.com
After this completes, your cluster’s configuration will be built, and kops will output a few interesting commands to manage your cluster. Note that your cluster hasn’t actually been built, just the configuration.
Step 5: Build your Kubernetes Cluster
Now that your cluster’s configuration is built, execute the following command to instruct kops to actually build the cluster in AWS
kops update cluster dev.yourdomain.com --yes
After a few minutes, your Kubernetes cluster will be deployed in AWS. If you make any additional configuration changes, just use kops update cluster again to push your changes.
Step 6: Add Cluster to Codefresh
Now we have a cluster up. Let’s use it! First, configure kubectl to work with the cluster we just made.
kops export kubecfg dev.yourdomain.com
Now all kubectl commands will automatically point at the cluster we just created.
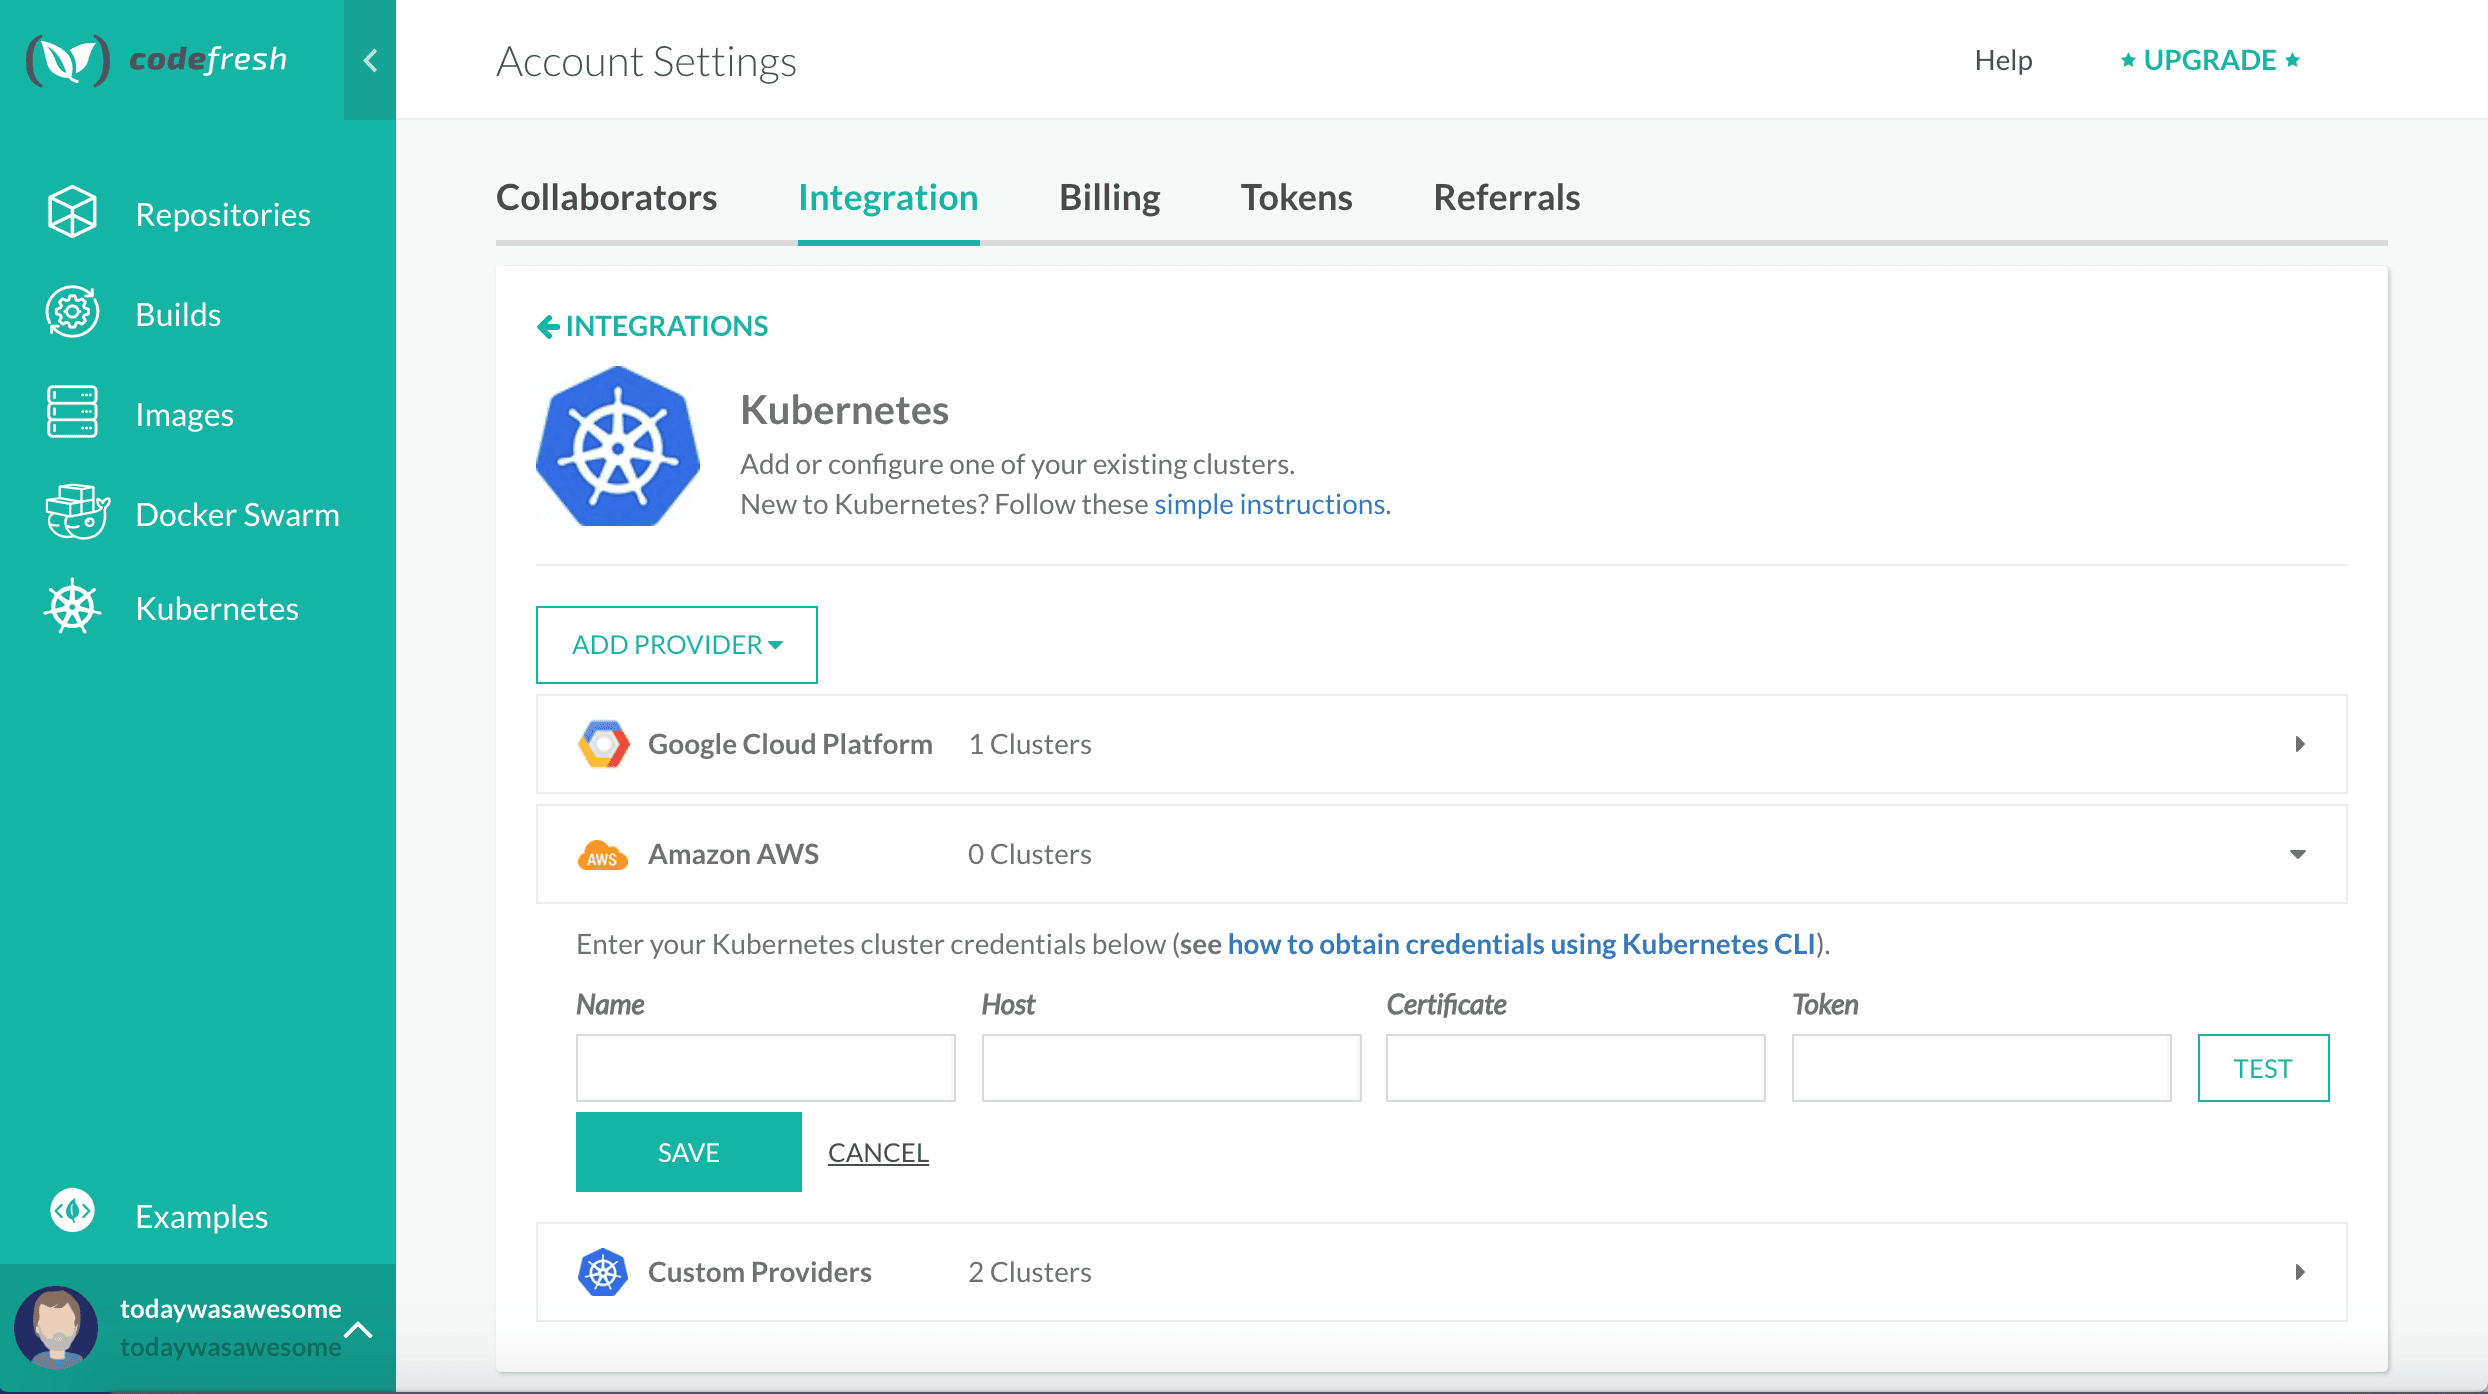
Adding to Codefresh is very easy, after logging in/creating a free account, click on “Kubernetes” on the left-hand side and then “Add Cluster”.
“Click Add Provider” and select “Amazon AWS”. Expand the provider dropdown to now connect your cluster. Name it whatever you like and then to get connection information using kubectl . I’ll be using pbcopy to copy each command to the clipboard, but if you don’t have that installed you can remove that part of the command.
The output of each command will be copied to your clipboard so you can paste it into Codefresh.
Host
export CURRENT_CONTEXT=$(kubectl config current-context) && export CURRENT_CLUSTER=$(kubectl config view -o go-template="{{$curr_context := "$CURRENT_CONTEXT" }}{{range .contexts}}{{if eq .name $curr_context}}{{.context.cluster}}{{end}}{{end}}") && echo $(kubectl config view -o go-template="{{$cluster_context := "$CURRENT_CLUSTER"}}{{range .clusters}}{{if eq .name $cluster_context}}{{.cluster.server}}{{end}}{{end}}") | pbcopy
Certificate
echo $(kubectl get secret -o go-template='{{index .data "ca.crt" }}' $(kubectl get sa default -o go-template="{{range .secrets}}{{.name}}{{end}}")) | pbcopy
Token
echo $(kubectl get secret -o go-template='{{index .data "token" }}' $(kubectl get sa default -o go-template="{{range .secrets}}{{.name}}{{end}}")) | pbcopy
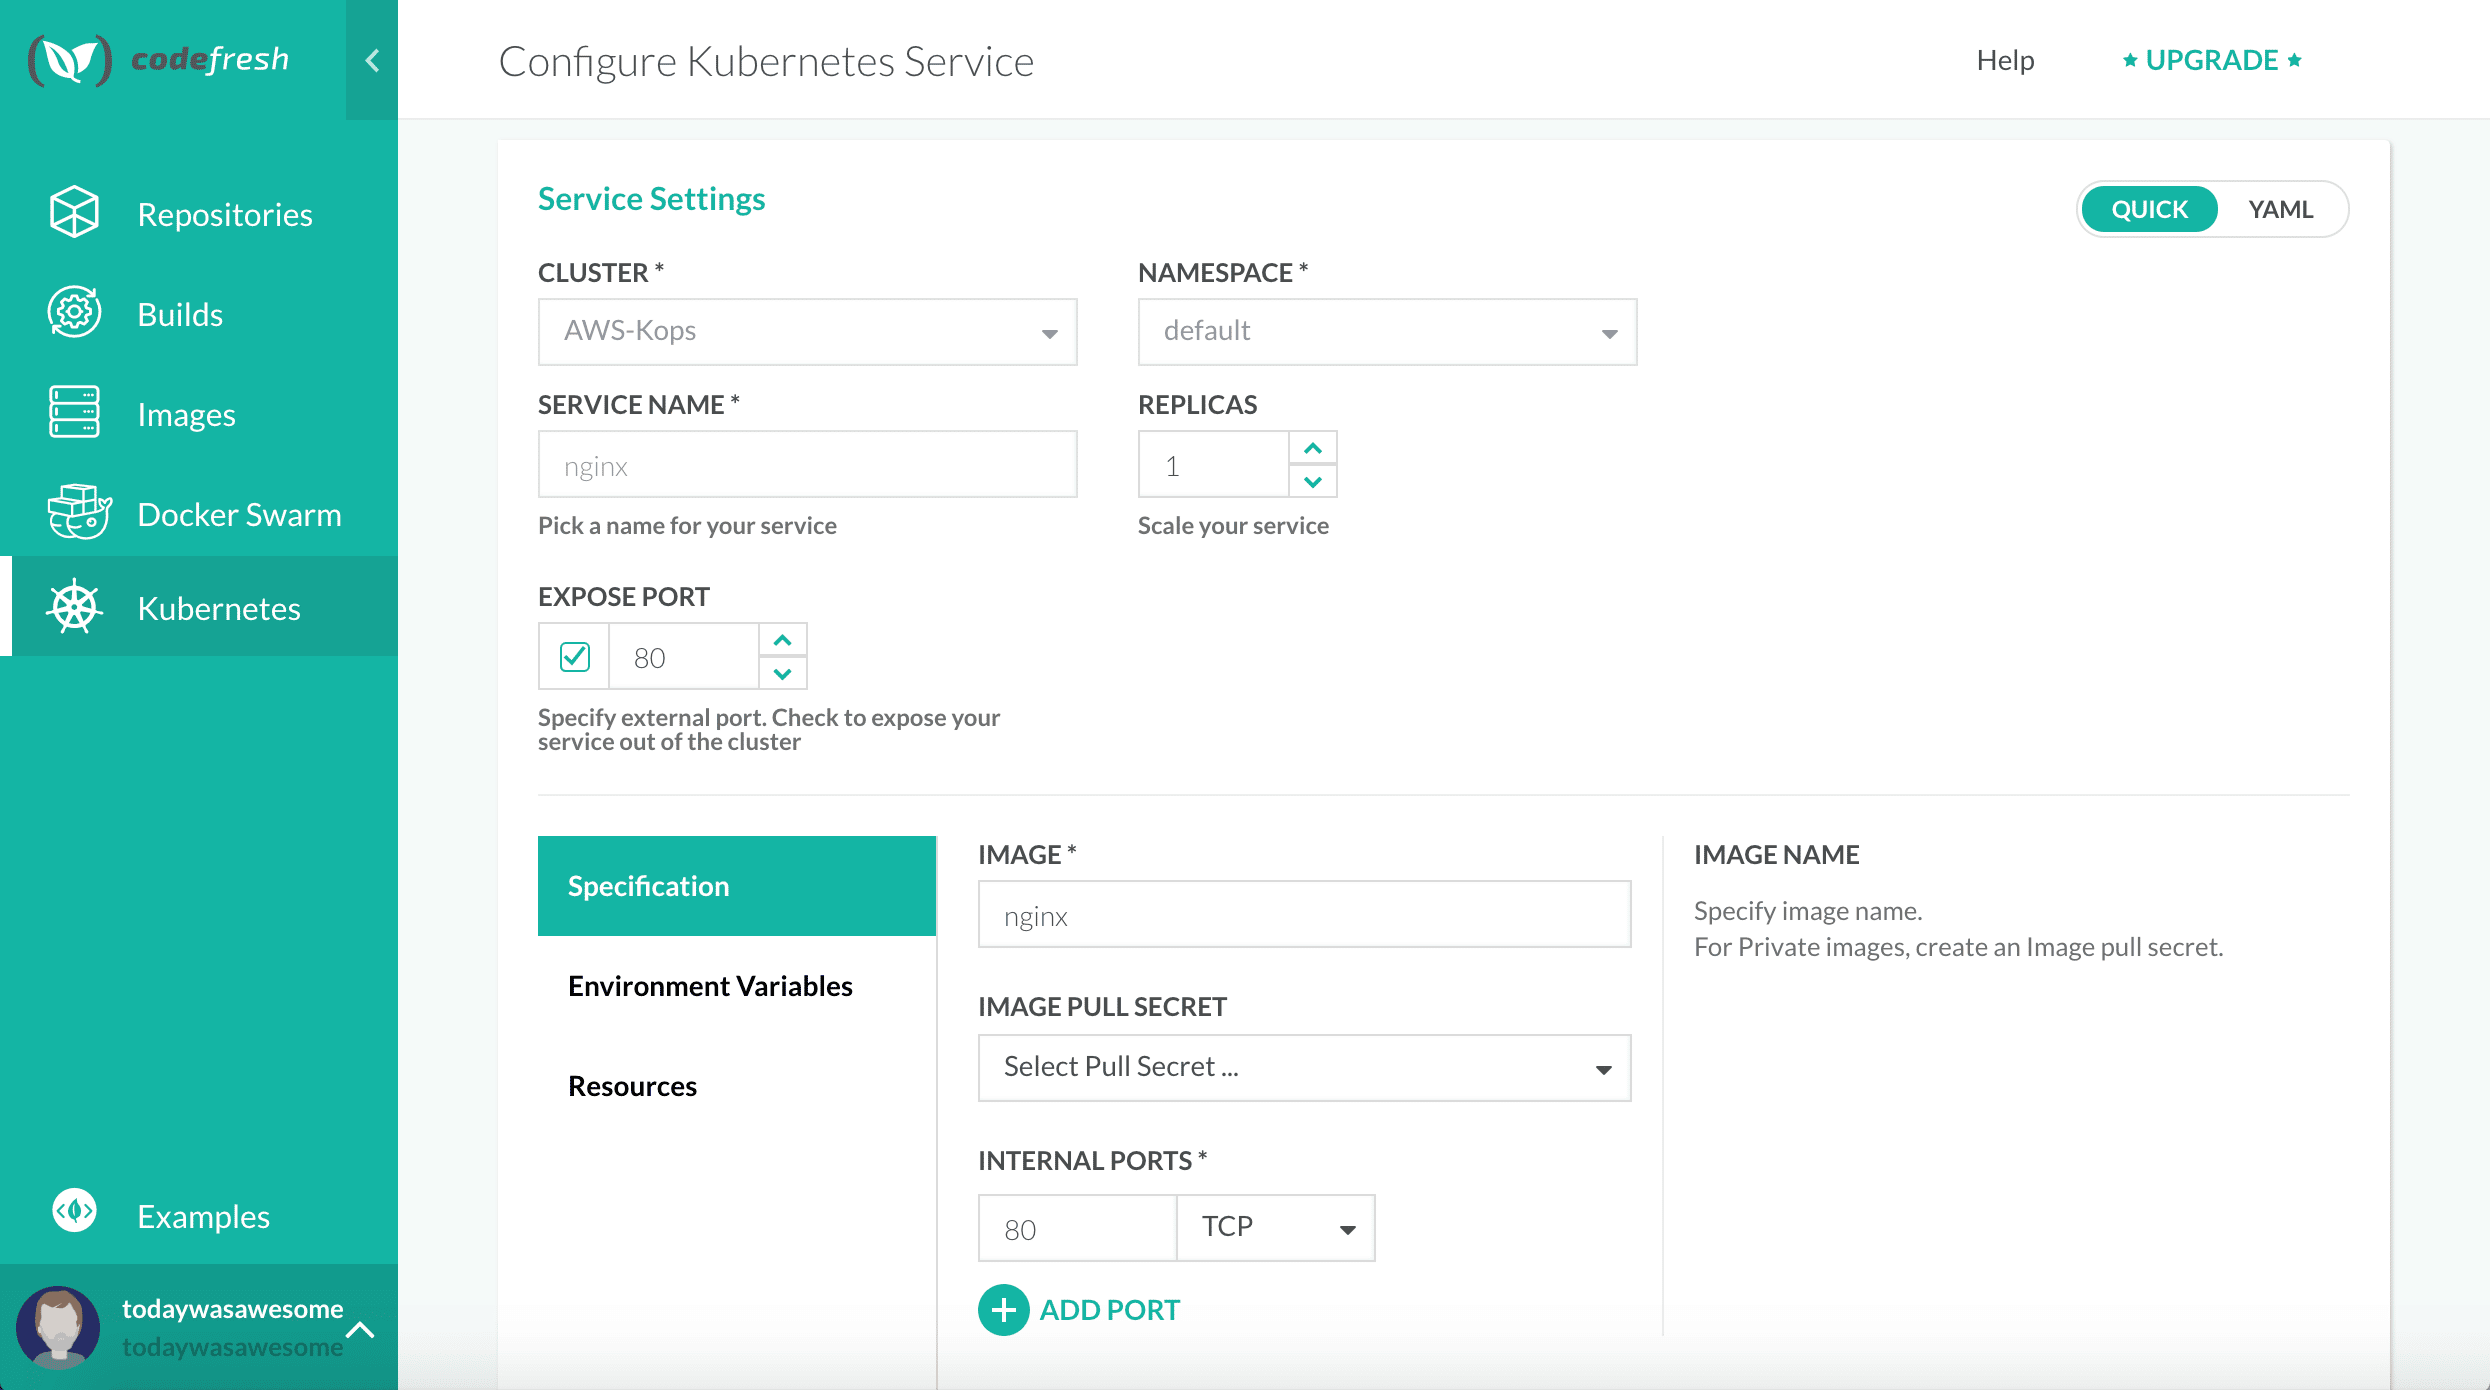
Click “Test” to make sure the connection is working then go back to the Kubernetes page. Click “Add Service” and add the information below
Click “Deploy” and nginx will be up and running within a few seconds.
Since we exposed it publicly, you’ll see a new ELB setup in AWS for the service we just deployed.
Conclusion
While Kops isn’t as complete a solution as a fully-managed Kubernetes service like GKE, it’s still awesome. The setup time and flexibility make Kops + AWS a great way to get up and running with a production-grade cluster. The next step is to add a real application to Codefresh. Then you can build, test, and deploy the application from a single interface. Plus we can shift all the testing left, and spin up environments on-demand for every change.
New to Codefresh? Create Your Free Account Today!


