Building an Automated Argo Bootstrap + Events + Workflows + CD Pipeline
Motivation
Better DevOps makes for more efficient engineering teams and more reliable releases, and when it comes to DevOps, it doesn’t get better than GitOps. According to DevOps-As-A-Service:
In short, GitOps is a set of standards and best practices that can be applied to application configuration and delivery, all the way to infrastructure management. GitOps is not a tool but works by relying on a single source of truth (typically Git) for declarative applications and infrastructure.
One of the many goals of DevOps is to reduce Time To Value (TTV) and to provide faster feedback while enabling developers to easily self-service or not have to engage to get a service at all. As such, one of the most useful architectures to build right away as a foundation for all other work is a Continuous Delivery (CD) Pipeline.
Who Is This Guide For?
Those looking to take their cloud engineering and/or container orchestration to the next level. Being able to deploy, build, and orchestrate containers is an powerful set of skills, but automating those tasks and linking them together can really accelerate the development cycle by abstracting away manual CI and CD tasks which eat away actual application development time. However, those running a homelab or bare-metal configuration of any kind will probably find this the most useful. There are several considerations to take when designing for an enterprise-level infrastructure and the implications behind choosing software for that scenario is most likely beyond the scope of this article.
End Product
A fully functioning and automated CD pipeline which utilizes the Argo Ecosystem to allow for a quick and seamless rollout of a simple frontend application operated entirely by a git repository.
Prerequisites
- An already running Kubernetes cluster (preferably in a high availability structure). If you have the bare-metal resources available, one technical author I follow in particular has a great guide on using Ansible to deploy a solid K3s cluster.
- A git account. I typically use github for my personal projects.
- A decent understanding of Kubernetes architecture, API, etc.
The Project At A Glance
Infrastructure
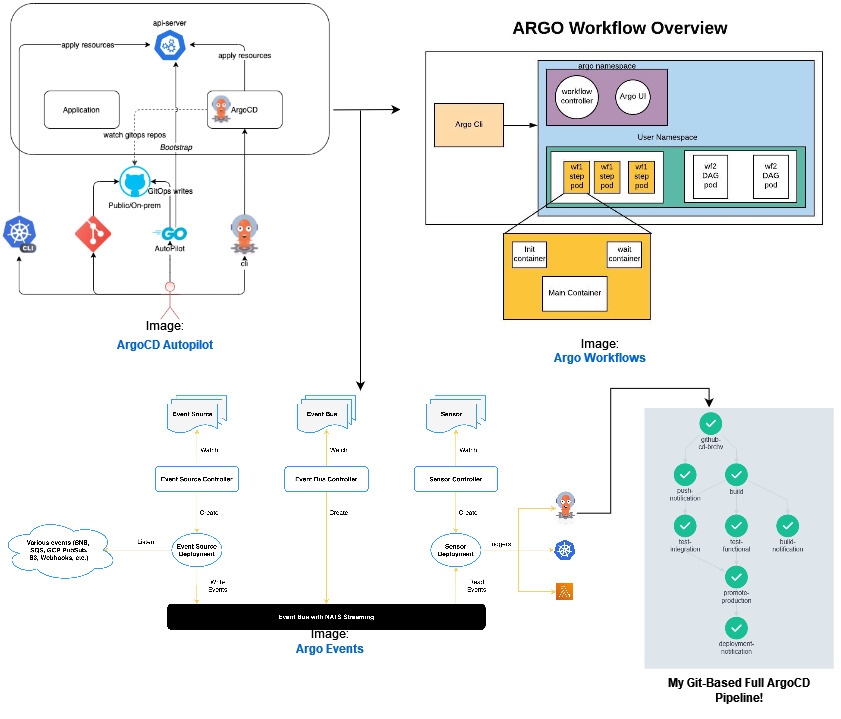
- Argo CD Autopilot
The Argo CD Autopilot is a tool which offers an opinionated way of installing Argo CD and managing GitOps repositories. – Argo CD Autopilot Docs
- Argo CD
Argo CD is a declarative, GitOps continuous delivery tool for Kubernetes. – Argo CD Docs
- Argo Events
Argo Events is an event-driven workflow automation framework for Kubernetes which helps you trigger K8s objects, Argo Workflows, Serverless workloads, etc. on events from a variety of sources like webhooks, S3, schedules, messaging queues, gcp pubsub, sns, sqs, etc. – Argo Events Docs
- Argo Workflows
Argo Workflows is an open source container-native workflow engine for orchestrating parallel jobs on Kubernetes. – Argo Workflows Docs
Application
Although this is really overkill for a simple static page, I wanted to give myself some room to grow as I learn more frontend coding. There is a seemingly endless supply of libraries, frameworks, and meta-frameworks around frontend stacks, but I have found a great foundation for well-documented and extensible code in the following:
Should you want to take this stack further into a full application in one bundle, one of the fastest rising packages for customizing an integrated solution has been t3 stack, which is a CLI-based “…way to start a full-stack, typesafe Next.js app”.
Setting Up The Foundation
Once the cluster is up and running, along with a working github account, the first step is to get Argo CD onto the cluster. Again, for this demonstration we are using Argo CD Autopilot. This will bootstrap a self-managed Argo CD along with the git source of truth. The instructions are very straightforward and provide clear details for this step.
The instructions are available for almost any environment, but since I am primarily a Linux user for all of my servers, the relevant code is below:
# get the latest version or change to a specific version
VERSION=$(curl --silent "https://api.github.com/repos/argoproj-labs/argocd-autopilot/releases/latest" | grep '"tag_name"' | sed -E 's/.*"([^"]+)".*/1/')

# download and extract the binary
curl -L --output - https://github.com/argoproj-labs/argocd-autopilot/releases/download/$VERSION/argocd-autopilot-linux-amd64.tar.gz | tar zx

# move the binary to your $PATH
mv ./argocd-autopilot-* /usr/local/bin/argocd-autopilot

# check the installation
argocd-autopilot version
At this point, you need to make sure you have a valid Github token and export your variables for ArgoCD Autopilot to consume:
export GIT_TOKEN=ghp_PcZ...IP0
export GIT_REPO=https://github.com/owner/name
Set up the GitOps repository:
argocd-autopilot repo bootstrap
And now you’re off to the races with a bootstrapped ArgoCD Autopilot project!
A Little Extra CD
Although I would say there is nothing really wrong with the deployment described in the basic documentation for Argo CD Autopilot, I chose to borrow a slightly more advanced option for my choice of deployment patterns.
Typically, you would simply use Argo CD Autopilot to define an application as such:
argocd-autopilot project create testing
argocd-autopilot app create hello-world --app github.com/argoproj-labs/argocd-autopilot/examples/demo-app/ -p testing --wait-timeout 2m
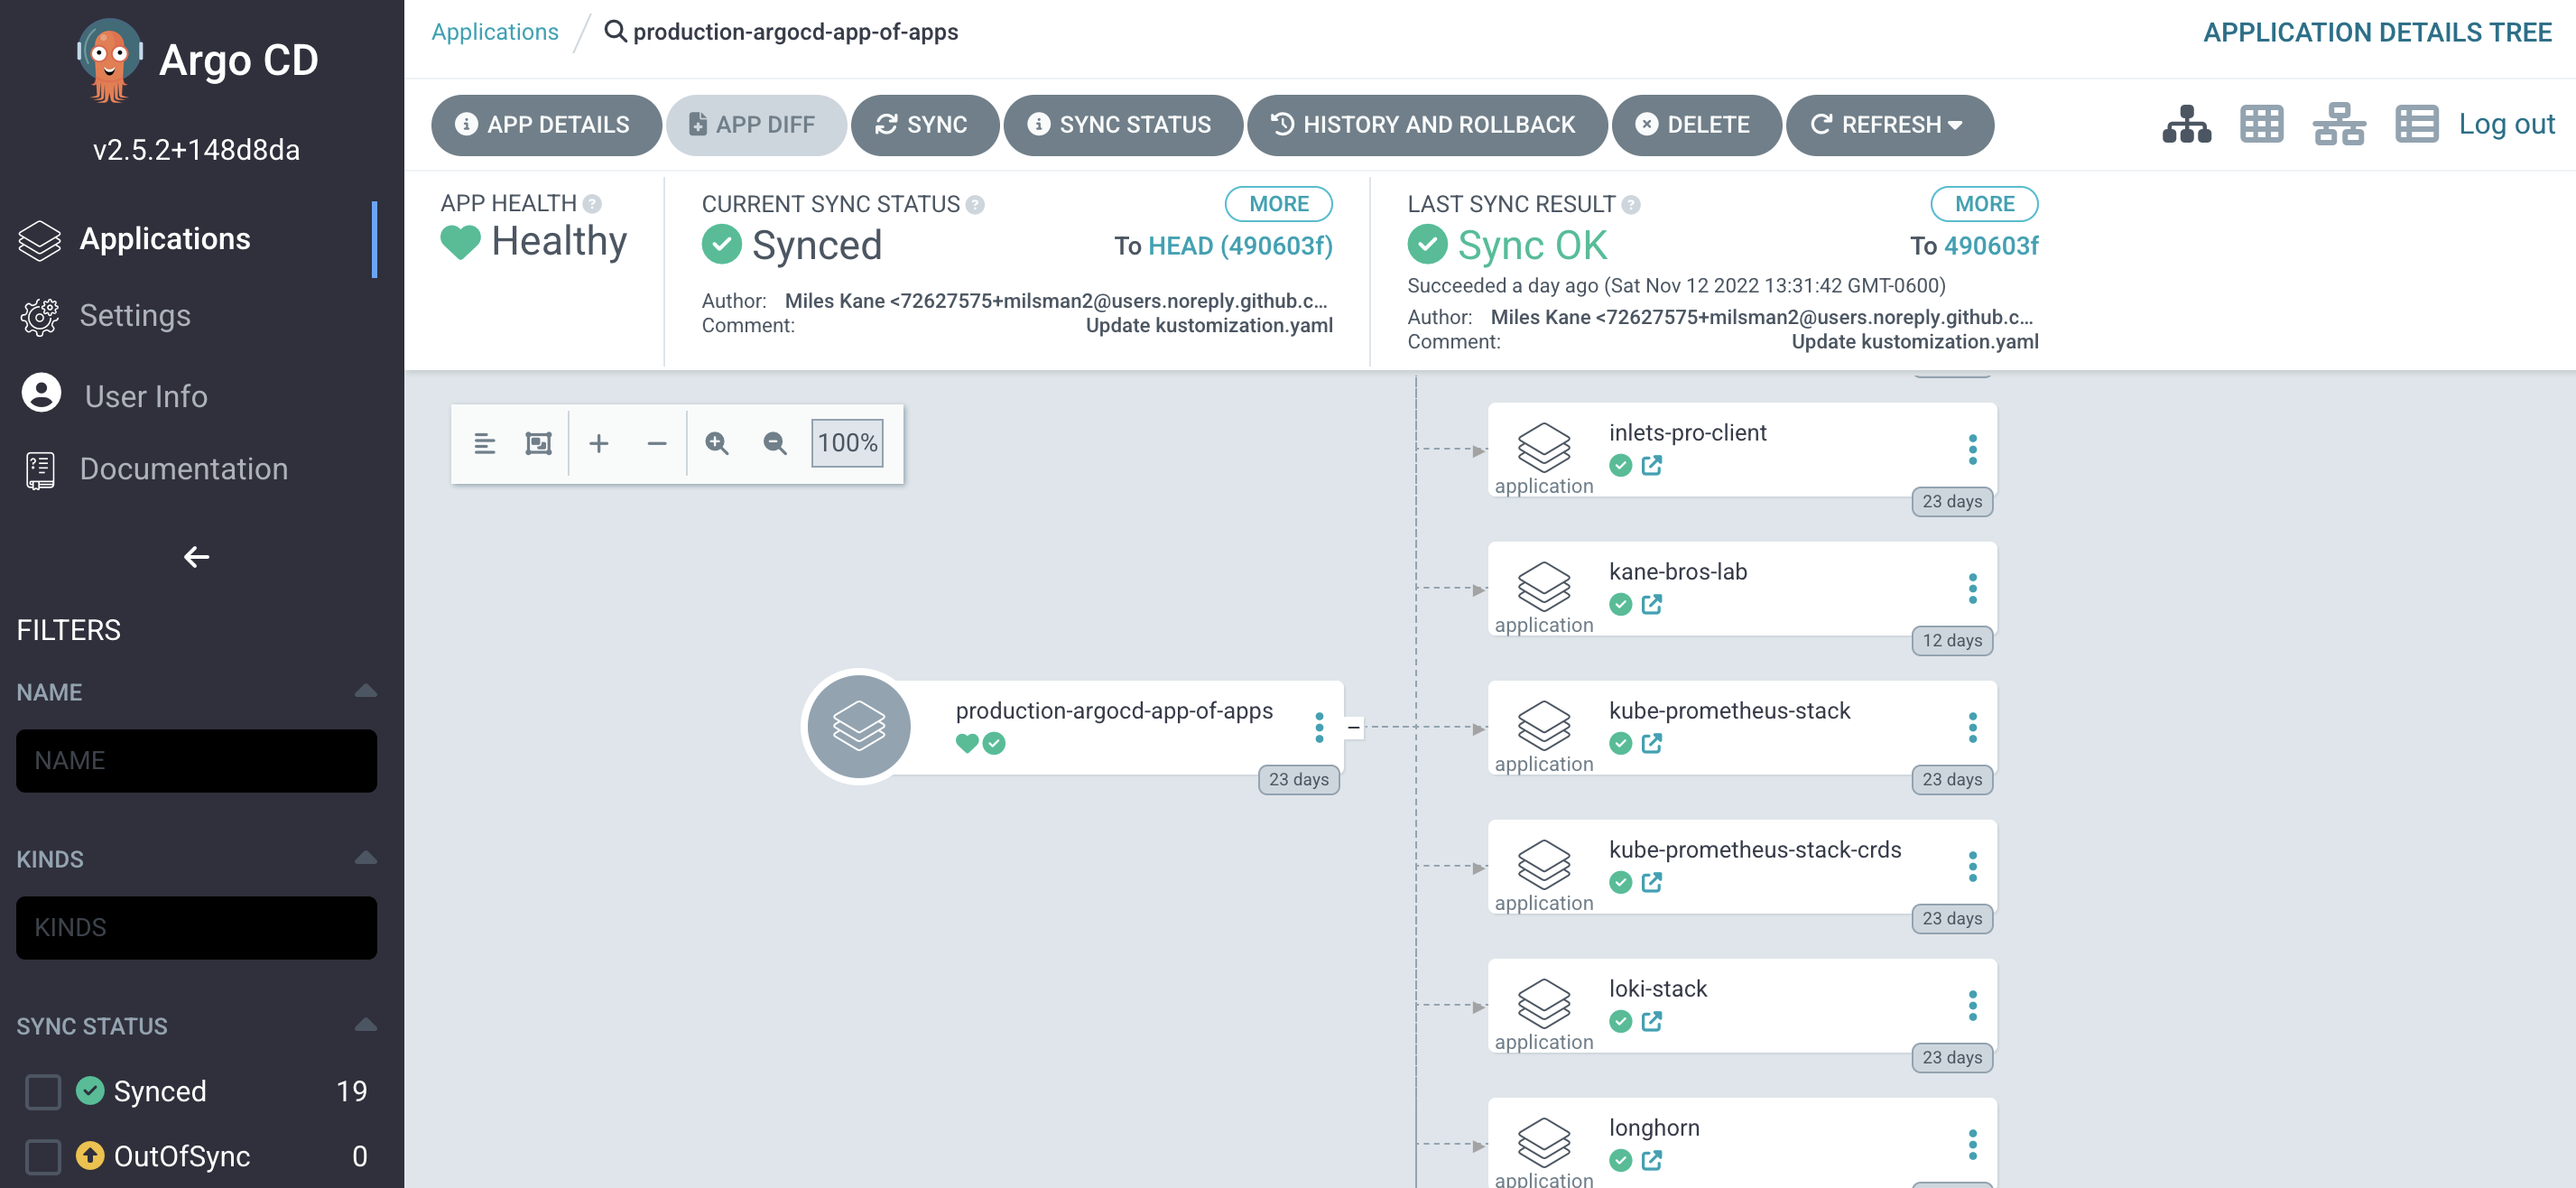
This will yield an application for Argo to deploy, which is totally fine, but I prefer the app-of-apps pattern explained once again directly by the Argo organization. By making my only application in the project created by Argo CD Autopilot be an app-of-apps, I can define one main app launched by Argo CD to control the others. This also has the benefit of allowing for one of my other favorite Argo CD patterns, using 3rd party deployments as subcharts. There are numerous ways to dice the Argo CD onion, but this one has been fairly rock solid for me as an extensable and reliable base. I simply have a main app directory through Argo CD Autopilot and the following structure:
argo-cd-autopilot/apps/argo-cd-app-of-apps/base/argo-events.yaml

## Typical Application within App-of-Apps

apiVersion: argoproj.io/v1alpha1
kind: Application
metadata:
  namespace: argocd
  name: argo-events
  finalizers:
  - resources-finalizer.argocd.argoproj.io
spec:
  syncPolicy:
    automated:
      prune: true
      selfHeal: true
    syncOptions:
    - CreateNamespace=true
    - PruneLast=true
  project: default
  destination:
    server: https://kubernetes.default.svc
    namespace: argo-events
  source:
    path: argo-events/kustomize/overlays/production
    repoURL: https://github.com/milsman2/amd64-apps
    targetRevision: HEAD

argo-cd-autopilot/apps/argo-cd-app-of-apps/base/kustomization.yaml

## Kustomization to Deploy All Applications

apiVersion: kustomize.config.k8s.io/v1beta1
kind: Kustomization
resources:
  - ./argo-events.yaml
  - ./argo-workflows.yaml
  - ./argo-workflows-config.yaml
  - ./cert-manager.yaml
  - ./cert-manager-issuers.yaml
  ...and so on
By utilizing this pattern, you buy yourself a whole lot of flexibility and honestly to manage this repo in whatever style suits you (.e.g. monorepo). Within the amd64-apps repository, I have various per-application folder setups, like this one:
amd64-apps/argo-workflows/Chart.yaml

## Argo Workflows as Sub-Chart

apiVersion: v2
name: argo-workflows
type: application
version: 1.0.0
appVersion: "1.0.0"
dependencies:
- name: argo-workflows
  version: 0.20.1
  repository: https://argoproj.github.io/argo-helm

amd64-apps/argo-workflows/value.yaml

## Setting the Values Override File

argo-workflows:
  crds:
    install: true
    keep: false
  createAggregateRoles: true
  singleNamespace: false
  controller:
    workflowNamespaces:
      - argo
    image:
      registry: quay.io
      repository: argoproj/workflow-controller
    rbac:
      create: true
    metricsConfig:
      enabled: true
      path: /metrics
      port: 9090
      ignoreErrors: false
      secure: false
      portName: metrics
      servicePort: 8080
      servicePortName: metrics
    telemetryConfig:
       enabled: false
    serviceMonitor:
      enabled: true
      namespace: "monitoring"
    serviceAccount:
      create: true
    name: workflow-controller
    serviceType: ClusterIP
    pdb:
      enabled: false
    nodeSelector:
      kubernetes.io/os: linux
      nodeCategory: worker
  server:
    extraArgs:
      - --auth-mode=server
    enabled: true
    baseHref: /
    image:
      registry: quay.io
      repository: argoproj/argocli
    rbac:
      create: true
    name: server
    serviceType: LoadBalancer
    servicePort: 2746
    serviceAccount:
      create: true
    nodeSelector:
      kubernetes.io/os: linux
      nodeCategory: worker
    secure: false
    clusterWorkflowTemplates:
      enabled: true
      enableEditing: true
  useDefaultArtifactRepo: false
  useStaticCredentials: true
  artifactRepository:
    archiveLogs: false
One application can make for some fun ways of making sure updates are cascaded and constantly kept up with using the features like Sync and Prune.
Your Basic “Best Practice” JS App
TLDR: npx create-react-app my-app –template typescript
This pattern, when combined with TailwindCSS just really ticks a lot of the boxes for me.
- Extensible
- Works out of the box
- Lots of documentation
- Good examples in lots of repositories
The last time I checked, this Dockerfile was the “golden standard” one for a static site build of this combination of frameworks/libraries:
sample-react-app/Dockerfile

## Dockerfile to build a react application with TypeScript, Next.js, and TailwindCSS

# Install dependencies only when needed
FROM node:16-alpine AS deps
# Check https://github.com/nodejs/docker-node/tree/b4117f9333da4138b03a546ec926ef50a31506c3#nodealpine to understand why libc6-compat might be needed.
RUN apk add --no-cache libc6-compat
WORKDIR /app

# Install dependencies based on the preferred package manager
COPY package.json yarn.lock* package-lock.json* pnpm-lock.yaml* ./
RUN
  if [ -f yarn.lock ]; then yarn --frozen-lockfile;
  elif [ -f package-lock.json ]; then npm ci;
  elif [ -f pnpm-lock.yaml ]; then yarn global add pnpm && pnpm i --frozen-lockfile;
  else echo "Lockfile not found." && exit 1;
  fi


# Rebuild the source code only when needed
FROM node:16-alpine AS builder
WORKDIR /app
COPY --from=deps /app/node_modules ./node_modules
COPY . .

# Next.js collects completely anonymous telemetry data about general usage.
# Learn more here: https://nextjs.org/telemetry
# Uncomment the following line in case you want to disable telemetry during the build.
# ENV NEXT_TELEMETRY_DISABLED 1

RUN yarn build

# If using npm comment out above and use below instead
# RUN npm run build

# Production image, copy all the files and run next
FROM node:16-alpine AS runner
WORKDIR /app

ENV NODE_ENV production
# Uncomment the following line in case you want to disable telemetry during runtime.
# ENV NEXT_TELEMETRY_DISABLED 1

RUN addgroup --system --gid 1001 nodejs
RUN adduser --system --uid 1001 nextjs

COPY --from=builder /app/public ./public

# Automatically leverage output traces to reduce image size
# https://nextjs.org/docs/advanced-features/output-file-tracing
COPY --from=builder --chown=nextjs:nodejs /app/.next/standalone ./
COPY --from=builder --chown=nextjs:nodejs /app/.next/static ./.next/static

USER nextjs

EXPOSE 3000

ENV PORT 3000

CMD ["node", "server.js"]
The Actual Pipeline
There are lots of YouTube and Github guides out there, and honestly a lot of which one works depends on your learning style and personal preferences. That being said, one of my personal favorites for learning and implementing advanced techniques for Argo projects with some really handy and robust workflows for Argo CD is Victor Farcic of the DevOps Toolkit series. In particular, I don’t think I can explain better than he, the philosophies and code that create an end to end CD pipeline.
However, the basis of much of any code templates for Argo can be sourced from Codefresh, which gives a great template for all of the workflows and code structure utilized in my current project environment. The below code is an example of my personal implementation and tweaking of those templates to show what your project might look like while running in production.
For example, my amd64-apps/argo-events/kustomize folder contains most of the pieces and configurations I use for the Argo Events application. The boilerplate EventBus deployment is
amd64-apps/argo-events/kustomize/base/event-bus.yaml

apiVersion: argoproj.io/v1alpha1
kind: EventBus
metadata:
  name: default
spec:
  nats:
    native:
      replicas: 3
      auth: token
“The Sensor defines a set of event dependencies (inputs) and triggers (outputs). It listens to events on the eventbus and acts as an event dependency manager to resolve and execute the triggers
The Sensor component of this ecosystem essentially hooks into the service bus waiting for certain elements to be in a given state and can execute actions based on that fulfillment. Although the name “trigger” for me at least seemed to imply a conditional being true, the concept of a “trigger” in Argo Events is actually a description of the things you want to happen based on a given signal. In this code, the created resource is an Argo Workflow that uses secrets as volumes and runs through templated cluster-wide available build steps and also uses some clever bash to roll the image for deployment up to the next hash. Once again, I would defer to the documentation by Victor Farcic for a more detailed look.
My
githubcd sensorsits as below:
apiVersion: argoproj.io/v1alpha1
kind: Sensor
metadata:
  name: github-cd
spec:
  template:
    serviceAccountName: argo-events-sa
  dependencies:
  - name: github
    eventSourceName: github
    eventName: github-cd
  triggers:
  - template:
      name: trigger
      argoWorkflow:
        group: argoproj.io
        version: v1alpha1
        resource: workflows
        operation: submit
        source:
          resource:
            apiVersion: argoproj.io/v1alpha1
            kind: Workflow
            metadata:
              generateName: github-cd-
              namespace: argo
            spec:
              entrypoint: build
              serviceAccountName: argo-workflows-workflow-controller
              volumes:
              - name: regcred
                secret:
                  secretName: regcred
                  items:
                    - key: .dockerconfigjson
                      path: config.json
              - name: github-access
                secret:
                  secretName: github-access
                  items:
                    - key: token
                      path: token
                    - key: user
                      path: user
                    - key: email
                      path: email
              - name: slack-access
                secret:
                  secretName: slack-access
              templates:
              - name: build
                dag:
                  tasks:
                  - name: build
                    templateRef:
                      name: container-image
                      template: build-kaniko-git
                      clusterScope: true
                    arguments:
                      parameters:
                      - name: repo_url
                        value: ""
                      - name: repo_ref
                        value: ""
                      - name: repo_commit_id
                        value: ""
                      - name: container_image
                        value: milsman2/
                      - name: container_tag
                        value: ""
                  - name: promote-production
                    templateRef:
                      name: promote
                      template: promote
                      clusterScope: true
                    arguments:
                      parameters:
                      - name: environment
                        value: base
                      - name: repo_owner
                        value: milsman2
                      - name: repo_name
                        value: argo-cd-autopilot
                      - name: image_owner
                        value: milsman2
                      - name: image_name
                        value: ""
                      - name: tag
                        value: ""
                    dependencies:
                    - test-functional
                    - test-integration
                  - name: test-functional
                    template: test
                    dependencies:
                    - build
                  - name: test-integration
                    template: test
                    dependencies:
                    - build
                  - name: build-notification
                    templateRef:
                      name: custom-json
                      template: custom-json
                      clusterScope: true
                    arguments:
                      parameters:
                      - name: stage
                        value: build
                      - name: author
                        value: ""
                    dependencies:
                    - build
                  - name: push-notification
                    templateRef:
                      name: custom-json
                      template: custom-json
                      clusterScope: true
                    arguments:
                      parameters:
                      - name: stage
                        value: push
                      - name: author
                        value: ""
                  - name: deployment-notification
                    templateRef:
                      name: custom-json
                      template: custom-json
                      clusterScope: true
                    arguments:
                      parameters:
                      - name: stage
                        value: deployment
                      - name: author
                        value: ""
                    dependencies:
                    - promote-production
              - name: test
                script:
                  image: alpine
                  command: [sh]
                  source: |
                    echo This is a testing simulation...
                    sleep 5
                  volumeMounts:
                  - name: github-access
                    mountPath: /.github/
        parameters:
        - src:
            dependencyName: github
            dataKey: body.repository.git_url
          dest: spec.templates.0.dag.tasks.0.arguments.parameters.0.value
        - src:
            dependencyName: github
            dataKey: body.ref
          dest: spec.templates.0.dag.tasks.0.arguments.parameters.1.value
        - src:
            dependencyName: github
            dataKey: body.after
          dest: spec.templates.0.dag.tasks.0.arguments.parameters.2.value
        - src:
            dependencyName: github
            dataKey: body.repository.name
          dest: spec.templates.0.dag.tasks.0.arguments.parameters.3.value
          operation: append
        - src:
            dependencyName: github
            dataKey: body.after
          dest: spec.templates.0.dag.tasks.0.arguments.parameters.4.value
        - src:
            dependencyName: github
            dataKey: body.repository.name
          dest: spec.templates.0.dag.tasks.1.arguments.parameters.4.value
        - src:
            dependencyName: github
            dataKey: body.after
          dest: spec.templates.0.dag.tasks.1.arguments.parameters.5.value
        - src:
            dependencyName: github
            dataKey: body.repository.owner.name
          dest: spec.templates.0.dag.tasks.4.arguments.parameters.1.value
        - src:
            dependencyName: github
            dataKey: body.repository.owner.name
          dest: spec.templates.0.dag.tasks.5.arguments.parameters.1.value
        - src:
            dependencyName: github
            dataKey: body.repository.owner.name
          dest: spec.templates.0.dag.tasks.6.arguments.parameters.1.value
You will need to create an ingress as seen here in order to receive the webhook from your git source upon change to the application code base:
apiVersion: networking.k8s.io/v1
kind: Ingress
metadata:
  name: github-eventsource
  annotations:
    cert-manager.io/cluster-issuer: 'prod-issuer-amd64'
spec:
  tls:
  - hosts:
    - github-event.kanebroslab.com
    secretName: github-event-prod-tls-v1
  ingressClassName: nginx
  rules:
  - http:
      paths:
      - path: /
        pathType: Prefix
        backend:
          service:
           name: github-eventsource-svc
           port:
             number: 12000
    host: github-event.kanebroslab.com
My Event Source file is also fairly straightforward. The Event Source is the YAML that Argo Events uses to describe the creation of a resource that both
- Creates a Service to listen for the event of interest
- Creates the Actual Resource which will fire in the event of the condition being true
In this instance, I am creating through Argo code and permissions, a resource tied to my Github repo which is responsible for setting up a webhook as described through the YAML. Here I have two repos I want being watched and both push to the URL at the endpoint “/push”. Right now the Event Source is configured on any action being done to the main branch, but one item on my Roadmap is definitely to tailor this to specific actions on specific situations.
apiVersion: argoproj.io/v1alpha1
kind: EventSource
metadata:
  name: github
spec:
  service:
    ports:
    - port: 12000
      targetPort: 12000
  github:
    github-cd:
      repositories:
        - owner: milsman2
          names:
            - react-kube-demo
            - kane-bros-lab
      webhook:
        endpoint: /push
        port: "12000"
        method: POST
        url: "https://github-event.kanebroslab.com"
      events:
        - "*"
      apiToken:
        name: github-access
        key: token
      insecure: true
      active: true
      contentType: json
Once again, the rest and most of this code can be credited to Victor Farcic and his public repository.
I still have some fine tuning to do, but by establishing this skeleton, I have a CD pipeline that does a lot of the more tedious parts of getting a new frontend application, and honestly any others that can be built into a container, built, tested, and out into the world.
These are the ClusterWorkflowTemplates which are very extensible.
---

apiVersion: argoproj.io/v1alpha1
kind: ClusterWorkflowTemplate
metadata:
  name: container-image
spec:
  serviceAccountName: workflow
  templates:
  - name: build-kaniko-git
    inputs:
      parameters:
      - name: repo_url
      - name: repo_ref
        value: refs/heads/master
      - name: repo_commit_id
        value: HEAD
      - name: container_image
      - name: container_tag
    container:
      image: gcr.io/kaniko-project/executor:debug
      command: [/kaniko/executor]
      args:
      - --context={{inputs.parameters.repo_url}}#{{inputs.parameters.repo_ref}}#{{inputs.parameters.repo_commit_id}}
      - --destination={{inputs.parameters.container_image}}:{{inputs.parameters.container_tag}}
      volumeMounts:
        - name: regcred
          mountPath: /kaniko/.docker/

---

apiVersion: argoproj.io/v1alpha1
kind: ClusterWorkflowTemplate
metadata:
  name: promote
spec:
  serviceAccountName: workflow
  templates:
  - name: promote
    inputs:
      parameters:
      - name: environment
      - name: repo_owner
      - name: repo_name
      - name: image_owner
      - name: image_name
      - name: tag
    script:
      image: vfarcic/kustomize:3.9.2
      command: [sh]
      source: |
        set -e
        git clone https://$(cat /.github/token)@github.com/{{inputs.parameters.repo_owner}}/{{inputs.parameters.repo_name}}
        cd {{inputs.parameters.repo_name}}/apps/argocd-app-of-apps
        sleep 2
        echo BEFORE:
        cat {{inputs.parameters.environment}}/{{inputs.parameters.image_name}}.yaml
        echo AFTER:
        cat {{inputs.parameters.environment}}/{{inputs.parameters.image_name}}.yaml | sed -e "s@- {{inputs.parameters.image_owner}}/{{inputs.parameters.image_name}}:.*@- {{inputs.parameters.image_owner}}/{{inputs.parameters.image_name}}:{{inputs.parameters.tag}}@g" | tee {{inputs.parameters.environment}}/{{inputs.parameters.image_name}}.yaml
        git config user.name "$(cat /.github/user)"
        git config user.email "$(cat /.github/email)"
        git add {{inputs.parameters.environment}}/{{inputs.parameters.image_name}}.yaml
        git commit -m "Upgraded {{inputs.parameters.environment}}/{{inputs.parameters.image_name}}.yaml with the tag {{inputs.parameters.tag}}"
        git push
      volumeMounts:
      - name: github-access
        mountPath: /.github/

---
apiVersion: argoproj.io/v1alpha1
kind: ClusterWorkflowTemplate
metadata:
  name: custom-json
spec:
  serviceAccountName: workflow
  templates:
  - name: custom-json
    inputs:
      parameters:
      - name: stage
      - name: author
    container:
      image: milsman2/custom-json:v1.0.0
      command: [python, ./app/main.py]
      args:
      - --Author={{inputs.parameters.author}}
      - --Stage={{inputs.parameters.stage}}
      volumeMounts:
        - name: regcred
          mountPath: /kaniko/.docker/
        - name: slack-access
          mountPath: /.env/
Argo as a notification system
One feature that I thought would both be useful in the real world/production environment as well as just fun to play around with as a foundation was extending the use cases for webhooks. Since webhooks are usually pretty “cheap” from a setup standpoint and many third party applications come with capabilities to interface with webhooks, I thought I could try out some more pipeline setup with the Argo stack.
Most of the modern chat applications have similar interfaces, but for this example I chose to use Slack. After getting a webhook started in my application, I thought about just using the Argo HTTP Trigger, but I really wanted to separate a bunch of the JSON styling driven by the rich block API provided by Slack.
Although a bit over the top for this use case, once again I wanted a safe environment to POC my own version of a black box for various messaging app API’s using Python. So, I essentially made a Python Dockerfile and uploaded the container to be consumed by my ClusterWorkFlowTemplate from above.
Dockerfile

#
FROM python:3.10

#
WORKDIR /code

#
COPY ./requirements.txt /code/requirements.txt

#
RUN pip install --no-cache-dir --upgrade -r /code/requirements.txt

#
COPY ./app /code/app

#
CMD ["python", "./app/main.py"]

---
# ./app/main.py

"""
All imports for sending a custom webhook
"""
import os
import json
from datetime import datetime
import argparse
import requests
from dotenv import load_dotenv

load_dotenv()
now = datetime.now().time()  # time object
parser = argparse.ArgumentParser()
parser.add_argument("--Stage", help = "Stage")
parser.add_argument("--Author", help = "Author")

args = parser.parse_args()

STAGE = args.Stage
AUTHOR = args.Author
SLACK_WEBHOOK = os.environ.get('SLACK_WEBHOOK')

def main():
    match STAGE:
        case "build":
            data = {
                "blocks": [
                    {
                        "type": "header",
                        "text": {"type": "plain_text", "text": "Build Completed"},
                    },
                    {"type": "divider"},
                    {
                        "type": "section",
                        "fields": [
                            {"type": "mrkdwn", "text": f"*End Build Time* n{now} UTC"},
                        ],
                    },
                    {"type": "section", "fields": [{"type": "mrkdwn", "text": f"*Author*: {AUTHOR}"}]},
                    {"type": "divider"},
                    {
                        "type": "section",
                        "fields": [{"type": "mrkdwn", "text": "Nice :heavy_check_mark:"}],
                    },
                ]
            }
        case "deployment":
            data = {
                "blocks": [
                    {
                        "type": "header",
                        "text": {"type": "plain_text", "text": "Build Deployed"},
                    },
                    {"type": "divider"},
                    {
                        "type": "section",
                        "fields": [
                            {"type": "mrkdwn", "text": f"*End Build Time* n{now} UTC"},
                        ],
                    },
                    {"type": "section", "fields": [{"type": "mrkdwn", "text": f"*Author*: {AUTHOR}"}]},
                    {"type": "divider"},
                    {
                        "type": "section",
                        "fields": [{"type": "mrkdwn", "text": "Nice :heavy_check_mark:"}],
                    },
                ]
            }
        case "push":
            data = {
                "blocks": [
                    {
                        "type": "header",
                        "text": {"type": "plain_text", "text": "Main branch merged"},
                    },
                    {"type": "divider"},
                    {
                        "type": "section",
                        "fields": [
                            {"type": "mrkdwn", "text": f"*Merge Time* n{now} UTC"},
                        ],
                    },
                    {"type": "section", "fields": [{"type": "mrkdwn", "text": f"*Author*: {AUTHOR}"}]},
                    {"type": "divider"},
                    {
                        "type": "section",
                        "fields": [{"type": "mrkdwn", "text": "Nice :heavy_check_mark:"}],
                    },
                ]
            }
        case default:
            data = {
                "blocks": [
                    {
                        "type": "header",
                        "text": {
                            "type": "plain_text",
                            "text": "Message type not recognized :(",
                        },
                    },
                ]
            }

    requests.post(
        SLACK_WEBHOOK,
        data=json.dumps(data),
        headers={"Content-Type": "application/json"},
        timeout=3,
    )

if __name__ == "__main__":
    main()
This code essentially allows the git-based webhook coming in to pass the Author and possibly stage if not wanting to hard-code it and transforms the data into JSON blocks for formatting of the webhook being sent to slack.
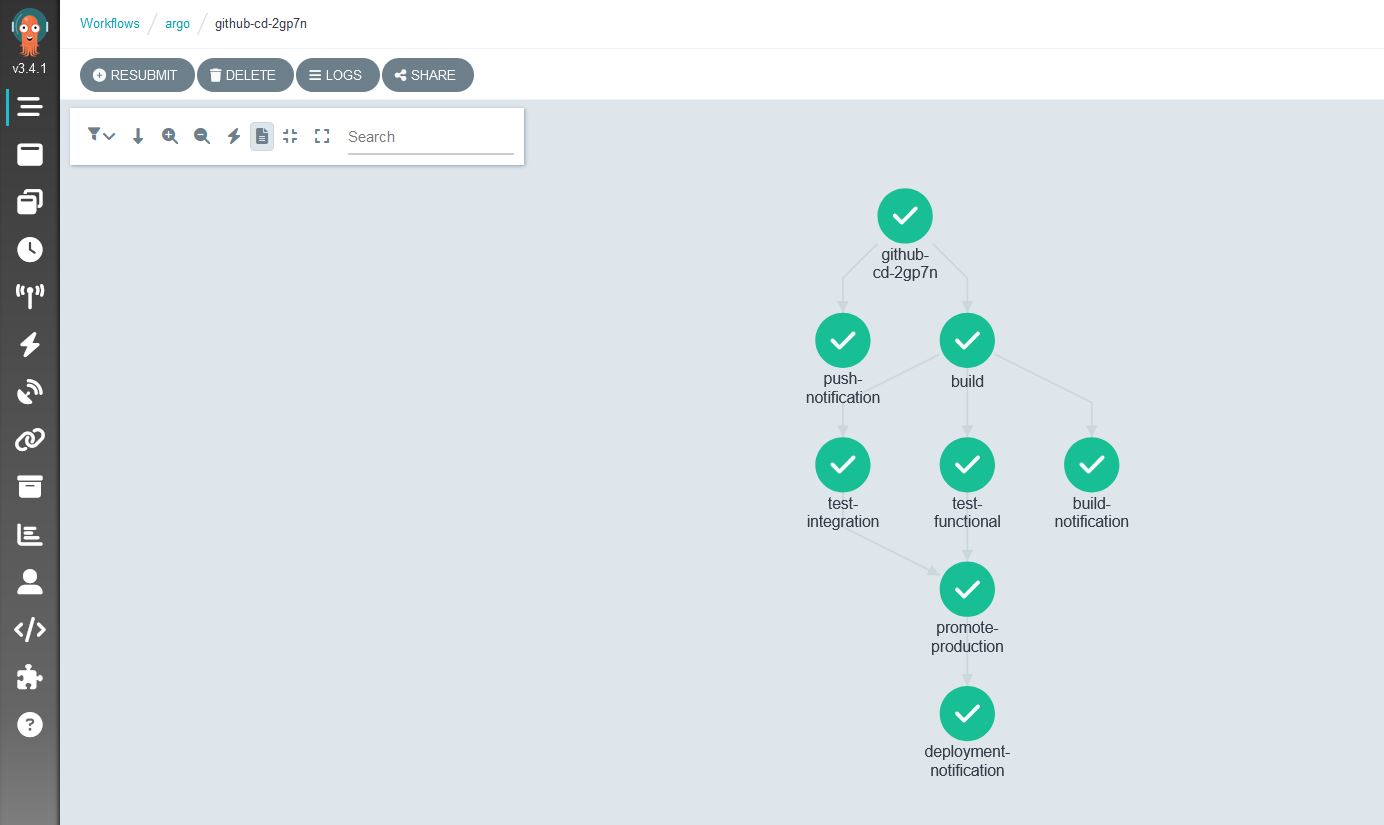
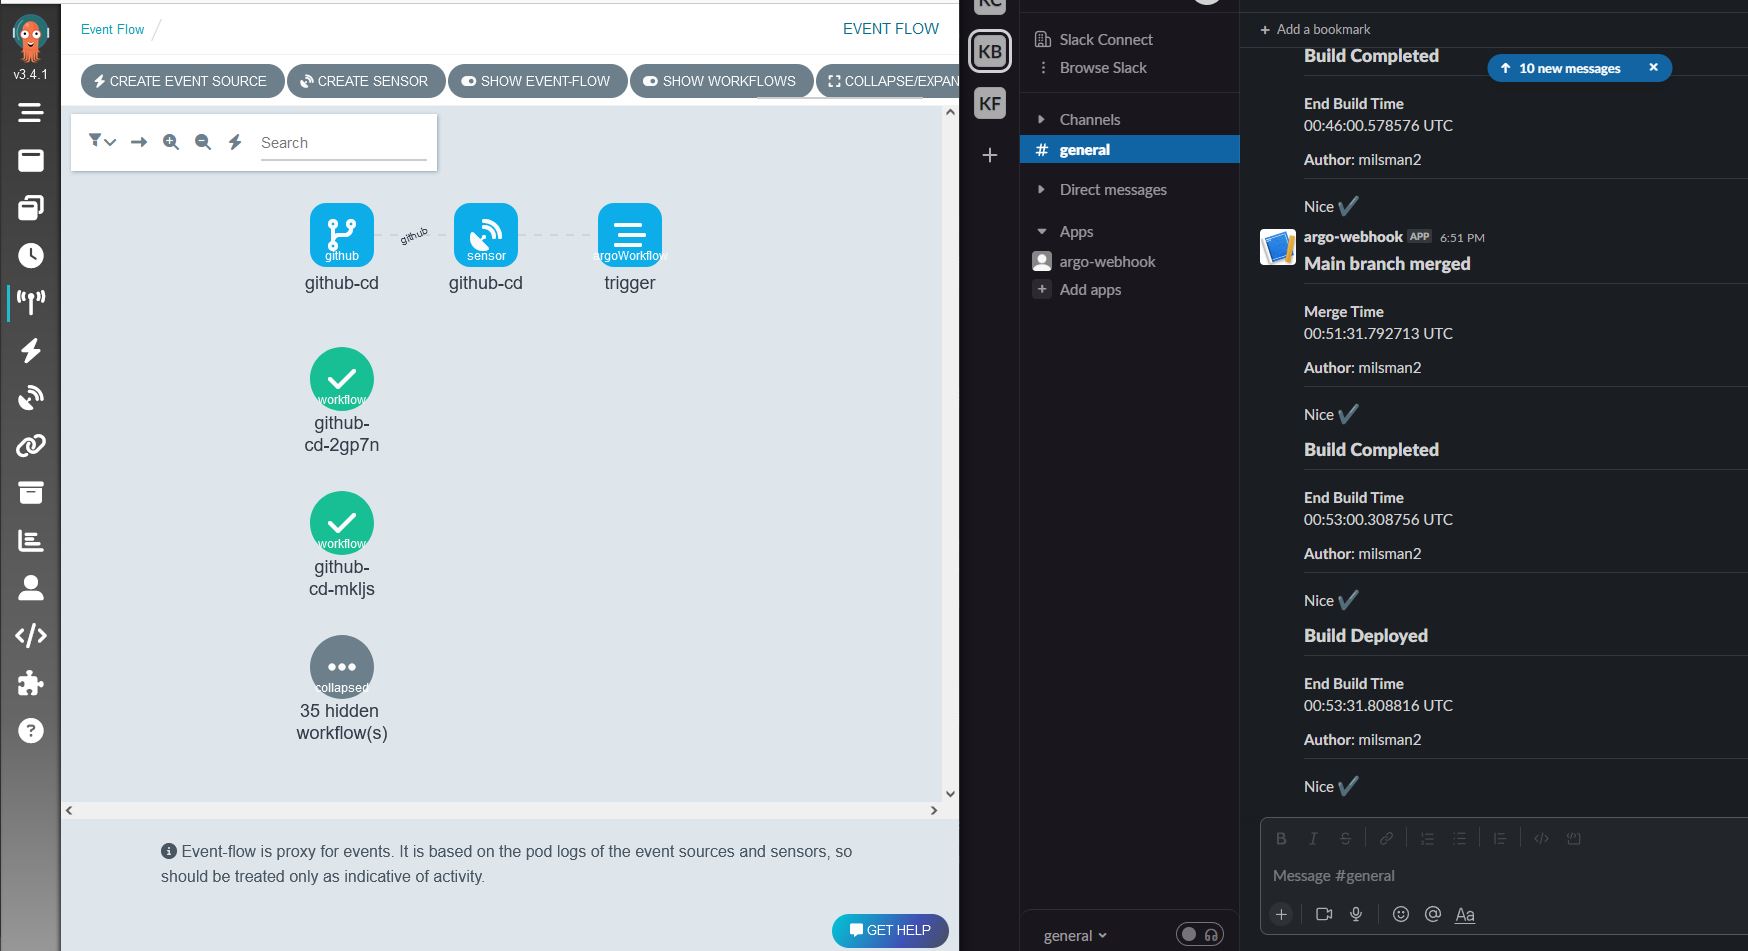
Although I tend to use CLI for most of my day to day activities, I will freely admit I am happy to sometimes be lazy and want to see pretty pictures of my infrastructure. Argo also fulfills some “nice-to-haves” in this department as you can see from my CD pipeline GUIs:
Argo showing me my sensor connected to triggers and workflows
There are tons of tons of ways to build off of this layout and I have found connecting those steps relatively easy.
Closing Thoughts
There are a lot of options for having automation and CI and CD in your workflows and many times, the ones provided by your cloud vendor are not only sufficient but also purpose built to make things easy to connect by design. However, Argo and all the packages that it includes seem to have taken the same philosophy and made it a clear and (relatively, after some YouTube watching) easy to digest ideas of how event based DevOps can be implemented. The Argo documentation is good, and there are plenty of 3rd party resources that have been very helpful. I plan to keep building on this platform while keeping an eye out as always for the new tools that can make DevOps less manual.


