Telepresence 2 was recently released and (like Telepresence 1) it is a worthy addition to your Kubernetes tool chest. Telepresence is one of those tools you cannot live without after discovering how your daily workflow is improved.
So what is Telepresence? It is too hard to describe all the functionalities of the tool in a single sentence, but for now I would describe it as the “Kubernetes swiss army networking tool”. In this post we will see the major use cases that it covers but as time goes on and more teams adopt Telepresence I am sure that more creative uses of it will be discovered.
The major problems that Telepresence solves are:
- Kubernetes debugging and issue analysis. This is useful for both developers and Kubernetes operators
- Easy local development without a locally running Kubernetes cluster. This is mostly useful for developers
- Preview environment creation and real time collaboration in a team. This is great for large teams that have adopted Kubernetes.
We will see these use cases in turn as each one builds on top of the previous one.
Telepresence is a project in the growing discipline of Developer Experience, in which we have other tools such as tilt.dev, garden.io, okteto and resources like dex.dev. It focuses specifically on helping developers work with containers and Kubernetes (as opposed to tools that focus on administration and management of clusters).
By the way, if you are already familiar with Telepresence 1, then Telepresence 2 is a complete rewrite (now in Go) with many more improvements for reliability and extra features.
Beam yourself into your Kubernetes cluster (using Telepresence for Kubernetes debugging)
Let’s say that you are a Kubernetes operator. You are tasked with deploying an application with many microservices (queue, auth, backend, front-end etc). You deploy your manifests and while the pods seem to start up ok, communications between the services are not working correctly.
The front-end cannot seem to find the backend, the queue is inaccessible from the backend and so on. You need a way to test connectivity between services and how they respond. Your first impulse would be to use the venerable kubectl port-forward to make all these services available locally to your workstation. While this approach might work, it is not really what you want, because with kubectl port-forward you only make a remote port available to a local port.
What you really want is a way to see INSIDE the cluster and see things from the perspective of the service that you are interested in. You want to understand how the backend pod for example can access other services from inside the cluster. Also if you want to debug too many services at once, opening multiple terminals with kubectl exec or kubectl port-forward is a cumbersome process.
Wouldn’t it be great if you had a magic way that transferred your laptop inside the Kubernetes cluster? This way you could run any kind of command directly in your terminal from the same perspective of a pod and understand network connectivity with simple tools like curl, netcat, wget etc.
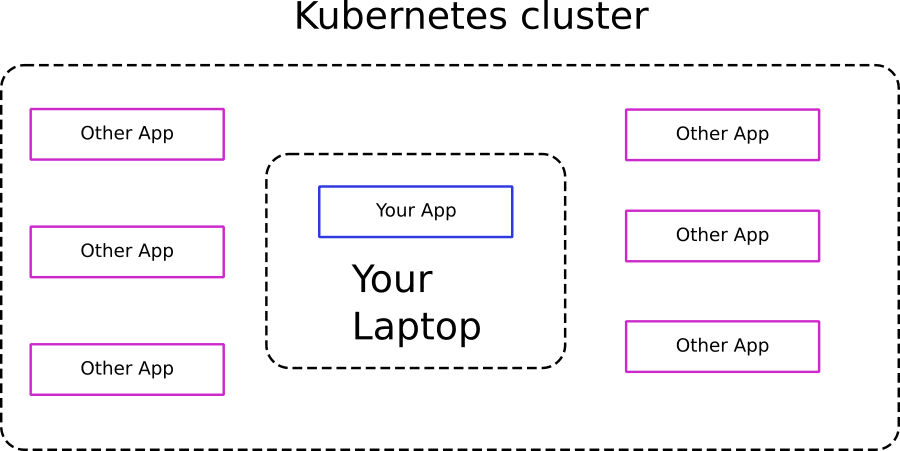
Well this magic way is exactly what Telepresence does! As the name suggests, telepresence moves your local workstation inside the Kubernetes cluster and makes it look like your local environment is inside a pod. All networking services and DNS names available to the pod are now available to your local workstation as well.
Behind the scenes telepresence runs a small agent in the cluster and routes traffic back and forth between a secure network tunnel. This is also one of the big differences with Telepresence 1. Telepresence 2 has a global routing agent for the whole cluster and each intercepted service gets its own traffic manager (as we will see in the next use case)
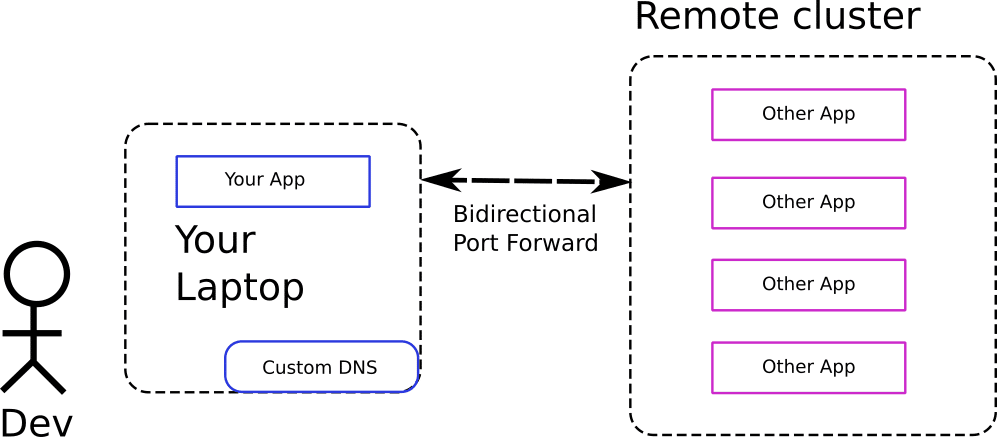
The telepresence CLI modifies your local networking settings and allows you to use your favorite tools on your local workstation as if you were inside the cluster.
This scenario is even more powerful if you are a developer. Let’s say that you are adding a new feature to an existing application with many microservices. Your tasks are
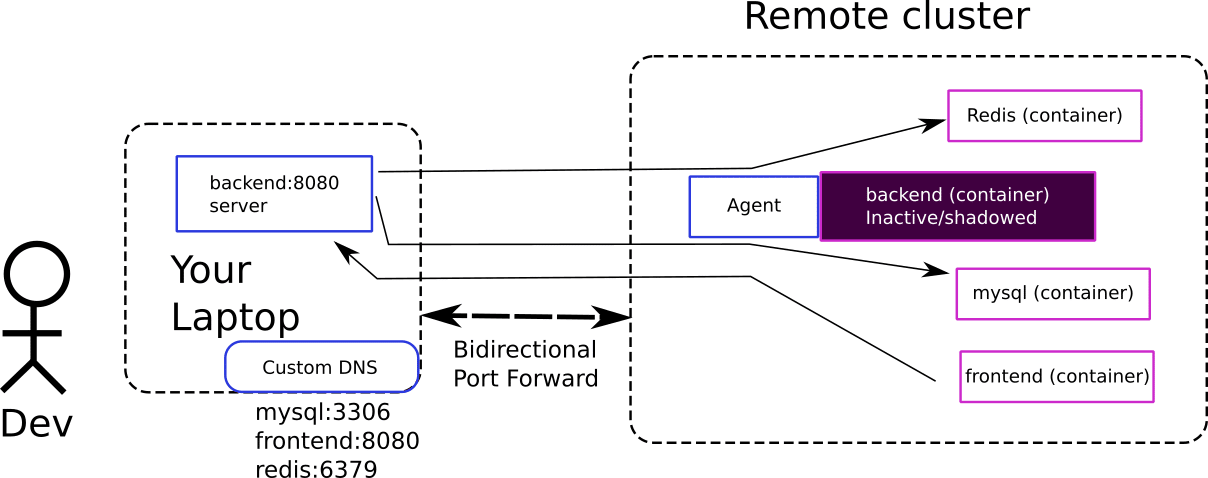
- Inspecting existing tables on a MySQL database which is only accessible from within the cluster
- Loading test data to the mysql database with a script that you will develop
- Examining REST responses from another service that you are going to depend on
- Send messages to a queue that is also running inside the cluster
Again, you could open 3-4 terminals with kubectl forward and have your tools connect to localhost:port.
Wouldn’t it be better to just open your Mysql administration tool and simply connect to mysql:3306?
This is exactly what telepresence does for you. If your database is available in the “mysql” dns name inside the cluster, then by running telepresence you make it available to your local workstation in the same manner. Your workstation essentially becomes part of the cluster.
How to make your workstation part of the cluster
This is the easiest way to get started with telepresence. Download the telepresence cli (currently available for Mac and Linux) and run in your terminal (with kubectl access to your cluster)
>telepresence connect
Launching Telepresence Daemon v2.1.3 (api v3)
Connecting to traffic manager...
Connected to context mydemoAkscluster (https://mydemoakscluster-dns-8734f6ac.hcp.centralus.azmk8s.io:443)
Telepresence will install a small agent in your cluster and setup local networking on your workstation to make any Kubernetes DNS names available locally.
Now you can run your favorite tools like inside the cluster. If for example your backend service is running with name “my-backend” on the namespace “demo” at port 9999, you can simply write:
curl http://my-backend.demo:9999
And get back a response! It doesn’t get any easier than this. You can launch your favorite IDE and connect to debugging ports, your Database administration tool and connect to your db, your internal dashboard for your ingress controller (that is normally available only within the cluster) and so on.
By the way, this is one of the areas where telepresence 2 has seen major improvements from the first version as the in-cluster agent allows for more reliable connections.
Local Kubernetes development without a local Kubernetes cluster
In the previous section we have seen how you can use Telepresence to debug your application. So let’s say that you found the problem and you want to fix it by making some code changes and redeploying the container.
Normally you could use the usual dance of code, package image, push, deploy to the cluster and that would work fine if you wish to spend your time by waiting for docker images to be built and pushed.
But with telepresence you can skip this process completely! Remember that we said that the communication tunnel between your workstation and the cluster is two way. This means that you can simply launch your application locally (outside of a cluster and outside of a container) and simply tell telepresence to “intercept” or route all traffic to your local port.
Here is how it works:
Telepresence installs a sidecar agent next to your existing application. This agent captures all traffic requests that go in the container and instead of sending them to the application inside the cluster, it routes all traffic to your local workstation.
Note that this is also a big difference between telepresence 1 and 2. Telepresence 1 used to replace the whole deployment in the cluster, while 2 uses an agent (and both versions of the application local and remote exist at the same time)
The end result is that you have an end-to-end hybrid workflow where:
- The application that you are developing runs locally on your workstation but thinks it is inside your cluster and can communicate with all other services in a transparent way
- All other services on the cluster (usually the services that are used by your application) also think that they are talking to another application inside the cluster, while in reality they are talking to an application with your local workstation.
With this kind of setup, the development process is straightforward. You just make code changes locally and the application is instantly updated. There is nothing to redeploy or repackage in a docker image. Any live-reload mechanism that your programming language supports can be used as is without any special changes. You can also launch debuggers, tracers and other dev tools locally as before.
Telepresence essentially cuts down the unnecessary parts of the development loop.
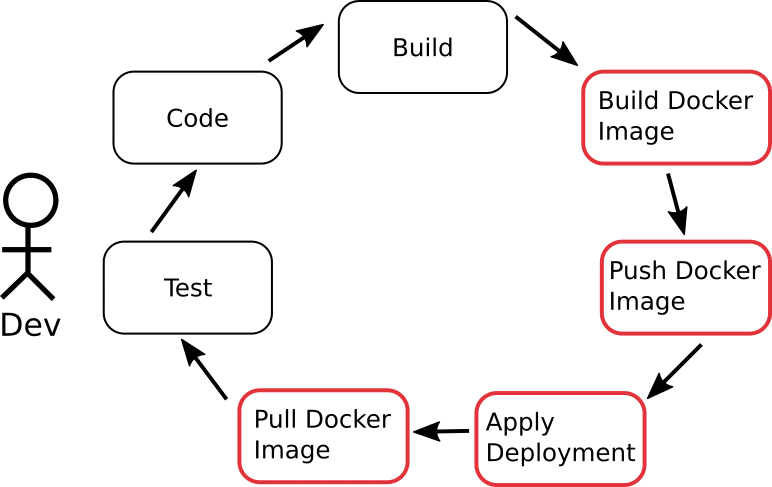
If you are accustomed to running a local Kubernetes cluster for development (or use other tools that simply redeploy your image to a remote cluster), you will already be familiar with the extra price that comes with Kubernetes development. They are the steps shown in red in the picture above. And Telepresence eliminates them!
This is also another big difference between Telepresence and other tools destined for Kubernetes development (such as Okteto, Tilt, and Garden.io). With telepresence there is no code sync process, no smart live reload mechanisms and no local build of any kind of image. The application is running outside a Kubernetes cluster, on your laptop.
The icing on the cake is that with this approach you no longer have to maintain a different set of environment properties for your cluster and for your local workstation. You can use a single property set for all configurations and your application will work in the same way regardless of where they run (your workstation or the cluster). Telepresence even saves for your all properties available inside the cluster as we will see in the next section.
How to make your local application think it is inside the cluster
First launch your application locally and make sure that it exposes its port correctly (e.g. at localhost:3000). This is also the time to setup your hot-reload mechanism supported by your programming language. Ideally each time that you make a change to your editor, your local app should refresh automatically.
Note that you should launch your application on its own. No need for a local Kubernetes cluster or a docker image.
Then run this command:
telepresence intercept dataprocessingservice --port 3000 -n demo --env-file ~/example-service-intercept.env
This is taken from the example application but feel free to change the command with our own service, port and kubernetes namespace.
And that’s it! The agent running next to the real application in the remote cluster will now intercept all requests to it and send them locally to your workstation. The reverse is also true and all requests made by your application with the cluster dns names will be routed to the cluster.
You can now start developing as normal. Any code changes you make are visible on the cluster right away. No more waiting for docker builds or image pushes. And you don’t even need a local Kubernetes cluster.
The .env file can be used by your IDE or your scripts to replicate the values from all the properties available from the cluster to your local workstation.
Kubernetes collaboration in a team environment
One of the most important differences between Telepresence 1 and 2 is that Telepresence no longer swaps the deployment inside the cluster (a method also followed by Okteto and similar tools) but instead installs a routing agent next to the existing service that takes care of all network communication.
The added advantage of this approach is the capability to add some routing behavior in the agent. In the previous use case we have seen how the agent can route all calls to your local workstation. But we can be a bit smarter and instruct the agent to route only some calls to your workstation while leaving the rest of the calls unaffected (so that they hit the original application inside the cluster).
And this exactly what Telepresence 2 offers in the form of preview environments! Here is how it works
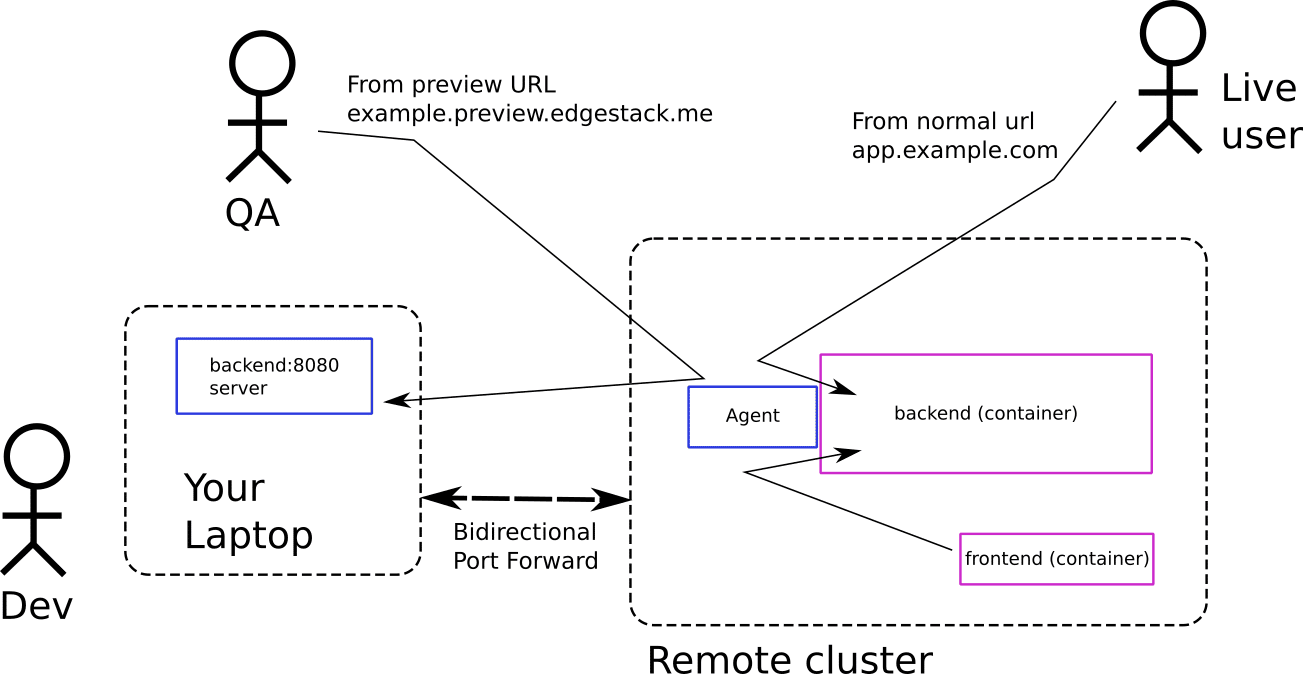
Ambassador offers a free service that creates preview URLs for you anytime you do an intercept in a service. If you enable it (it is completely optional), you will get a public URL every time you intercept an existing application in the cluster.
Then if somebody visits your preview URL, the agent will send all their traffic to your workstation. If somebody else visits your service NOT from the preview URL, then all of their traffic will go to the existing application that runs inside the cluster.
This allows you to quickly share your local environment with your team. Think of it as ngrok for kubernetes. The beauty here is the fact that both applications are running at the same time. This means that you are free to debug and develop your own application for fixing something, while all existing users of your application are still connecting to the production version oblivious to your changes.
Once you are ready to publish your changes to everybody you can of course commit your code and let your CI/CD solution update all live traffic. But during your development time there is no better way to work in a production like environment without actually affecting production.
I see this use case is very important for teams that want to quickly test hot-fixes without actually deploying anything but even basic collaboration with another developer becomes very simple if you can quickly share your feature with them and quickly iterate on it.
Note that this feature requires an ingress in your cluster. And it can be any kind of compliant ingress (and not just the Ambassador API gateway/edge stack).
The Ambassador Cloud dashboard also provides a nice UI for managing your preview environments:
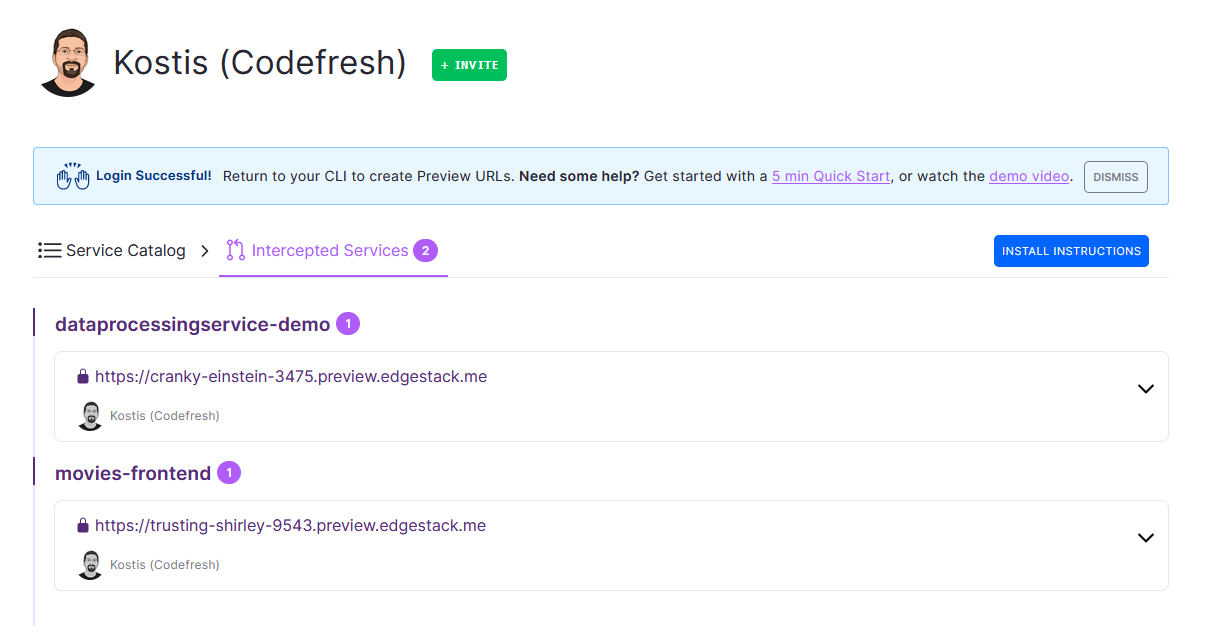
You can also decide if you want your environment to be accessible only from the same GitHub/GitLab organisation as you or any other user.
How to use preview environments with Telepresence and Ambassador cloud
Creating a preview environment is not a separate command on its own. You use the normal intercept command as before but you need to login into ambassador cloud first
telepresence login
telepresence intercept dataprocessingservice --port 3000 -n demo
The first command will open the UI and ask you to signup with Github/Google/Gitlab. Then the second command will intercept the service as before but also print out the URL of the preview environment.
You can share the preview environment via email/slack/messaging with your colleagues. It is interesting to notice that Telepresence adds an extra header to the traffic request when it works in intercept mode. You can use this header yourself in the application to make your application behave differently according to the source of the request (e.g. enable special debugging support if the request comes from a preview environment).
Comparison with other tools
The biggest competitor to Telepresence 2 right now is the previous version. There are some other tools that share some of the same functionality.
Comparison with kubectl port-forward:
The port-forward command is very simplistic as it only works on a single port for a single service and it is a one way connection. It is great for quick access to the cluster but Telepresence has many more features. You can still use kubectl port forward for adhoc connection issues, but for application development there are many better choices.
Comparison with kubefwd:
Kubefwd works similar to Telepresence by making your local environment think it is inside the cluster. The networking tunnel is one direction only. Telepresence is much smarter as it also makes the other cluster applications think that your local app is inside the same cluster. So with Kubefwd you only get 50% of what basic Telepresence offers. Telepresence also has volume mounting support for more advanced scenarios.
Comparison with Telepresence 1
Telepresence 2 is improved in every aspect compared to the previous version.The networking architecture is now completely redesigned. There is a global traffic manager on each cluster and each intercepted service has its own sidecar container.The new routing agent is great for reliability and Telepresence 2 will work better with spotty network connections. The ability to use the sidecar router instead of fully swapping the deployment comes with its own advantages (the preview environments). Also Telepresence 2 is a single binary written in Go making installation much easier (Telepresence 1 was a multi file Python application)
Combining Telepresence with outer loop tools
Telepresence is great for handling the so-called inner-loop of development. That is the part where you as a developer write your code and test right away on your local machine. For this part of the process you want the quickest feedback possible.
However once you complete your feature, you should still deploy your application to a cluster to verify its behavior and avoid the dreaded “works on my machine” issues. Telepresence is great for the inner development loop, but you need to remember that your application runs on your local workstation outside of a container and outside of a cluster.
After you feel comfortable with your feature you can complete your workflow with tools that address the outer development loop in the sense that they actually gather all your application dependencies in a container and then deploy your application to a Kubernetes cluster.
We have already explored such tools in our previous blog posts. Popular tools on this category are:
Okteto has a powerful sync process that creates a development environment inside your cluster and runs the application there. If you use specific Kubernetes features such as GPU nodes or have complex networking and security requirements (IAM roles, specific identities) then Okteto can help you quickly see how your application behaves in the real cluster. Okteto also comes with the Okteto Cloud/Okteto Enterprise option that has additional features in the context of a team (e.g. namespace isolation, credential management, build service, deploy from git, the Okteto Registry). See our review of Okteto for more details.
Tilt.dev is another service for local Kubernetes development. Its main strength is its innovative UI that groups all related microservices from an application plus any custom resources that you want to create. Tilt has many different options for local, hybrid or fully remote development. In the case of local development you still need a local Kubernetes cluster.
The GUI of Tilt is specifically designed for applications with a large number of microservices and is great for making changes to more than one service at once. Tilt is very extensible, making it easy to adapt to whatever setup the user has (as opposed to the user having to adapt to the tool), and has a growing extensions ecosystem with many third-party contributors (https://github.com/tilt-dev/tilt-extensions/). See our review of tilt.dev for more details.
Garden.io is a tool designed for the full software lifecycle (and not just deployments). Its main appeal is that it creates a model of your application dependencies with great visualization giving you great insights into what needs to be updated every time a change is made. Garden attempts to model the full software workflow including testing. You also have the ability to create your own tasks to improve your daily workflow. This means that you can set up Garden as a mini CI workflow (that you can call from your real CI service or Garden Enterprise) allowing you to unify the way a developer works with your CI pipelines. One of the strong points of the approach is that proper tests and pipelines can be run before pushing to git, which makes integration/e2e testing and debugging CI/CD issues much faster.
Garden also gives a lot of importance to extensibility. Even Kubernetes support is actually created as a plugin/extensions and there is already a set of providers for other platforms. Like Tilt.dev you can choose where the packaging/deployment takes place (on a local or remote kubernetes cluster) and of course supports live-reload capabilities. See our review of garden.io for more details.
Skaffold is a tool for local Kubernetes development. It contains an opinionated workflow (that can work the same on your local workstation or within a CI pipeline) and has built-in integration with many popular and not so popular build tools such as Bazel, Jib and buildpacks. See our review of skaffold for more details.
Adopting Telepresence in your team
So is Telepresence worth having in your tool chest?
First of all if you are a Kubernetes Administrator or system operator the answer is undeniably yes. All the other solutions are targeted strictly at developers. But if all you want is to see what endpoints are available in the cluster and want to run an adhoc bash/python script to do something that touches multiple services, Telepresence is much more powerful that kubectl port-forward.
If you are a developer, Telepresence works great for local development since it has the fastest code loop ever (just code). No file syncing, no docker rebuild, no live container update and no local cluster is needed. You need to take into account the fact that your application runs on your laptop OUTSIDE of a kubernetes cluster, accepting the risk of the dreaded “works on my machine” effect.
The preview feature of Telepresence is a nice addition, especially for really critical production hotfixes (where you want to develop a hotfix while your live users are unaffected).
To get the full benefits of local Kubernetes development you should couple Telepresence with another tool that actually deploys the application in the cluster and get the best of both worlds (fast local development, verification that the application will run the same in a Kubernetes cluster).
Cover photo by Unsplash