
In today’s post I’ll show you how easy it is to setup your first multi-service application and write tests against it. This guide should take 15-20 minutes to follow and you’ll have your first tests up and running. This will include
- Application setup using Docker Compose
- Setting up the tests to run every time a commit is made to our repo
- Sharing the environment with others to get user feedback
Setting up our demo application
We’re going to use an application called Demochat that provides a web based chat room. For the sake of time we’ll only have two services on our application but testing a 5 service application is just as easy. Demochat uses a node.js frontend and a mongodb database. For this project we’re going to use Codefresh to setup the testing because it’s very straight forward. Even if you don’t plan on using Codefresh, this is still a great way to see how all these pieces work together.
First, use your Github or Bitbucket account to create a Codefresh account, don’t worry it’s free. Answer the setup questions then click “Add Service”
Click the “Add by URL” radio and paste in the Demochat repo,
https://github.com/codefreshdemo/demochat
Then, hit next and select “My repo has a Dockerfile” and click next, the path will be correct by default. It will look something like this:
FROM node:0.10-slim

RUN npm install -g mocha

RUN npm install -g istanbul

RUN npm install -g gulp

RUN npm install -g debug

COPY ./package.json /src/package.json

RUN cd /src && npm install

COPY  ./ /src

WORKDIR /src

#ENV DEBUG=*

CMD ["npm", "start"]
Click “Create”, then “Build”. Congrats! Now, every time a commit is made on the master branch to that repo it will automatically rebuild the service. If you want it to work off your commits, for the branch and add your fork.
Remember our Node.js frontend can’t really do anything without Mongo so to finish our app click on “Compositions” and “Add Composition”.
Name it “Demochat” and click “Add Service” and then select the service we just added “Demochat”.
For this service, the last thing we need to do is add a port. Click the three dots next to the service name and select “Add Port”, set it to 5000.
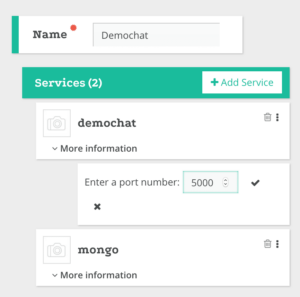
Now we’re ready to add our Mongo database. It uses a prebuilt image, click “Add Service” and type “mongo” into the Pre-built image field. 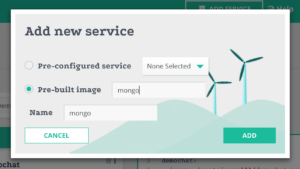
On the right hand side you can see the composition file that’s been created. You could copy and paste this into a docker-compose.yml. It should look like this, feel free to edit it if you’d rather skip the GUI
version: '2'
services:
  demochat:
    image: 'codefreshdemo/demochat:master'
    ports:
      - 5000
  mongo:
    image: mongo
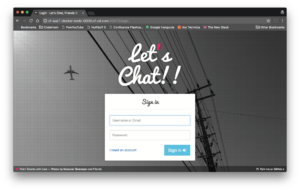
Finally we’re done, save it and click the little rocket looking icon to launch the app. We now have a fully running and testable application. The build should take around 45 seconds the first time and will give you a url where you can see the app in action.
Setting up tests for our microservices
Your application is made up of two services, one Node.js and one Mongo. We can test an individual service or we can test them together. This gives us a lot of options for what and how we can test. Each of these tests will run locally to our container.
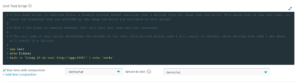
Go back to the “Services” page and click on the little gear icon for your Demochat service. This will take you to the pipeline configuration where you can setup different tests. Under “Unit Test Script” add the following code
npm start &
npm test
curl http://localhost:5000
echo "TEST PASSED"
Npm start will get our application running so we can start testing it
The npm test line will make sure we have all the needed packages and run the tests that come with each of those packages. Since this is a node application it will also run any tests we setup in the app/tests folder, we’ll come back to this in a minute.
The curl command is going to check to see if our application is running. If curl fails the tests script will also fail with whatever error code curl throws. You could grep certain text from the page too if you wanted to see certain output or write a simple bash script against it.
If we tested this service in isolation, without the Mongo the application won’t be running with the services it depends on. So check the box that says “Run tests with composition” and select the composition we made. Your whole setup should look like this.
This is the key to testing microservices, running and testing them together.
You can see how you could setup arbitrary commands and code here to test your application. If this were a php app, you could do a php myscript.php . Same for other apps. In this case, we’ve used npm’s native testing setup to extend the tests. They could be executed here aswell.
More about npm test
As I said, npm test will run the tests that come with each package as well as any tests you’ve setup in app/tests. In this app we have three scripts, feel free to check them out to see what they do and how they do it.
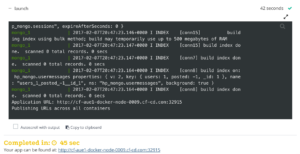
Click build, and you’ll see how the composition is setup and tested. Down in the “Running Unit Tests” box you can see the different messages of the tests running. If you go back and disable the composition and then try to build it the tests will fail because our Mongo service will not be present.
Why we test microservices together this way
When people first started writing microservices there was a theory that you should be able to test them on their own but this hid that a microservice may seem to function by itself but fall down when put in the context of the application. Testing the microservice in the context of the entire composition gives you a much more reliable measure of how well the microservice will work. In this example we only used a single composition for testing but we could add a Selenium service if we wanted to do some testing that way. There really is no better way to run Docker testing that with Codefresh.
Go write some tests, share your questions in the comments, and good luck.