Today we’re releasing a new CLI (Command Line Interface) tool to give engineers even more options for how they access and use Codefresh. In addition to exposing the features already available in Codefresh, the CLI unlocks a number of advanced features such as running parallel pipelines, waiting for pipelines to reach a desired state, searching all connected image registries and more! Here’s how to get started and try some of the features.
The CLI exposes the Codefresh API both for your local machine and inside of Codefresh pipelines.
Installing Codefresh CLI Locally and Authenticating
Install the command line
You can download the latest executable from the project’s GitHub, under “Releases”.
Alternatively, you can get it using npm/yarn package managers:
With NPM: npm install -g codefresh
With Yarn: yarn global add codefresh
For the pros among you, we even provide shell completions:
Linux: /usr/local/bin/codefresh completion >> ~/.bashrc
OS X: /usr/local/bin/codefresh completion >> ~/.bash_profile
Authenticate
First create an API key by going to your User settings, under “API keys”, and generating a new API key.
Then authenticate by running codefresh auth create-context –api-key {API_KEY}.
Using CLI in Codefresh Pipelines
If you use the Codefresh CLI in a pipeline step, it will be already configured, authenticated, and ready for use. No additional authentication is required!
As example, in this custom pipeline step we can use the CLI to fetch the Helm registry url and load it into a variable for use in later steps.
get_repo_url:
    image: codefresh/cli:latest
    commands:
      - cf_export HELM_URL=$(codefresh get ctx chart_repo_name -o=yaml | grep repositoryUrl | cut -d "'" -f 2)
Codefresh CLI Examples
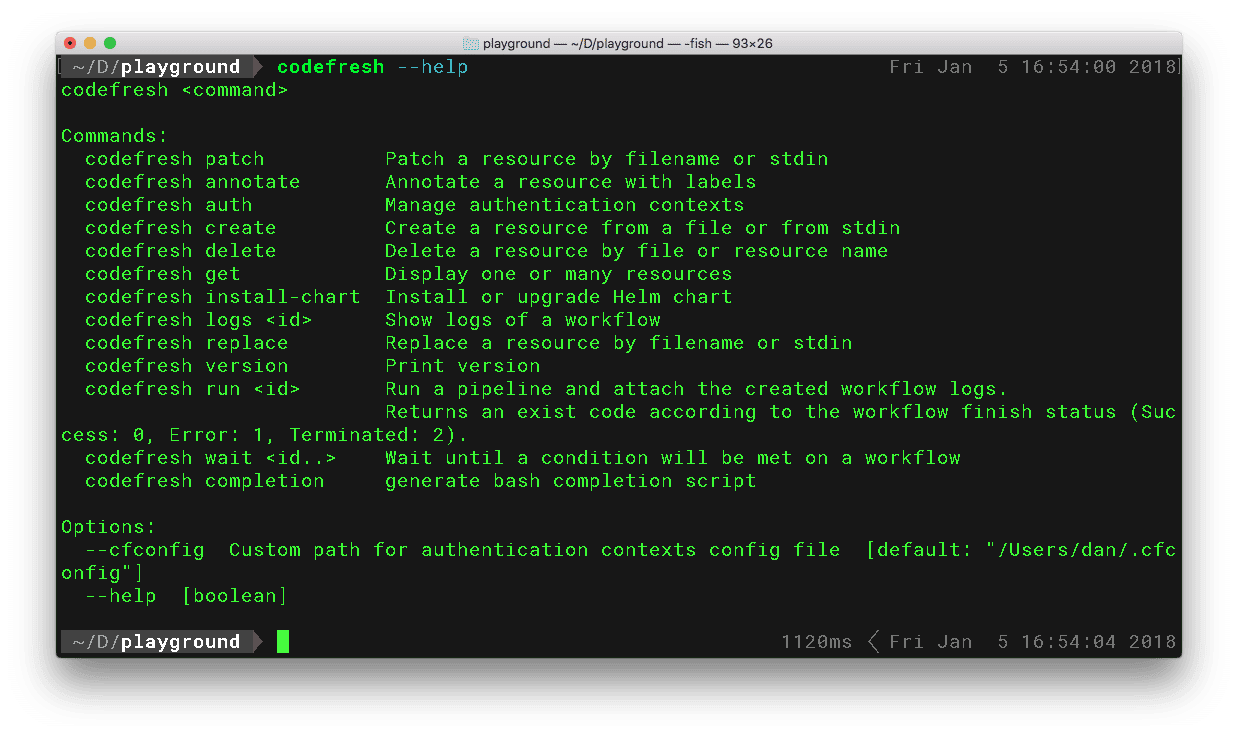
You can now get info on possible commands by running codefresh –help , which will output something like this:
codefresh <command>

Commands:
  codefresh completion             generate bash completion script
  codefresh tag <id> [tags..]      Add an image tag
  codefresh annotate               Annotate a resource with labels
  codefresh patch                  Patch a resource by filename or stdin
  codefresh auth                   Manage authentication contexts
  codefresh create                 Create a resource from a file or from stdin
  codefresh delete                 Delete a resource by file or resource name
  codefresh get                    Display one or many resources
  codefresh replace                Replace a resource by filename or stdin
  codefresh version                Print version
  codefresh logs <id>              Show logs of a build
  codefresh restart <id>           Restart a build by its id
  codefresh terminate <id>         Terminate a build by its id
  codefresh wait <id..>            Wait until a condition will be met on a build
  codefresh run <id>               Run a pipeline and attach the created workflow logs.
                                   Returns an exit code according to the workflow finish status (Success: 0, Error: 1, Terminated: 2).
  codefresh delete-release [name]  Delete a helm release
  codefresh install-chart          Install or upgrade a Helm chart
                                               Repository flag can be either absolute url or saved repository in Codefresh
  codefresh test-release [name]    Test a helm release

Options:
  --cfconfig  Custom path for authentication contexts config file  [default: "/Users/dan/.cfconfig"]
  --help      Show help  [boolean]


     ___|           |       _|               |       ___| |    _ _|
    |      _    _` |  _  |    __| _   __| __    |     |      |
    |     (   | (   |  __/ __| |    __/__  | | |  |     |      |
   ____|___/ __,_|___|_|  _|  ___|____/_| |_| ____|_____|___|


   For more information, find our official documentation at http://cli.codefresh.io
As you can see, Codefresh follows a {verb} {noun} syntax and additional information about each command is available by running
codefresh {command} --help
Get and Run Pipelines
Lets see all our pipelines.
codefresh get pipelines 1414ms Fri Jan 5 11:36:39 2018 ID NAME REPOOWNER REPONAME 5931cb632f40e50001e7c964 href-counter todaywasawesome href-counter 59d6552f89854200013086c6 vote containers101 voting-app 59d6552f6203b500013682d0 worker containers101 voting-app 59d6552f6203b500013682ce result containers101 voting-app 59e0fe3bc42b0e00015e9c99 yocto-project todaywasawesome yocto-project 59f29f1f84877a00014d43a6 mariohtml5 PengBAI mariohtml5 59f8c8b4d4f49c00017bd630 sample-func badamsbb sample-func 5a04e4c2f2b2250001a72f4f dotnet-docker-samples dotnet dotnet-docker-samples 5a09fe75d40bab000134e234 lets-chat todaywasawesome lets-chat 5a2049f748665e0001a6c563 demochat containers101 demochat 5a3d558508f0470001396bba demochat-prod containers101 demochat
Now we can run pipelines using their ID and specifying the repo branch you’re working from.
codefresh run 59f29f1f84877a00014d43a6 -b master 642ms Fri Jan 5 11:40:28 2018 =================== Step: Initializing Process =================== ...
Get images and add annotations
Since you can add multiple Docker registries to Codefresh, you can access all of them and manipulate annotations.
codefresh get images --image-name demochat --branch master 2277ms Fri Jan 5 16:30:18 2018 IMAGE_ID NAME TAG CREATED SIZE PULL aea1efd49faa containers101_demochat/demochat cf-helm 8 minutes ago 43.09 MB r.cfcr.io/todaywasawesome/containers101/demochat:cf-helm 8973dfa1b520 containers101/demochat master 7 hours ago 861.38 MB gcr.io/todaywasawesome/containers101/demochat:master 8447dd774c48 containers101/demochat release51 14 days ago 861.48 MB r.cfcr.io/todaywasawesome/containers101/demochat:release51
Lets add some annotations and information to these images so it’ll show up in the UI.
codefresh annotate image aea1efd49faa -l coverage=75% -l Performance_Report=https://a.blazemeter.com/app/#/accounts/103507/workspaces/95392/projects/137861/masters/16797563/summary
annotations add successfully
This will then show up in the UI. You can read the image annotations documentation here.

Running Matrix Pipelines
Matrix pipelines allow you to use a single pipeline to trigger tens of workflows with different variables. For example, lets say you were building different docker images for node.js where you watch to swap Dockerfiles but keep the same pipeline. First we’d create a variables file containing our different variables. You can use json, or yaml. I’ll name this variables file node-releases.yml
---
- gitrepo : https://github.com/nodejs/docker-node.git
  Dockerfile: ./8/alpine/Dockerfile
  tag: alpine
- gitrepo : https://github.com/nodejs/docker-node.git
  Dockerfile: ./8/onbuild/Dockerfile
  tag: 08-onbuild
- gitrepo : https://github.com/nodejs/docker-node.git
  Dockerfile: ./8/stretch/Dockerfile
  tag: 08-stretch
- gitrepo : https://github.com/nodejs/docker-node.git
  Dockerfile: ./8/slim/Dockerfile
  tag : 08-slim
---
Then we’ll run our matrix pipeline specifying that we want to wait until all of these workflows have completed before moving on.
codefresh wait --status=success $(codefresh run 5a3d558508f0470001396bba --var-file node-releases.yml)
Many more options
There are many many more commands and options for you to play with. The best thing about the CLI is that it’s self-documented. Just add --help whenever you’re in doubt. Feel free to explore the CLI and discover more things to do with it!
Conclusion
The Codefresh CLI opens up a lot of possibilities for working with pipelines and images. Since Codefresh is multi-tenancy by default, you can even switch contexts between accounts as needed! We’re excited to see what you build. To try it out, just create a free account, and follow the instructions at the top of this post.