The Raspberry Pi is a tinker’s dream. It’s a small, cheap computer you can use to power just about anything. It’s the perfect custom IoT ingredient thanks to the GPIO (General Purpose Input/Output) that lets you wire up external devices like LEDs, motors, etc. As with any application, IoT applications need testing and should have an automatic test flow to verify code as it’s changed. Problems start to arise when using the Raspberry Pi GPIO because the library used on the Pi doesn’t work with PCs. Most of the methods on the internet involve switching libraries between the Pi and PC. While those methods are working they provide inconsistent results because different libraries have different dependencies and may behave differently depending on their hardware environment.
This is the exact kind of problem Docker is designed to solve!
Running Docker on the Raspberry Pi already works well (see this blog). Since Docker on the Pi is growing in popularity, I decided to experiment with creating a Raspberry Pi application based on Docker and to add in a CI pipeline to automate testing.
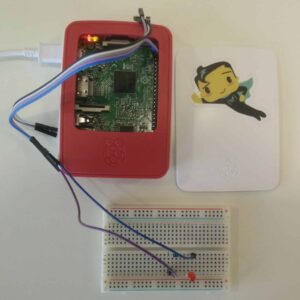 I built a simple web application to control a simple LED (see my setup left). Here’s the code written on Node.js:
'use strict';

let express = require('express');
let bodyParser = require('body-parser');
let Gpio = require('onoff').Gpio;
let app = express();

let led = Gpio(2, 'out');

app.use(bodyParser.json());

app.post('/led', function (req, res) {
    let value = parseInt(req.body.value);
    led.write(value, () => {
        res.send();
    });
});

app.listen(3000, function () {
    console.log('Example app listening on port 3000!')
});
The full code for this simple application can be found on github. The CI system I used is a custom version of our Codefresh platform that has been adjusted to build and run images on Raspberry Pi.
Creating And Testing a Docker Image In Codefresh
Once we have our code, the next step to fully automated CI is to create a Docker image. We will start of course with a Dockerfile. We need to use images built specifically for the Raspberry Pi because of the compatibility to the arm processor. The recommended Docker image for Node.js on the Raspberry Pi is resin/raspberrypi-node . Here’s my Dockerfile:
FROM resin/raspberrypi-node

WORKDIR /code/

ADD ./package.json ./package.json

RUN npm install

ADD ./index.js ./index.js

CMD ["node", "index.js"]
Thanks to my custom Codefresh, I’m able to build this image automatically after every commit. With Codefresh I can configure all my tests (unit/integration).
Now that we have a image for the raspberry pi we need a way to confirm that the image is doing what it is expected to do. The problem is that if we run this image and make our checks we need to use the actual GPIO of the Raspberry Pi, this can be a problem if we want to test multiple images the same time. So to run integration tests on our image we need to simulate the GPIO.
The GPIO in Raspbian is controlled by writing and reading into files (found at /sys/class/gpio/). As an example, when you want to use the GPIO on pin 2, you write the value 2 to a file named export. After doing that the Raspbian creates a directory named gpio2 with files defining the GPIO pin. Like the file direction that defines if the pin is used for output or input and The file value which contain the current state of the pin 1 for HIGH and 0 for LOW. Those files used to read the definition AND writing the definition. So when you want your program to set the pin to LOW, it will write out to the direction file and then it will write 0 to the value file.
With that in mind, I created a simple simulator for the GPIO. This simulator is also a docker image and contains a script towatch the files in the directory /gpio (It’s can be found on this github repo). To use the simulator we need to create a volume and mount it to the simulator container on path /gpio. We can then use it to test by mounting the volume to path /sys/class/gpio/ in our test image. Thanks to docker-compose , setting up the composition is easy. Here’s what it looks like
version: '2.1'
services:
  led-control:
    image: roycodefresh/raspiciexample
    volumes:
      - gpio:/sys/class/gpio
    depends_on:
      gpio-simulator:
        condition: service_healthy
  gpio-simulator:
    image: roycodefresh/raspidockergpiosimulator:master
    volumes:
      - gpio:/gpio
volumes:
  gpio:
    driver: local
To help us test the setup I added a new service, which will work with the Rest API of the simulator. This is recommended way to handle integration testing for Docker using Codefresh. Setting up our application this way lets us check our image without using the real GPIO. My test is a simple HTTP request to the LED controller application and then to the simulator to see that the change have been made. Here’s the code
'use strict';

let request = require('request-json');
let expect  = require('expect');

let ledControl = request.createClient('http://led-control:3000/');
let gpioSimulator = request.createClient('http://gpio-simulator:4500/');

describe('LED Application', () => {

    it('turn the led on', (done) => {
        ledControl.post('led', { value:  1 }, err => {
            if (err) {
                done(err);
                return;
            }

            gpioSimulator.get('out/2', (err, res, value) => {
                if (err) {
                    done(err);
                    return;
                }

                expect(value).toEqual(1);
                done();
            })
        });
    });

    it('turn the led off', (done) => {
        ledControl.post('led', { value: 0 }, err => {
            if (err) {
                done(err);
                return;
            }

            gpioSimulator.get('out/2', (err, res, value) => {
                if (err) {
                    done(err);
                    return;
                }

                expect(value).toEqual(0);
                done();
            })
        });
    });

});
After we have finished the integrations tests we can deploy it to a test environment. My application is designed to change make the LED blink based on API requests so it makes sense to test it with a service that hits that API. Here, docker-compose is again a big help. Let’s add the service:
version: '2.1'
services:
  led-control:
    image: 'roycodefresh/raspiciexample:master'
    privileged: true
    ports:
      - 3000
  blinker:
    image: 'roycodefresh/raspiciexample:master'
    command: "node -e "
        let blink = 0;
        let ledControl = require('request-json').createClient('http://led-control:3000/');
        setInterval(() => {
          blink = (blink + 1) % 2;
          ledControl.post('led', { value: blink }, () => {})
        }, 500); ""
The environment feature in Codefresh will normally spin up new code on AWS but I’ve set it here to deploy the blinking LED service to my Raspberry Pi.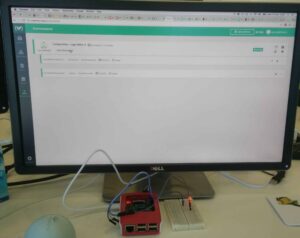
What Next?
Deploying the image
Since we were able to create the docker image, we can deploy it to any production environment we want. To use an actual GPIO we would need to add the flag –privileged when we are running the image.
Using advanced GPIO features
In this example I used a simple GPIO output, the simulator I wrote only simulated that feature. Even though I didn’t simulate GPIO input, it’s pretty straightforward. There are lots of more complex GPIO features worth simulating such as SPI, which is used for accessing hardware registers directly.
Raspberry Pi on Production Codefresh
As I wrote above, to create this experiment i used a customized version of Codefresh. Using Codefresh to create Raspberry Pi images is not yet available but we are hoping we can add support soon. If you are interested in experimenting with your Raspberry Pi images on Codefresh contact us, we’re looking for beta users.
Want to test more?
Try Codefresh, it’s the best way to run all Docker testing.